
Action validation
Before the action is completed, you can choose to perform a validation. By default, the person responsible for the validation (validator) is the person responsible for the item (project/indicator). However, there is an option available in the user profile to configure whether other users with that profile can validate actions that are not in items under their responsibility.
To enable this feature, access the side menu Settings > Actions, and check the “Enable Validation status” option:
When you enable this feature, the option “Update action to Completed status” will be displayed only after approval by the person responsible for the item*, and by default, it will be selected. With this option enabled, when the person responsible for the action informs its completion date, the action will automatically go to the Validation status and only after approval by the validator will it go to the Completed status (this will happen automatically).
If the option “Update action to Completed status only after approval by the person responsible for the item” is unchecked, the option Use “Validation” status as a rule for actions with a completed end date instead of completed will appear. When this option is checked, when the action completion date is completed, the action status will automatically change to “Validation” instead of going to “Completed”, but in this case, the validation process mentioned above will not take place. However, the user will still be able to change the action status to Completed, but this will have to be done manually.

When an action goes for validation, the validator receives an email requesting its validation. For this, the “Action validation request” alert must be active.
VALIDATION PROCESS
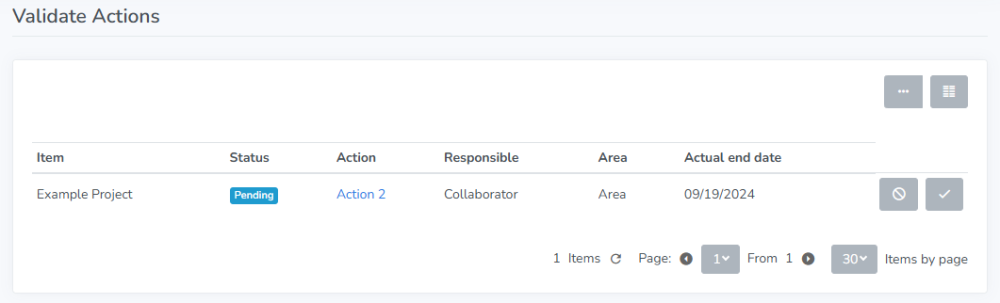
For the validator to validate the action, he/she must access the side menu My tasks > Validate actions. This menu will list all the actions that he/she has to validate.
To reject an action, he/she must click on the button  and to approve, on the button
  .
.
If he/she rejects the action, he/she must provide a justification. This justification will arrive in the email of the person responsible for the action informing that the action was not approved. However, for the email to be sent, the alert “Notification of non-validated action” must be active.

And if the action is approved, the person responsible for it will receive an email informing them that the action was approved. However, for this to happen, the “Action validation warning” alert must be active.
Note: if there is more than one validator, one of them only needs to validate. And when one validates, the action will be removed from the list of actions to be validated by the other.
Conclusion:
This topic demonstrated how to validate an action.