
This example shows how to control the discharge of a Carton from the most downstream zone of a ConveyLinx controlled conveyor. This example also shows how to properly accept the tracking data from the ConveyLinx module. For this example, the PLC must establish a connection with Module X.
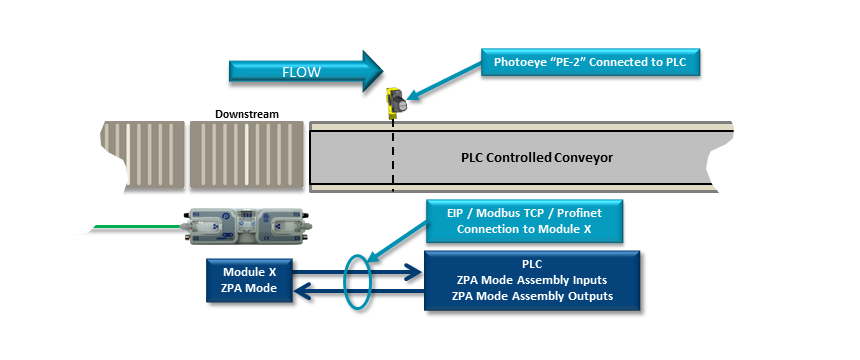
- To hold any Carton that arrives at Module X downstream zone, the PLC writes a “5” to Set Status for Downstream Discharge register. This tells Module X that downstream conditions are “full and stopped” so it will not try to release any loads downstream.
- When the PLC controlled conveyor is ready to accept a Carton from the MDR downstream zone, it writes a “1” to Set Status for Downstream Discharge register. This tells Module X that downstream conditions are clear and if it has a Carton on its downstream zone, it will run to release it downstream.
- When the Carton clears the local sensor in Module X Downstream Zone, the tracking data for that Carton will be populated in Get Tracking Forward Direction Word 1 and Get Tracking Forward Direction Word 2 registers.
- When Carton arrives at PE-2, the PLC writes a “5” to Set Status for Downstream Discharge register. This tells Module X that the Carton successfully transferred. If this is not done, then Module X will produce an Arrival Jam condition.
Optional Step:
If the application is such that the PLC would like to inhibit a new Carton from entering Module X downstream zone for whatever reason, there is a way to accumulate the next upstream zone to the Module X downstream zone. The PLC can set bit 8 in the Accumulation Control for Local Downstream Zone and this will cause the adjacent upstream zone to accumulate (whether this zone is on Module X or next adjacent upstream ConveyLinx Module). To return the accumulated upstream zone to normal operation; the PLC simply resets bit 8 in this register