
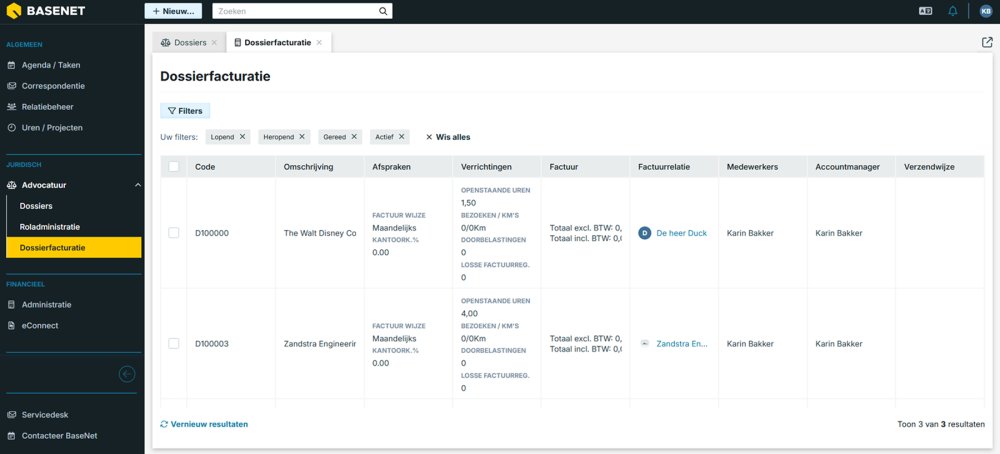
You can invoice matters via the “Matters billing” screen. Matters are only shown in this search screen if there is something to invoice.
You can reach Matters billing in 2 ways:
1 – From the sidebar
Go to Juridical ➤ Legal ➤ Matters billing
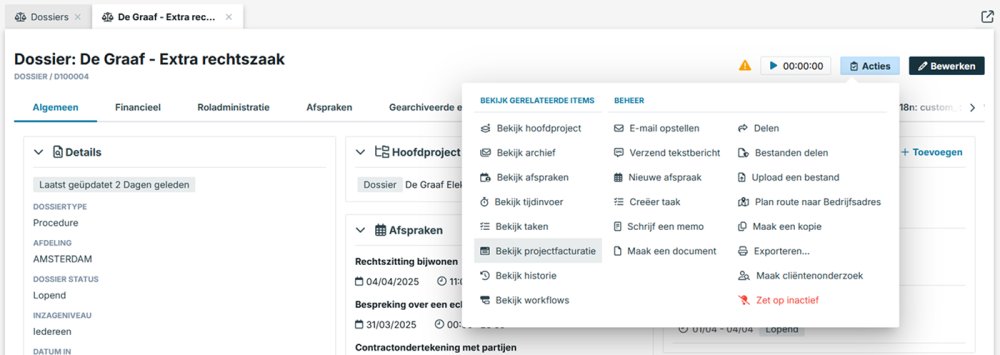
2 – From an individual matter – the screen will be filtered to only show entries that apply to that matter
Go to Any matter ➤ Click on Actions ➤ Click on Matters billing
____________
1. Filtering
You can filter the Matters billing screen if you click on the button called Filters:
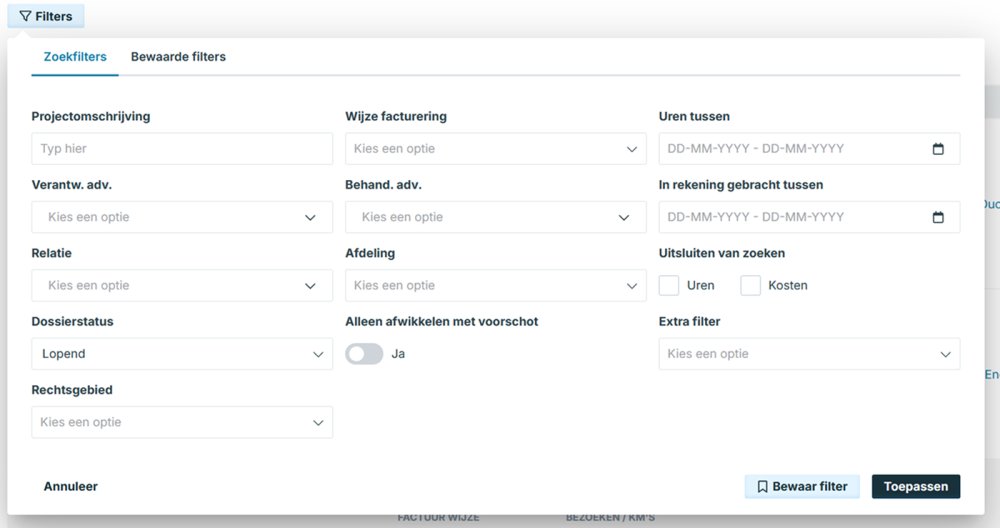
- Behand. adv. or Verantw. adv.: If desired, you can make a selection here between the handling or responsible lawyer if only his/her matters need to be invoiced at that time. Only the files of that specific lawyer will then be shown.
- File status: It is important that your files have a good status, so that you can easily find them. Pay close attention to which status(es) you are looking for in this search screen or adjust this filter if necessary to show all files.
- “Hours between” and “Charges between”: With these filters you can easily filter on hours and charges up to the date you entered. This is useful, for example, if you want to invoice up to a certain date, such as the end of the month.
If necessary, enter the other filters as desired and click on Save to see the resulting list of billable matters. In the results, you can see in the column ‘Agreements’ whether there are advances, fixed price amounts and components of the additions. The column ‘Transactions’ shows what is open in terms of hours, forwarding and individual invoice lines.
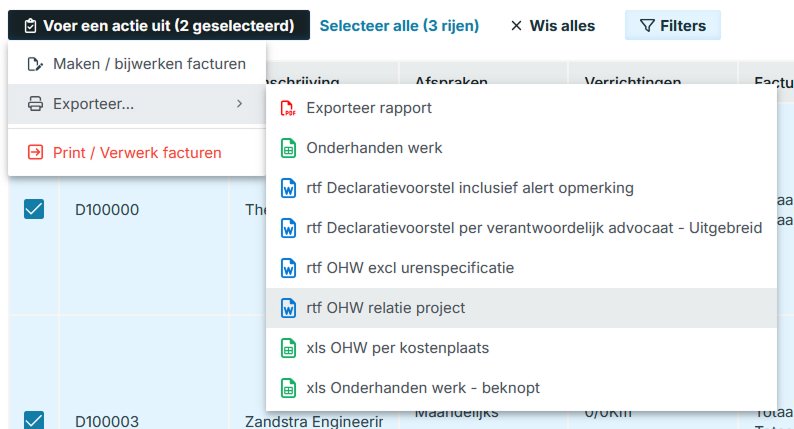
2. Printing reports
It is possible to print a declaration proposal and/or an overview of the work in progress prior to invoicing.
To do this, select the relevant files by checking them. Then click on  at the top left above the grid ➤ Export ➤ select, for example, the report “rtf Declaration proposal per responsible lawyer – Extensive” or “rtf OHW relationship project”.
If you still want to make corrections to the outstanding hours, you only have to click on “Outstanding hours” in the column “Transactions”. A new screen opens with the hour lines that are ready for invoicing. At this stage you can still make changes to descriptions and the like.
If you have checked all billable components, you can create the draft invoices using the action:
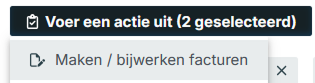
The invoices are now created and after completion a new window will appear with the message that x number of invoices have been created. The draft invoices can still be adjusted separately if necessary. You can do this by clicking on “Open invoice:…(new invoice number)” (or ‘There are multiple invoices’ when processing invoice splits) in the “Invoice” column.
The Outgoing invoice will open in a new BaseNet tab.
3. Outgoing invoices

In this screen you see the overview of your invoice. You can add extra invoice lines if you scroll further down to Invoice lines and click on +New.
If you wish to edit the invoice, click on Edit in the upper corner right.
- Invoice number: This is automatically generated based on the next consecutive number from the company settings.
- Administration: The administration is automatically filled in based on the department indicated in the file.
- Status: A new outgoing invoice has the default status “Waiting” and automatically changes to “Invoiced” when you finalize the invoice by processing it.
- Sending date: Enter the sending date if desired. BaseNet Online CRM will automatically calculate the due date based on the sending date. If no date is entered, the processing date is automatically used.
- Expiry date: Enter the due date if desired. If this was entered automatically by BaseNet Online CRM, you can always adjust it.
- Financial year: If necessary, change the financial year to which the outgoing invoice relates. When using an export link to an external accounting package, the financial year must correspond to the invoice date.
- Period: If necessary, change the period to which the outgoing invoice relates. When using an export link to an external accounting package, the period must correspond to the month of the invoice date.
- Journal: If necessary, select in which sales ledger the outgoing invoice should be processed in the administration (only applicable if you have multiple sales ledgers).
- Invoice for and Invoice to: BaseNet Online CRM will automatically enter the “Invoice for” and “Invoice to” based on the invoice relationship of the file.
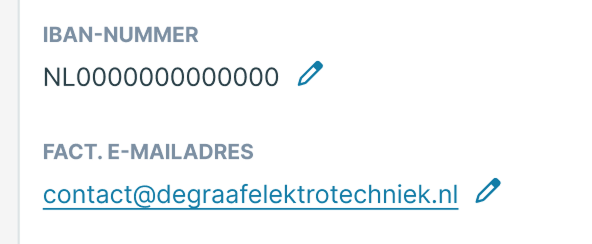
- Payment method, Shipping method, IBAN number and Invoice e-mail address: These fields are filled in automatically if they are filled in in the debtor settings of the relation.
You can use the following fields for the outgoing invoice:
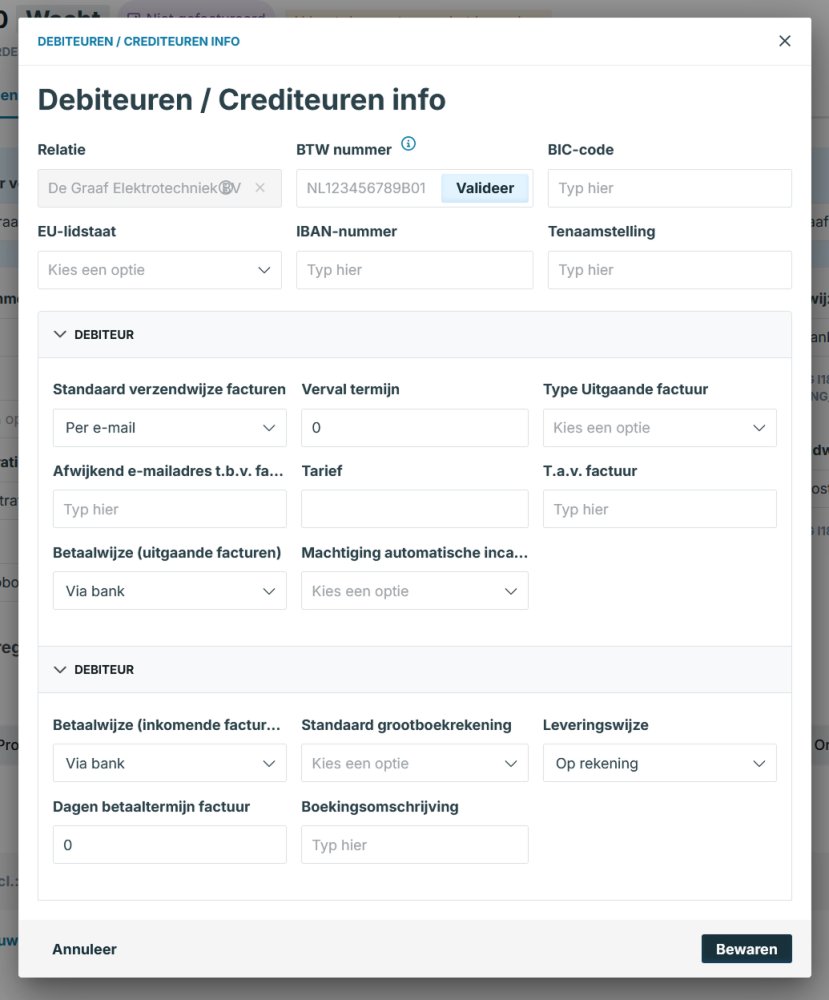
- VAT number;
- IBAN number;
- BIC number;
- Name.
In the “Debtors” section, you can enter the following fields:
- Standard shipping method for invoices;
- Different email address for invoices;
- Payment method (outgoing invoices);
- Expiry date;
- Rate;
- Direct debit authorization;
- Outgoing invoice type (for foreign invoicing);
- T.a.v. invoice.
If the fields are filled in, this information will automatically be used for all new invoices from this relationship. Click Save to return to the outgoing invoice.
The fields described above can of course also be filled in/adjusted manually. Use of the debtor settings is not mandatory, but is recommended to work as efficiently as possible.
Click on Save to save the changes.
4. Preview the invoice
If the invoice is to your liking, you can check the outgoing invoice by means of a preview. You can do this in multiple ways:
- After you save the invoice, on the General tab, look for the card “Preview” and click on the button “Click to Preview”
- After you save the invoice, on the General tab, look for the card “Quick actions” and click on Download the invoice
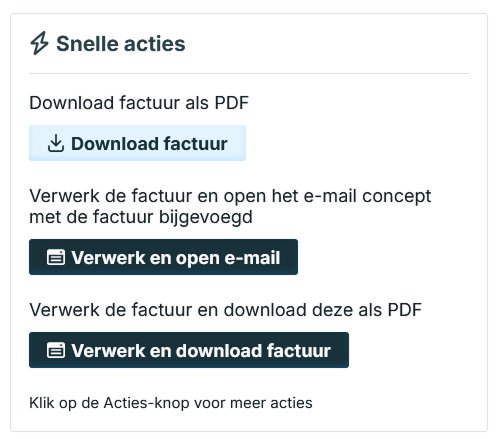
You can see all the actions above if you click on Actions, in the dropdown menu.
5. Process the invoice
If the preview is to your liking, you can finalize the invoice by processing it. If you want to process invoices per invoice, check the Quick actions menu or click on the Actions button, then click on “Process and open e-mail” or on “Process and print”. The accompanying e-mail or the print version in Word will be opened and the invoice will be given the status “Invoiced”.It is also possible to process multiple invoices at once. Here you create all concept invoices via the matter billing screen and after correcting the concept note click on Save to return to the matter billing screen. Check the rows with concept invoices (shown by “Open invoice:..” in the “invoice” column) that you wish to process and click on Perform an action, then on Print/Process invoices. The input screen below will open in a new window.
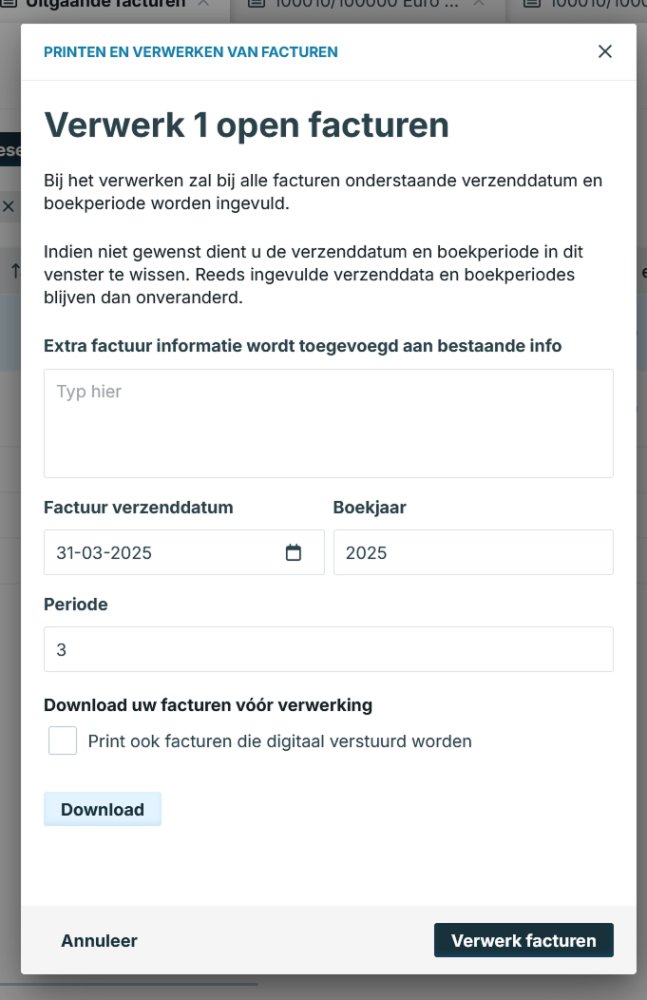
- Extra invoice information…: Here you can optionally provide additional information in the invoices. Your invoice template may need to be adjusted to use this field.
- Invoice dispatch date, financial year and period: When processing, the indicated dispatch date, financial year and period will be filled in for all invoices. If this is not desired, these fields must be cleared. Already filled in shipping dates, fiscal year and period of each invoice will then remain unchanged.
- Also print invoices that are digital…: Check this field if you also want to view and/or print a print version of the invoices that will be sent by e-mail when processing.
Click on “Process invoices” to process the invoices definitively. The status of the invoices is immediately changed to “Invoiced”. The files will now no longer be visible in the file invoicing screen, unless there are other billable hours and the like in the file.