
Appendix /
Jam Conditions |
ConveyLinx ERSC ✅ | ConveyLinx-Ai 24V ✅ | ConveyLinx-Ai 48V ✅ |
 |
 |
 |
|
| ConveyLinx-ECO ✅ | ZPA Mode ✅ | PLC I/O Mode ❌ | |
 |
 |
 |
There are two (2) types of Jam conditions detected by the ConveyLinx modules: Arrival Jam and Sensor Jam
Arrival Jam
When a carton leaves an upstream zone and is conveyed to its next downstream zone, this upstream zone expects positive confirmation of carton arrival from the downstream zone. This communication occurs automatically along the ConveyLinx network. If a new carton arrives at this upstream zone while this upstream zone is waiting for a downstream arrival confirmation, the new carton will accumulate on this upstream zone. If the upstream zone does not receive this confirmation within the Jam Timer interval, the ConveyLinx module will produce an Arrival Jam fault. Once an Arrival Jam occurs, the ConveyLinx module will automatically hold any new carton at the upstream zone for a pre-determined Auto Clear Time Timer value and then resume normal ZPA function. By default, the Jam Timer and the Auto Clear Timer values are set to 5 seconds for each. This condition will be indicated on the corresponding Sensor LED on the module.
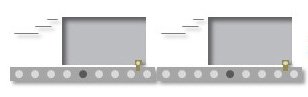
| Carton 1 has left PE1 and is on its way to PE2 and because PE1 is clear, Carton 2 is entering Zone 1 |  |
| Carton 1 disappears but the Zone 2 motor continues to run for the Jam Time period (5 sec. by default). During this time Carton 2 arrives at PE1 but Zone 1 stops because Jam Timer is still timing |  |
| When the Jam Timer expires, the Sensor LED blinks to indicate an Arrival Jam and keeps blinking for the Auto Clear Time (5 sec. by default). When Auto Clear Time expires, the Arrival Jam is reset and Carton 2 will release if Zone 2 is empty |  |
How to Disable Arrival Jam
How to change the Jam and Auto Clear Timers
Sensor Jam
While a zone is releasing a carton; if this carton remains blocking the photo-sensor for the Jam Timer period (default of 5 seconds), the ConveyLinx module will detect a Sensor Jam. This will be indicated on the corresponding Sensor LED on the module.
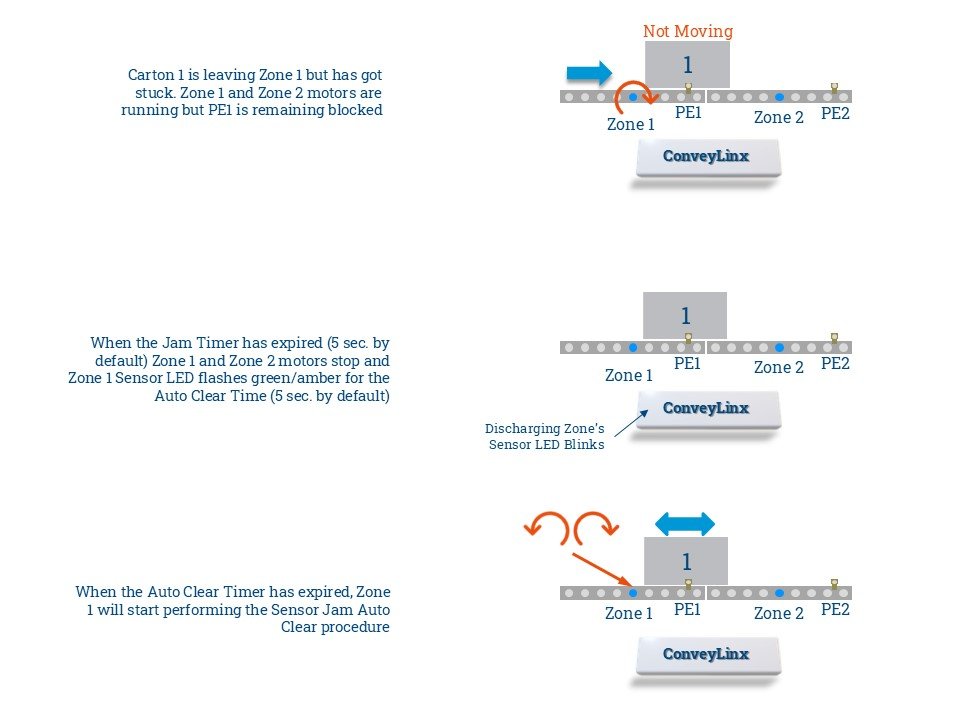
Sensor Jam Auto Clear
- Here is what happens when Sensor Jam Auto Clear procedure occurs
- Run the zone motor in reverse until the sensor is clear or 1 second has elapsed, whichever happens first
- Wait for the Auto Clear Timer to expire
- Run the zone motor forward to attempt discharge to the downstream zone (Attempt #1 complete)
- If sensor is still blocked after discharge attempt, the zone motor runs in reverse until the sensor is clear or 1 second has elapsed, whichever happens first
- Wait for the Auto Clear Timer to expire
- Run the zone motor forward to attempt discharge to the downstream zone (Attempt #2 complete)
- If sensor is still blocked after discharge attempt, the zone motor runs in reverse until the sensor is clear or 1 second has elapsed, whichever happens first
- Wait for the Auto Clear Timer to expire
- Run the zone motor forward to attempt discharge to the downstream zone (Attempt #3 complete)
- If sensor is still blocked after Attempt #3, the sensor must either be cleared manually to reset the Sensor Jam condition, the Clear Jam Button in EasyRoll+ can be pressed, or a PLC can set the Clear Jam Bit. Please note that if any of the discharge to downstream attempts (steps 3, 6, or 9) are successful, the Sensor Jam condition is automatically reset.
Post your comment on this topic.