Module Configuration Screen Tabs /


Configuration

ConveyLinx ERSC ConveyLinx-Ai 24V ConveyLinx-Ai 48V
ConveyLinx-ECO ZPA Mode PLC I/O Mode


This screen allow you to view and change the module’s operational configuration.

When Current Mode is PLC – Online
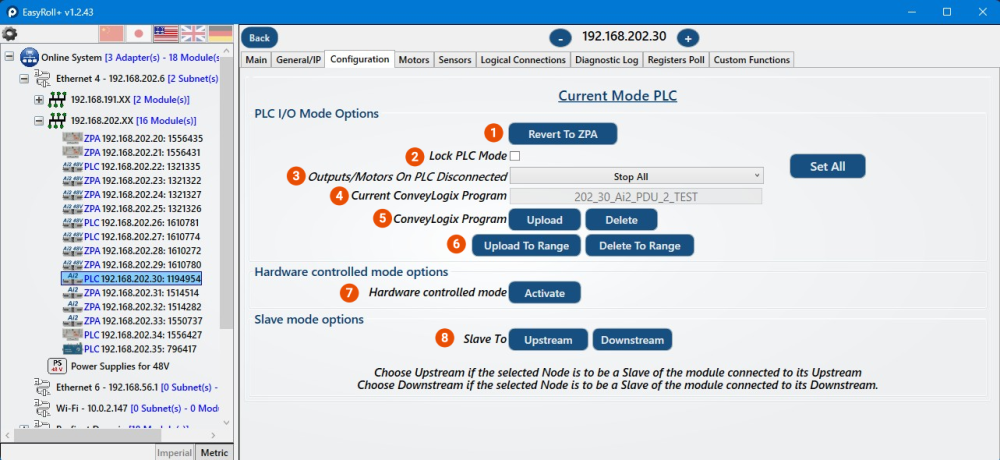
Item Function Description
Revert To ZPA
  • Changes the PLC mode to ZPA mode
Lock PLC Mode
  • Box will have to be unchecked again to change the mode for this module
Outputs/Motors on PLC Disconnected
  • The drop down includes options: Stop All, and Don’t Change. This instructs the motors and outputs on a potential disconnect to either hault or continue their last instruction
Current ConveyLogix Program
  • Shows the ConveyLogix Program that is currently uploaded onto this module
ConveyLogix Program
  • Upload or Delete a ConveyLogix Program from this module
Upload to Range, Delete To Range
  • Allows uploading ConveyLogic programs to multiple modules at once, or deleting the program from multiple modules at once
Hardware Controlled Mode
  • You can activate the module itself taking control back from the ZPA, PLC, ETC mode here
Slave To:
  • You can assign the current module to Slave Mode. The Master module can be set as the module upstream or downstream

When Current Mode is ZPA – Offline
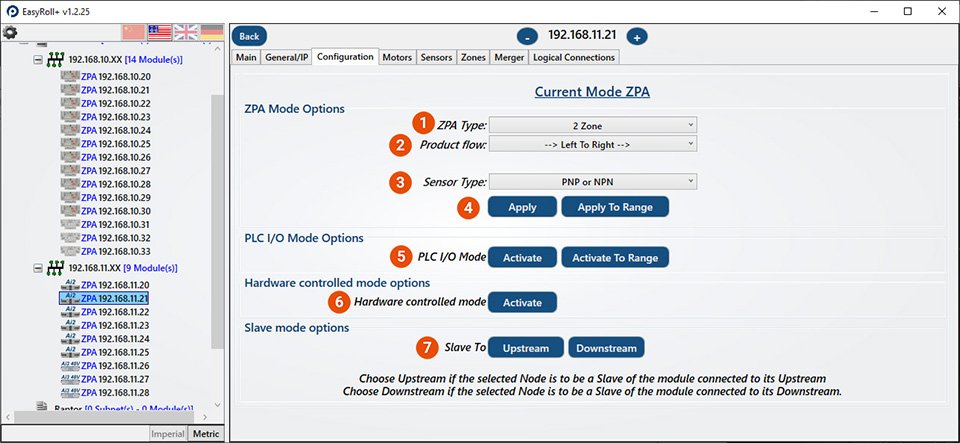
Item Function Description
ZPA Type
  • Displays drop down selector for ZPA type
  • Choices are 2 Zone, 1 Zone, and 1 Zone Belted
Product Flow
  • Dropdown to select flow direction
  • Choices are Left to Right or Right to Left
  • Direction based upon viewing the front of the module
Sensor Type
  • Dropdown to select hardware connection option for the sensor ports
  • PNP or NPN utilizes the PNP/NPN auto sensing circuit
  • Push-Pull configures the sensor circuit to inhibit the auto sensing function and accept push pull type sensors
  • Push Pull type sensors will not work if PNP or NPN is selected
  • Push / Pull Configuration only available for AI Family
Apply Buttons
  • Click Apply to update the current module with any changes to the ZPA selections
  • Click Apply to Range to show module selection dialog to select other modules to use the selected changes
PLC I/O Mode
  • Click Activate to change the current module to PLC I/O Mode
  • Click Activate to Range to show module selection dialog to select other modules to change to PLC I/O Mode
Hardware Controlled Mode
  • Click to change the current module to Hardware Controlled Mode
Slave Mode
  • Click Upstream to configure the current module be controlled by its upstream neighbor
  • Click Downstream to configure the current module be controlled by its downstream neighbor
  • Extending the effects of an upstream sensor to a downstream slave and more is possible by thoughtful assignment here in the Configuration tab


When Current Mode is PLC I/O Mode – Offline
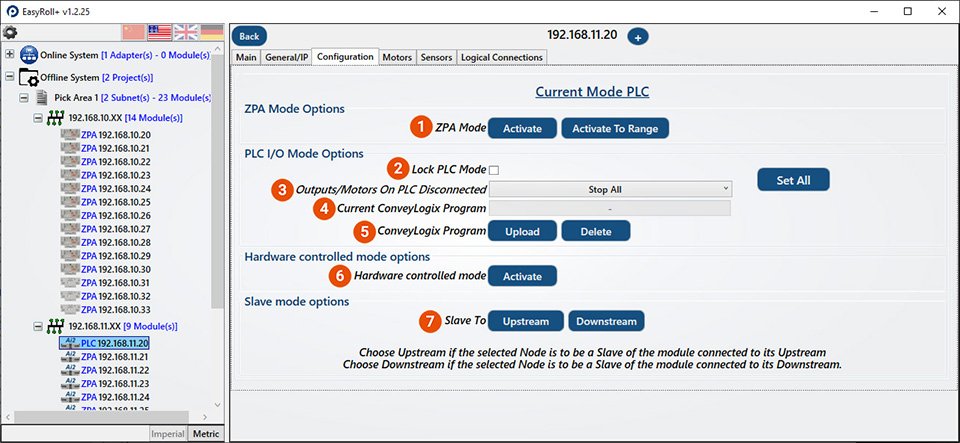
Item Function Description
ZPA Mode
  • Click Activate to change the current module to ZPA Mode
  • Click Activate to Range to show module selection dialog to select other modules to change to ZPA Mode
PLC Lock Mode
  • Click to enable the lock feature for the current module
  • Lock Mode keeps the module in PLC I/O Mode during any subsequent Auto-Configurations
PLC Disconnect
  • Dropdown to select action to be taken for outputs if PLC communications are lost
    ● Selection affects both motors and any digital output signals
ConveyLogix Program
  • Read only display of the filename of the currently installed ConveyLogix program
  • Display will be blank if no ConveyLogix program is installed
Load ConveyLogix
  • Click Upload to open file select dialog for the desired ConveyLogix program to install
  • Click Delete when you want to delete an installed program and return the module to strict remote PLC control
Hardware Controlled Mode
  • Click Activate to change the current module to Hardware Controlled Mode
Slave Mode
  • Click Upstream to configure the current module be controlled by its upstream neighbor
  • Click Downstream to configure the current module be controlled by its downstream neighbor*


When Current Mode is Hardware Controlled – Offline
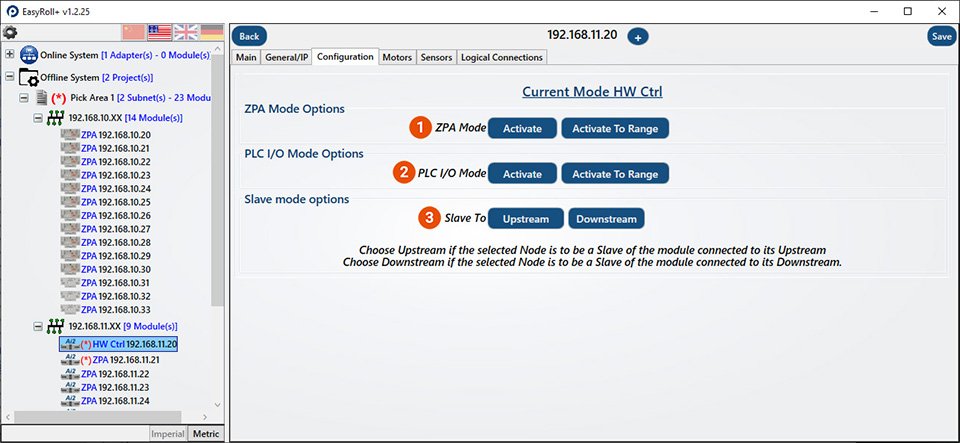
Item Function Description
ZPA Mode
  • Click Activate to change the current module to ZPA Mode
  • Click Activate to Range to show module selection dialog to select other modules to change to ZPA Mode
PLC I/O Mode
  • Click Activate to change the current module to PLC I/O Mode
  • Click Activate to Range to show module selection dialog to select other modules to change to PLC I/O Mode
Slave Mode
  • Click Upstream to configure the current module be controlled by its upstream neighbor
  • Click Downstream to configure the current module be controlled by its downstream neighbor

Feedback

Was this helpful?

Yes No
You indicated this topic was not helpful to you ...
Could you please leave a comment telling us why? Thank you!
Thanks for your feedback.

Post your comment on this topic.

Please do not use this for support questions.
Pulseroller Contact Page

Post Comment