
Legal files are, along with contacts, a central reference point within BaseNet. Legal files are used to link correspondence, legal file information and financial information for a client.
Creating a legal file
Legal ➤ legal files
Click on  to display the screen below:
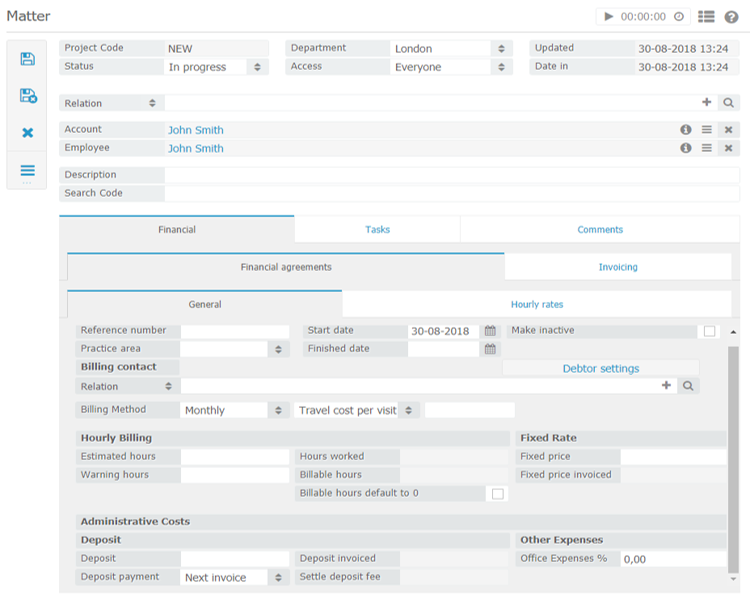
In the main section of the legal file screen, solicitors and contacts can be filled in. Here you can enter your contacts (an individual, a company or a private person). Moreover, you can add an assigned and responsible solicitor. The latter should always be one from your law firm.
It is possible to create contacts whilst filing a or linking an existing contact.
To add a new contact, simply click on the [+] symbol (next to the magnifying glass symbol). Subsequently, a new screen will be opened, where you can enter the information related to the contact. To save your actions, click on save.
In the General tab, you can set the field of law. This list can be extended if you have the required credentials:
company settings➤ Law➤ Field of law
Comments Tab ➤ In the ‘comments’ tab a short description can be added to the matter. Under the “alert comments”, important comments can be added. For example “beware: a new advanced payment is expected”
Settting a rate per hour➤
There are four levels of rates per hour:
1. Employee wage per matter
2. General rate per matter
3. Employee rate
4. Office rate
The system first checks whether ‘Level1’ has been entered, if so, that rate is applied. When no rate has been entered to the system then check whether a rate has been entered in the following next level. If you have the proper credentials appertaining to company settings, you are able to make changes to the wages appertaining to level 3 and 4. In order to do so, follow these steps:
Settings➤ Companysettings➤ Hours, and subsequently go to ‘Standard rate per hour’ (level4) or “rate per hour per employee” (level3).
Under the Finances> Hours/Rates you will have the option of setting a rate per hour based on a matter (default rate, level 2). You can also set a rate per employee by using the New button (level1). Beware: If the tab is left completely empty, the system automatically applies the default office rate which was specified in the central settings.
Fixed price➤ The amount entered in this field will be taken into account when billing. No hours will be billed. Additional expenditures and office expenditures (if applicable) will be taken into account.
Office expenditures➤ In the office expenditures field the office expenditures can be specified per individual dossier. If you have access to the company settings you have the ability to set a standard percentage regarding office expenditures. A different rate from the default rate for the dossier is of course possible.
Retainer ➤ If you would like to work based on a retainer you can add the amount in the retainer field. In the first billing that you create the retainer amount will be included. When creating a second billing the system will automatically take the retainer into account. The fields “retainer billed” and “retainer reimbursed” directly show what, and how much has been taken into account when billing retainers.
Travel expenses➤ If you would like to include travel expenses you can opt for:
*Travel expenses per visit
*A rate per distance
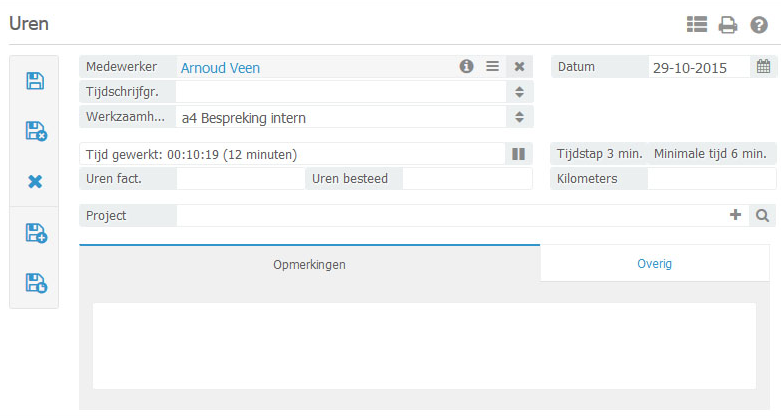
The travel expenses per visit can be entered per matter or through Settings on company settings. The distance rate can only be set per matter. When entering your hours, do not forget to set the “travel expenses” field on “yes” in order to include the travel expenses. When working based on a distance rate (per kilometer/mile) and entering hours, you should keep in mind that the distance also needs to be entered. For further information, please see the screenshot bellow:
“Other” tab:
Under the “other” tab, custom fields can be created which are missing in BaseNet. For entering these fields the actual (company settings) credentials are required.
Go to: Company settings➤ Legal ➤ Matter settings, to create the fields.
Splitting invoices➤ Through the “split invoice” tab, which can be found under the “financial agreements” tab, you can split invoices. There are two ways of splitting invoices:
- Splitting based on percentage
- Splitting based on set rates/ amounts
When ‘Splitting based on percentage’ a percentage can be entered which the system will subsequently use for dividing the to be paid amounts which are to be billed.
The “set rates/ amounts” option is linked to the ‘Fixed fee’ field. When such a division takes place, you should keep this field into account. By clicking the ‘remainder’ field the system will automatically fill in the difference between the ‘Fixed fee’ and the first set division.