
Manage > Company settings > Workflows
In BaseNet workflows are a series of linked tasks. It is possible to trigger a task individually and to distribute it over certain employees, functions or departments.
Example 12.2. Functionalities of workflows
When you want to create a call registration for instance for a sales call, certain actions precede this call registration. For example receiving a task, which prepares you for the sales call and one task after the call, which reminds you of a call follow-up. For this purpose, a workflow can be created for the concerning tasks after the registration of a calendar event with the label “sales call”.
The following chapter explains how to create a workflow.
19.1. Creating workflows
Manage > Company settings > Workflows > Workflows
Procedure 12.1. Creating a workflow
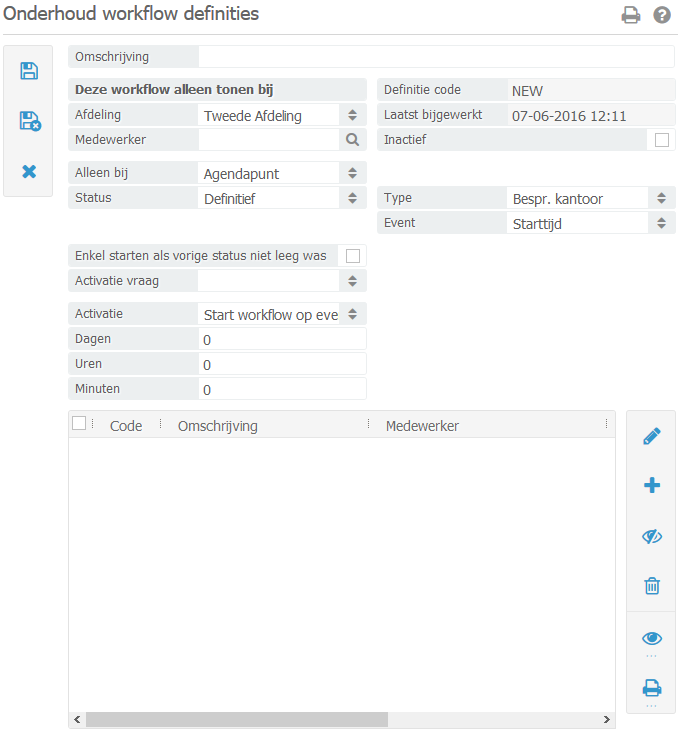
To create a new workflow click on New, after which the following screen appears:
Dashboard
In the description, you can specify whether you wish to assign/ link the workflow to a particular user. This is not mandatory. Here you can also specify which department you wish to use the workflow for.
Defining type
When the description and other details, have been entered you will reach the screen where you can specify the workflow type and its duration. You can now choose for workflow type, you will see the following illustration confirming that you have chosen for “calendar item”.
When you have indicated this you can specify the calendar item’s status and the type of calendar item. Hereby you specify which “event” should trigger the workflow.
Activation
Here you indicate when the workflow should precisely be initiated, such as, for instance, the moment that the calendar event has been set to “Definitive” such as in the case of calendar type “Sales Call”.
Moment of activation
Here you can specify whether you wish to set a warning message before starting a workflow or whether the workflow should be initiated automatically without being preceded by a dialogue box.
There are serveral types of activation, the specified type depends on the type of workflow which you wish to make. The following possibilities are available as listed bellow:
Start workflow on event
This means that the workflow is initiated as soon as the event is saved or confirmed. An event could be a calendar event or project, for example.
Start workflow X days/ hours before event
In this type you can specify a day on which you wish the workflow to be initiated and in the settings you can indicate when the workflow should be completed.
Complete workflow X days/ hours before event
In this type you specify by which date the workflow should be completed, by entering a particular date, when the calendar event takes place and you can set that the workflow should, for example, be completed one day in advance or one day before the calendar event takes place.
Start workflow X days/ hours after entering the calendar event, this can be done, for example, as a confirmation towards the customer in the form of a callback after a calendar event.
End workflow X days/ hours after event
When opting for this option, you can specify how many days after the calendar event has been created, the task should be completed.
New workflow task
When the workflow’s startup screen has been set you can continue with creating tasks. When wanting to set a task for a new workflow click on ‘New’ in the workflow screen.
When you have done this, you will reach the New Task window. Here you can enter a description and a summarised description. The information and changes made should always be saved.
Workflow settings: Here you can set the default status. This way a task can be kept on hold and when you indicate that the task is ready or planned, the status will switch to “in progress”.
This means that the task is activated from the moment that the following task has been completed.
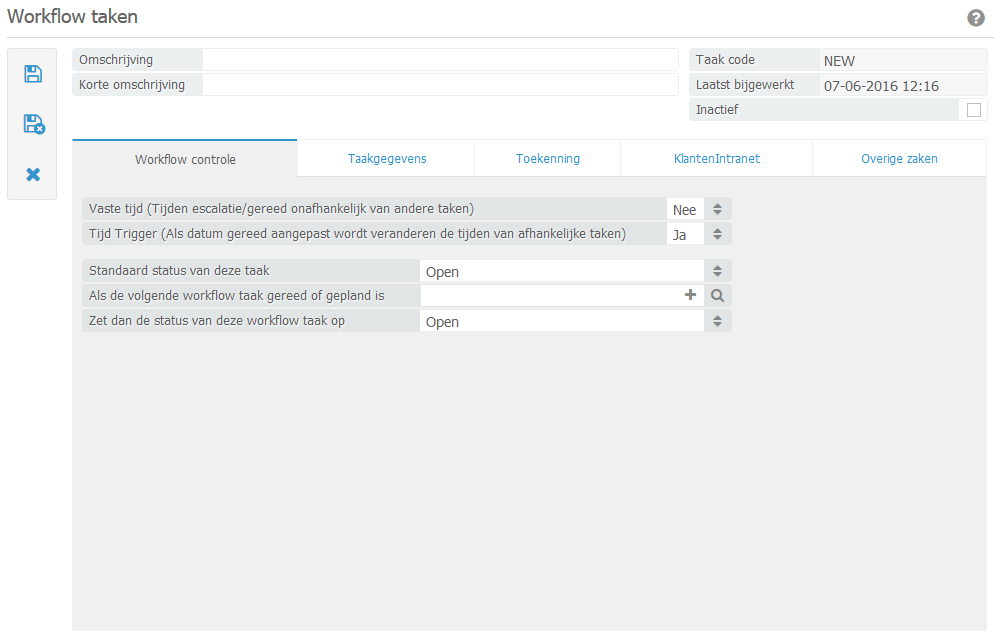
A fixed time can be indicated per task, so that the task should, for example, be completed in 2 weeks. When you are in the stage of working on following tasks and done with the first task, the consecutive task might turn its status to “escalated”, meaning that it has been delayed. Escalation serves as a warning and reminder that the task should be completed before its deadline/ completion date.
A fixed time can be entered by choosing “Yes” in the fixed time field.
In the trigger field, you may also opt for Yes or No. When opting for Yes, the escalation time and completion time are adjusted. When setting this to No, the ready date and escalation date are subsequently modified and will not affect subsequent tasks in the workflow.
Task data (as shown in the illustration) indicated how a time can be set for the workflow of the task. This time will be displayed in the date bar of the escalation and ready field. The data will then be shown in the right top corner of the task window.
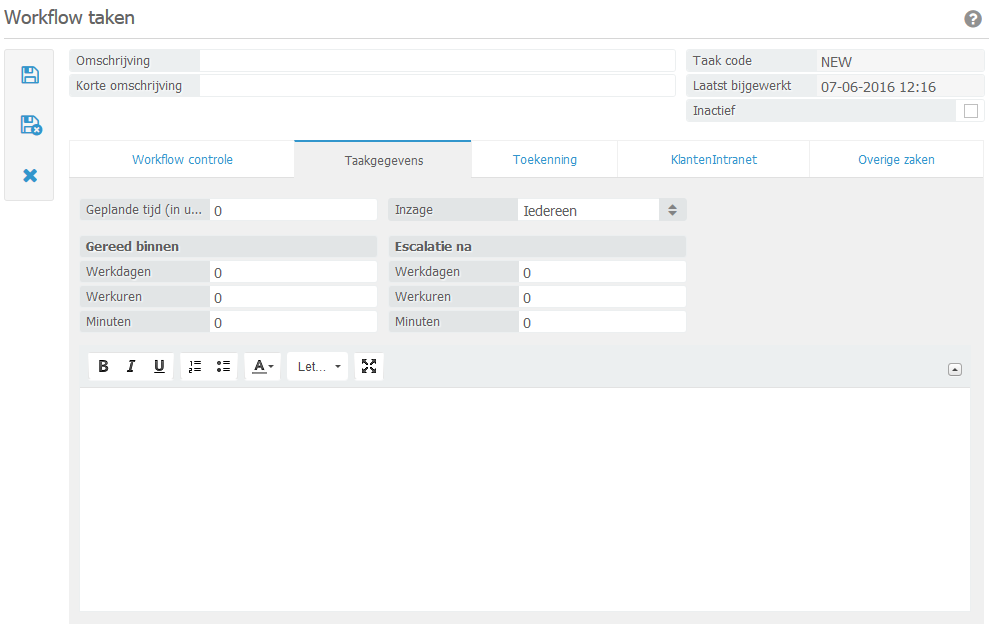
As you can see, the planned time for this task is set to 0. In addition, this task should be completed within 1 office day.
After 4 office hours you will receive a notification that the task is about to escalate, meaning that you are reaching your deadline.