
This section describes how to enable secure networking communication between the different components of the ROB-EX Scheduler system. Enabling SSL means that traffic between server and clients are encrypted and that web-server sessions with the Shop Floor client must be accessed through https in the browser.
For how to configure encryption between ROB-EX Scheduler Server and the database see the section Server installation – Secure network communication.
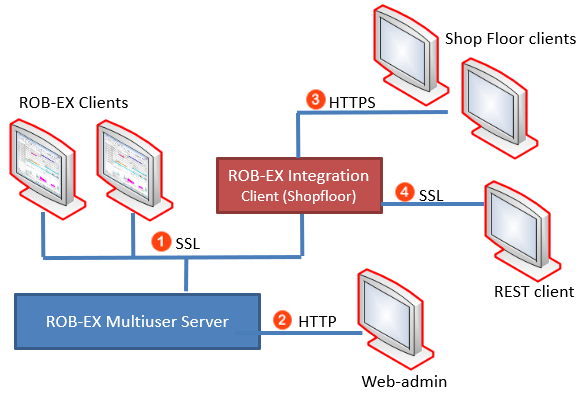
This manual is divided into the following sections, explaining how to enable secure communication for the different components (the number refers to the number on the drawing above)


Multiuser Server
SSL communication between the Multiuser Server and ROB-EX Desktop Clients is by default turned off. To enable this feature change the configuration by hand editing file application.yml. Read more about the settings of this file here.
Start out by locating the location on the file system where your server is installed. If in doubt locate the Server service (Run->Services.msc and locate the ROB-EX Scheduler Multiuser Service for instance X). Double click on the service and take a note of the “Path to executable:” – the application.yml file will be in the same directory as the executable. The default location will be in C:\Program Files (x86)\ROB-EX\ganttServerG2\application.yml.
Add these lines to the file, changing the grpc.server.security.enabled value to true
grpc:
   port: 6566  # client http port
   server:
      security:
enabled: trueGenerating ROB-EX Scheduler Server certificates
This explains how to generate self-signed certificates for the components 1+2 on the top drawing.
The default certicate installed out-of-the-box is located in ganttServerG2\certificates. This self signed certificate is locked to the localhost domain and should only be used for testing, i.e. the default certificates will only work for ROB-EX Desktop Clients connecting to https://localhost:6565. You need to generate your own private self-signed certificates where you bake the hostname of your server into.
To generate new self-signed certificates
- Install the Openssl command line tool from a trusted location. See e.g. wiki.openssl.org/index.php/Binaries . You can test a valid openssl tool by opening a command prompt with cmd.exe and run the command
openssl version -a. The following has been tested to work with the v1.1.1 of the Openssl tool. - Edit
ganttServerG2\create-selfsigned-certificate.bat, replacingrobex-srv1in the lineset SRV_NAME=robex-srv1with the actual name of your ROB-EX Scheduler server. Then save the file - Run the
ganttServerG2\create-selfsigned-certificate.batscript, by double clicking the file from Windows File Explorer. Verify that new *.pem and *.pfx files were generated to theganttServerG2\certificatesfolder.
Finally copy the two files selfsigned-public-key-cert.pem and selfsigned-key-store.pfx to the \config\certificates folder of your ROB-EX Scheduler Client installation directory. This will ensure that the ROB-EX Scheduler clients know the new certificates.
Common issues and debugging pointers.
If self signed certificates are used the property gantt.certificates.local has to be set to true, if not the client wont be able to connect to the server. By default there will be nothing in the log file indicating that an error has happened, besides the time out when connecting. To obtain the information that the TLS handshake failed, because the client doesn’t trust the certificate, the log level for the name space io.grpc.netty need to be set to trace. The same problem will happen if host name does not match the name in the generated certificate.
In general issues with the certificates wont be shown at the error log level, so it is necessary to edit the logback.xml of the client or server to debug issues with certificates.
Web-admin
SSL communication between the Multiuser Server Admin pages (typically on port 9090) and ROB-EX Desktop Clients is by default turned off. To enable this feature change the configuration by hand editing file application.yml. Read more about the settings of this file here.
Start out by locating the location on the file system where your server is installed. If in doubt locate the Server service (Run->Services.msc and locate the ROB-EX Scheduler Multiuser Service for instance X). Double click on the service and take a note of the “Path to executable:” – the application.yml file will be in the same directory as the executable. The default location will be in C:\Program Files (x86)\ROB-EX\ganttServerG2\application.yml.
Add these highlighted lines to the file as part of the server section, making sure the server.port.ssl.enabled value is set to true
server:
   port: 9090  # web-admin http server port
   use-forward-headers: true  # To support reverse-proxy like Traefik
   ssl:
      enabled: true
      key-store: ./certificates/selfsigned-key-store.pfx
      key-store-password:     # see openssl '-passout pass:' option
      key-password:           # see openssl '-passout pass:' option (use same value as key-store-password)
      key-alias: localhost    # see openssl '-name' option. Will typically be the lower case hostname of the server
      key-store-type: pkcs12  # .pfx file extension.
Very likely the key-alias must also be edited to reflect the real hostname of the Windows server that hosts the ROB-EX Scheduler Multiuser Server service. On top, if the certificate is not a selfsigned certificate, in order to discover the alias name, you need to use the jre keytool for this
bin\jre\bin\keytool -v -list -storetype pkcs12 -keystore RobexPrivateKey.pfx
Enter keystore password: ***
The output will look like this. The alias name is toward the top. The name marked in bold is the alias needed. Update config file ganttSeverG2\application.yml with this name.
Keystore type: PKCS12
Keystore provider: SUN
Your keystore contains 1 entry
Alias name: te-85a00c42-4d6f-487f-86a9-e072c9182816
Creation date: Jun 8, 2023
Entry type: PrivateKeyEntry
..Shop Floor
Changes must be made to the \plugins\shopfloor\site\conf\server.xml file. If Shop Floor is available as a public service on the internet, then it is strongly recommended to secure the communication with SSL.
The normal http connector should be commented out, like this:
<!--
 <Connector className="org.apache.catalina.connector.http.HttpConnector"
               port="80" minProcessors="5" maxProcessors="75"
               enableLookups="true" redirectPort="18443"
               acceptCount="10" debug="0" connectionTimeout="60000"/>
-->
Below the above connector is another with scheme=https. This needs to be commented-in by removing the immediate surrounding <!-- and -->
 <Connector className="org.apache.catalina.connector.http.HttpConnector"
                       port="443" minProcessors="5" maxProcessors="75"
                       enableLookups="true"
                       acceptCount="10" debug="0" scheme="https" secure="true">
                <Factory className=
                                 "org.apache.catalina.net.SSLServerSocketFactory"
                         clientAuth="false"
                         keystoreFile="/config/ssl/.keystore"
                         keystorePass="xxxxxxxxxx"
                         protocol="TLS"
                         keyAlias="gantt"
                        />
            </Connector>
The important parts are the marked areas for port, scheme and secure. The default https port is 443 and Shopfloor can be accessed on https://localhost (i.e. notice it is not necessary to specify the port number, as 443 is the default port for https communication). If another port is preferred the port attribute should be changed.
More information about how to install your own certificate files can be found in the chapter Keystore and truststore. Note that if you install your own certificates, then In addition the client must be configured with updated SSL settings as described in ROB-EX Desktop Client configuration.
REST Server Service
To enable SSL for the REST Server Service integration (used as example for communication with .NET based clients) add the https scheme usage as a parameter on the short cut for starting ROB-EX Desktop Client, or alternatively insert this line in custom/GanttSetup.properties:
-Dgantt.rest.scheme=httpsMore information about how to install your own certificate files can be found in the chapter Installing your own Shop Floor and REST certificate. Note that if you install your own certificates, then In addition the client must be configured with updated SSL settings as described in ROB-EX Desktop Client configuration.
REST clients connecting to a https enabled REST service, must be configured to allow and accept self-signed certificates. The details of this depends on the coding language used, but should be straight forward to implement.
Installing your own Shop Floor and REST certificate
This explains how to generate self-signed certificates for the components 3+4 on the top drawing.
The default certicate installed out-of-the-box is located in \config\ssl. These default certificates are not locked to the localhost domain and could be used out-of-the-box. However for improved safety is is always good to generate your own self signed certificates.
This section describes what tools to use in case you would like to install and use your own certificate, e.g. your own self signed certificates or a certificate obtained from a trusted certificate authority (CA). The certificate provided out of the box with ROB-EX Scheduler, is a self signed certificate. This certificate type has the following pros and cons:
- (+) it is free to use
- (+) it never expires (a certificate issues by a CA, will typically expire after 1-2 years)
- (+) it is secure, in the sense that transmitted data is encrypted in a robust and secure fashion
- (-) a browser will warn that the certificate is not issued by a trusted certificate authority. If you want to avoid the warning, the different browsers all have options a user can accept a self signed certificate as being safe (search the Internet for a how-to on the subject).
If you would like to install your own certificate, the certificate should be generated and added to the keystore for the ROB-EX Desktop Client sides. A tool that is part of the JDK from Oracle/OpenJDK, called keytool and is located in the bin folder, is used for working with certificate stores
To generate your own certificate.
keytool -genkey -alias gantt -keyalg RSA -validity 36500 -keystore .keystoreIf you wish to add an existing signed primary certificate use this:
keytool -import -trustcacerts -alias gantt -file mycertificate.crt -keystore .keystoreThe client side need to use a truststore with the certificate. To do this, export from the keystore with the keytool:
Export the certificate from the keystore
keytool -export -alias gantt -keystore .keystore -rfc -file provider.cerImport the certificate into the truststore
keytool -import -alias gantt -file provider.cer -keystore .truststoreNew keystore and truststore files should be placed into the \config\ssl folder (client side)
ROB-EX Desktop Client
The client setup properties for Shop Floor and REST Server Service must be changed by adding/modifying the lines below to the \custom\GanttSetup.properties file (typically add these lines at the top of the file):
-Djavax.net.ssl.keyStore=./config/ssl/.keystore
-Djavax.net.ssl.keyStorePassword=

-Djavax.net.ssl.trustStore=./config/ssl/.truststore
-Djavax.net.ssl.trustStorePassword=
Note that when using the internal ROB-EX Scheduler generated certificate, passwords can be left as blank and it will automatically use the password defined in the server.xml config. Passwords need only be specified when you want to use your own generated certificate.
Post your comment on this topic.