
This chapter describes the setup and use of the module CSV 1 integration for ROB-EX Scheduler.
Using this module text files with data delimited by comma, semi colon etc. containing order and routing information can be imported into ROB-EX. The following are examples of how input text files may look like (the header row has been added to provide overview; this row will normally be omitted in actual usage).
Example CSV file 1: order header import (each line is a single production order and a suitable master route is assigned to the order during import)
Order.Id; Order.quantity; Order.customer; Order.productId; Order.description;       Order.deliveryDate;
2001;     500;            "IPKO Ltd";     "P100-25";       "Deliver on Eur-pallet"; 11-11-12;
2002;     250;            "Red Star Ltd"; "313309-NE";     "Picked up by carrier";  13-11-12;
2003;     390;            "Technic Ltd";  "S199-01";       "5555 5512";             08-11-12;
Example CSV file 2: order and operation import (each line is an operation – for additional requirements see Operation fields section)
Order.Id, Order.DeliveryDate, Order.quantity, Order.routeId, Opr.name, Opr.opNum, Opr.Workload,  Opr.PostQueue
1000,     2012-04-09,         500,            1000,          Cutting,        10,    5.5,         2
1000,     2012-04-09,         500,            1000,          Painting,       20,    4.0,         0
Before import is possible a template describing how data in the import file is mapped into corresponding ROB-EX fields must be created using a built in wizard.
In this chapter you are guided through:
- How to create a template for mapping imported data
- How to use the Textfile Plugin macro and general settings
- How to import order data
The following data can be imported:
Project
| Name in ROB-EX | Name in field chooser | Description |
|---|---|---|
| Project id | Project.id | Specifies the project ID. |
| Project name | Project.name | Specifies the project name. |
| Project no | Project.no | Specifies the project number / the project alternate name |
Order
| Name in ROB-EX | Name in field chooser | Description |
|---|---|---|
| Order number | Order.id | Must always be imported |
| Order name | Order.name | |
| Product | Order.productId | The end product to produce. If “Order.routeId” is not specified, the template route for the order is searched using the product name. May be omitted. |
| Product | Order.productName | productName Specify this if the product name is different from the product id and/or if the product name is different from the route name. |
| Alternate route | Order.alternateRoute | An optional alternate route name. Will be used when searching for the correct master route. |
| Quantity | Order.quantity | If omitted or set to 0: ROB-EX sets the value to 1. |
| Customer | Order.customer | May be omitted |
| Text | Order.description | Optional. Please notice that this field is the only field allowing import from multiple different columns. In that case each column is added as description with a line break as separator between each imported text part. |
| Delivery date | Order.deliveryDate | If omitted: ROB-EX sets the date to “now” |
| Materials ready | Order.materialDate | If omitted: ROB-EX sets the date to “now” |
| Status | Order.status | Import the order with the given order state: 5 = incomplete, 10 = new, 15 = forcalculated, 20 = planned, 30 = released, 40 = start possible, 50 = started, 60 = paused, 70 = cancelled, 80 = complete, 90 = deleted |
| Preconditions | Order.preConditionsOk | Should the order be imported with the preconditions flag true. |
| Route | Order.routeId | The id of the template route to assign to the order. Normally the production order route is only created if a template route with same name/id exists. Specify the following setting in custom/GanttSetup.properties in order to automatically create a new route with the specified name: “textio.createRouteEvenNoTemplate=true”. |
| Planning strategy | Order.planStrat | Use this planning strategy if the order is imported with the status > 10. none = backward from delivery date with unlimited capacity forward = forward from the time now. backward = backward from the delivery time empty = strategy selected from Functions->Settings->Scheduling strategy. In versions after 7.0.0.433: all strategies specified in Automated Scheduling are in addition allowed. Also see Scheduling in ROB-EX for further details on the planning strategies. |
| Raw material consuming | Order.rawMaterial.consuming | The name of the raw material which the first operation in the route consumes. If the raw material doesn’t exist, it will be created. |
| Raw material producing | Order.rawMaterial.producing | The name of the raw material which the last operation in the route produces. If the raw material doesn’t exist, it will be created. |
| Sub order source | Order.subOrder.source | Comma separated list of orders (order number) which the current order is dependent of. Thus they must be finished before the current can start. |
| Sub order target | Order.subOrder.target | Comma separated list of orders (order number) which are dependent of the current order. Thus the current order must be finished before the target sub orders can start. |
| Custom Integer 1 | Order.customInt1 | Custom integer field |
| Custom Integer 2 | Order.customInt2 | Custom integer field |
| Custom Text 1 | Order.customText1 | Custom text field |
| Custom Text 2 | Order.customText2 | Custom text field |
| Custom Text 3 | Order.customText3 | Custom text field |
| Custom Text 4 | Order.customText4 | Custom text field |
| Custom Text 5 | Order.customText5 | Custom text field |
| Custom Text 6 | Order.customText6 | Custom text field |
| Custom Text 7 | Order.customText7 | Custom text field |
| Custom Text 8 | Order.customText8 | Custom text field |
| Custom Calendar 1 | Order.customCalendar1 | Custom date field |
| Custom Calendar 2 | Order.customCalendar2 | Custom date field |
Operation
In order to import route and operation data some some additional consideration must be taken.
First please observe that each row in the imported file must represent a single operation. Hence to import an order with three operations then the import file must contain three rows. Each row repeats the same order no, route id etc. but contains different operation name, operation workload etc.
Secondly observe this important requirement: The default interpretation of a line in the imported text file is a single order, so in order to enable operation import the following setting must be copy/pasted into the custom\GanttSetup.properties file:
textio.createOperationMultipleRows=true
textio.createRouteEvenNoTemplate=true
Also see additional information in the section for Order.routeId:
| Name in ROB-EX | Name in field chooser | Description |
|---|---|---|
| Start | Operation.startCal | Specifies the start time for the first operation in the sequence. |
| End | Operation.endCal | Specifies the end time for the first operation in the sequence. |
| Workload | Operation.workload | The workload for the operation. |
| Name | Operation.name | The name of the operation. |
| Resource | Operation.resource | The name of the selected resource. If this is not specified it tries to look up the selected resource from the template operation. |
| Operation no | Operation.opNum | The index in the route where the current operation should be added. Multiple operations can be added to an order/route. |
| Setup | Operation.setup | The setup time for the operation. |
| Pre queue | Operation.Pre queue | The pre queue time for the operation. |
| Post queue | Operation.Post queue | The post queue time for the operation. |
| Switch over | Operation.Switch over | The switch over time for the operation. |
| Id | Operation.Id | Specify this to control the id the operation should be created with. |
| Capacity | Operation.Capacity | The capacity of the operation. Is only used if wlType=1 |
| wlType | Operation.wlType | Specify “0” for fixed workload or “1” in order to calculate the workload from the capacity and quantity. |
| Transport | Operation.transport | The transport time for the operation. |
Create a template for how imported data is mapped
Before data can be imported a template of how data is mapped between the import file and ROB-EX fields must be created using the build in template generation wizard. The created template is used every time new data is imported. Multiple templates can be created in order to import data from files with different mappings.
Create the template using the 3-step-wizard available from the menu “Files->Import->Text file”:
Press the “New” button in order to create a new import template. The 3-step-wizard is started.
Step 1 of 3

 |
Select the text import file to be used as a model for setting up the text import template. The text import file must have the same format as the files to be imported. When the text import file is selected, the content of the file is shown in the field “File contents”. |
 |
Select windows or DOS format. |
 |
Press Next in order to go to step 2 in the wizard. |
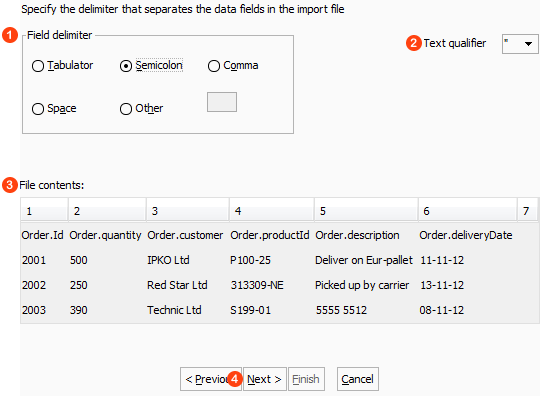
Step 2 of 3
|
Select the field delimiter: tabulator, semicolon, comma, space or a user defined character. |
|
Select a text qualifier character used to indicate the start and end of text strings, e.g. quotation marks (“). |
|
When selecting field delimiter and text qualifier the guide imports the text in a table. The field delimiter is used to put data in to columns. |
 |
Press Next to go to step 3 in the import wizard. |
Step 3 of 3

| |
The fields available in the text file are placed in columns. Select a column to specify that it should be imported. |
| |
The selected column can have three different formats:
|
| |
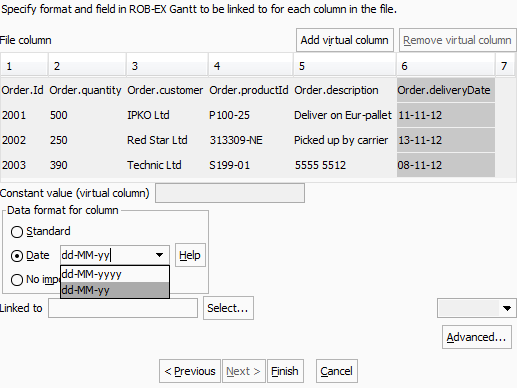 Enter a date format or select one of the default formats. Press Help for a list of symbols that can be used in the date format  |
| |
Select the field in ROB-EX the import field should be linked to: Press the button Select to open the Field chooser showing the available fields. Select a field and press Ok. |
 |
In some cases the import text file does not contain a column for a desired field in ROB-EX. To specify a default value to a missing ROB-EX field press the “Add virtual column” to put a constant value  in one of the fields in ROB-EX. The column is added at the end of the column list. in one of the fields in ROB-EX. The column is added at the end of the column list.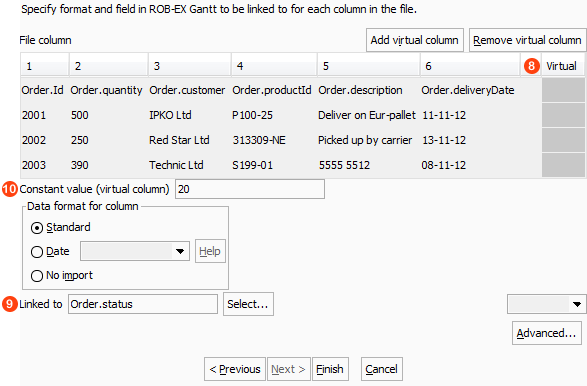 Select the new added virtual columns  , and select the field the value shall be linked to , and select the field the value shall be linked to  . .The example above will put “20” (Planned) as the orders state for all imported orders. |
 |
Press the Advanced button to specify decimal and grouping separator. |
 |
Press the Finish button to save the setup. Enter the filename for the template and an alias in the dialog. |
Note: , , and must be completed for all columns that need to be imported.
The import template is ready for use either in a macro as explained below or by manual execution as explained in the chapter Importing Data.
Using the Textfile Plugin macro and general settings
The auto detection settings will enable automatic import of CSV files when files have been changed. A file change could be that a new file is created in a specified directory or a named file is created or updated. To enable the automatic import create one or more macros using the “New” button and assign either a directory pattern or a named file the macro will monitor. Once the file(s) have been detected as changed the macro lines added to the macro will be executed.
By creating multiple macros the auto detection feature can monitor the change of multiple files in different locations.
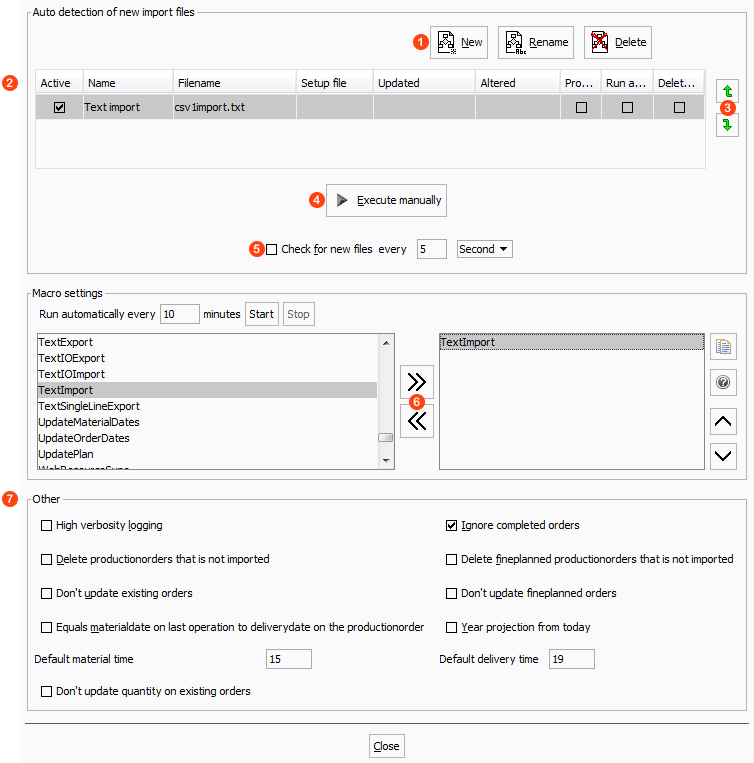
| |
Create, rename and delete macros. |
| |
Setting for the macro: import file name, template file name etc. The following paragraph is a guide in how to setup a macro Double click on a macro in the macro list in column “Filename” to select the file to be imported. If clicking “Open” in the file chooser when a directory is selected, you will be prompted to enter a file pattern. Alternatively press “Open” when a single file has been selected. In the Setup column double click the cell and navigate to a previously created setup file stored in the “custom” directory of your ROB-EX installation, e.g. f:\scheduler\planner\custom. The naming convention for the setup files are “timp_*.properties” |
| |
Change the order the macros are executed in. |
| |
Executes the selected macro. |
| |
Activates auto detection of new files at the specified time interval. |
| |
Add or remove macro commands to the macro. See Macro editing for details on available macro commands. |
| |
Options for the Textfile import in general. |
Importing data
When the setup of an import template is completed (please refer to the previous chapter Create a Template) import of text files is possible.
If not importing operations, then during the import ROB-EX will search for suitable master routes for the imported orders.
- If an imported order has the same product name as a route in ROB-EX, the imported order is connected to the route. The order is given the status “New” of no other status is imported.
- If there is not found a route in ROB-EX which has the same name as the product name of the imported order, the imported order is not connected to a route. The order will in this case be given the status “Incomplete”. The user must in those cases after import find a suitable route for the order before it can be planned. This is done from the order list by selecting Edit and then select a route for the order.
A text file is imported this way:
- Select “Import->Text file” in the Files menu.
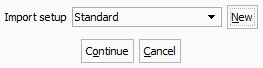
- In the window “Text import” select the name of an already created import template.
![]()
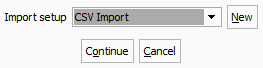
- Press the button Continue to start the import.
- Select the file to be imported in the window “Open import file” and press Open.
- The data from the file is imported into ROB-EX.
- Imported orders receives the status “Incomplete” or “New” if no other status is given.
Post your comment on this topic.