
The ROB-EX Batch module contains powerful features with high relevance for, as an example, the Food and Beverage industry, Chemical processing and Health and Pharmaceutical. In a few words this module contains features that can:
- create multilevel batch orders based on recipes and customer requirements
- during capacity scheduling split orders so they fit the physical equipment, i.e. storage tanks, bin sizes etc.
- automatically add CIP (Clean In Place) jobs based on equipment specific rules
- warn when shelf life of intermediate materials exceeds the predefined limit
Below is an overview of the features in the Batch module with links to more in depth information. Also the following contains a full example demonstrating how the most important features of the Batch module are configured and used.
The example is backed by configuration files and a ROB-EX demo plan for further self study and experimentation.
Main features of the Batch module
- Automatic order generation based on demands. See macro DemandSatisfier.
- Automatic tank planning based on tank capacities. See macro TankPlanning.
- Automatic CIP order generation based on CIP rules. See macro CreateCIP.
- Shelf life monitoring. It defines the age of a material and aims to avoid consuming a material which has been in stock for too long. The Shelf life feature depends on orders having been pegged. See macro Pegging.
Shelf life broken can be illustrated in two ways:- The color scheme Shelf life turns operations red Ãf they consume a material which has exceeded its shelf life – producing operations will turn yellow.
![]()
- The CheckShelfLife macro can be executed to generate a list of orders consuming a material which has exceeded its shelf life. Check preconditions in the manual – see below.
For further information see macro CheckShelfLife.
- The color scheme Shelf life turns operations red Ãf they consume a material which has exceeded its shelf life – producing operations will turn yellow.
- Break down orders to batches based on equipment limitations. See macro SplitOrderToBatches
- Manual tank planning. Split a producing operation based on warehouse space. See macro SplitOperationsByStorageSpace.
- Manual tank planning. Split producing and consuming operations based on warehouse space – and ensuring warehouse to be emptied. See macro SplitOperationsEnsureEmptyWarehouse
- Join multiple orders into one big order. See macro JoinOrders.
- Join operations which are split and delete linked CIP orders etc. See macro ResetSplit.
- With Batch some additional steps on the Operation is added: “Fill up time” and “Emptying time”. These timing values are used in a similar way to “Setup” and “Switchover” time and is used to model the transfer time when material is pumped from one tank to another tank. The fields are edited from the “Batch” tab on the edit operation dialog. If the operation is producing “Emptying time” can be illustrated as “max storage time” instead. See max storage

Basic example using IDS vs. Demand Satisfier Macro
This chapter will demonstrate the difference in using the demand satisfier macro and the interactive demand satisfier (IDS). It uses a simple plan with shipments of finished goods.
First you need to configure the IDS. This is done by clicking the IDS icon in the toolbar. Enter data regarding Analyzer Horizon, transaction type, material type, Satisfier method, etc. and click OK to save.
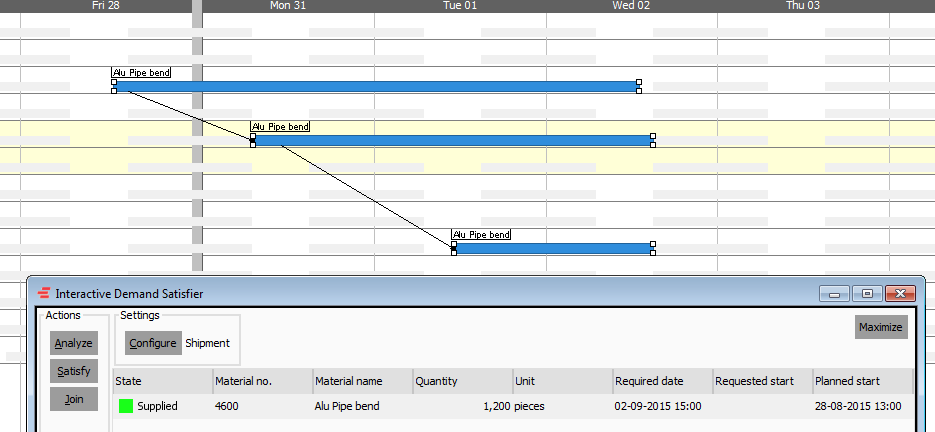
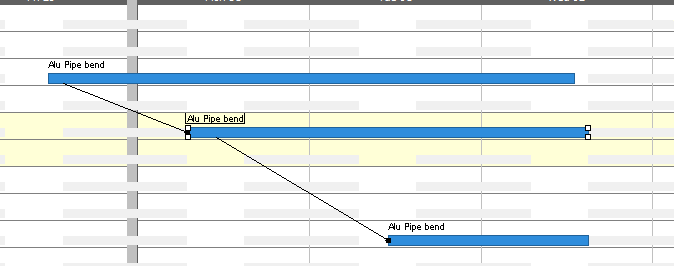
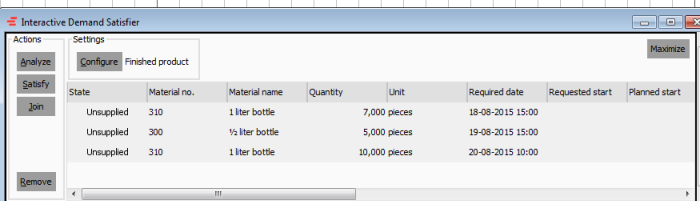
In the example below we have a shipment for the finished product Alu pipe bend to be shipped within the next 3 weeks.

By configuring the IDS to look for shipments within a 4 week horizon and with the materialtype = finished products the IDS returns this shipment when you activate the function Analyze demands.
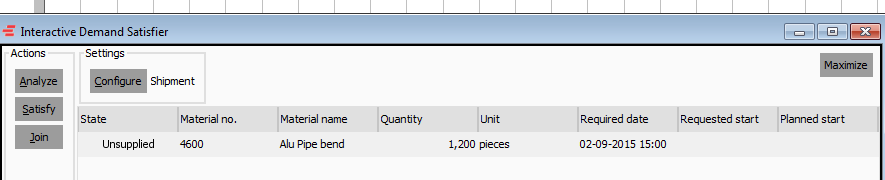
By choosing to Satisfy demands it will create the orders necessary to fulfill these shipments, taking into account the chosen planning strategy, the Satisfy settings for the IDS configuration etc.,
and the state of demand is changed from Unsupplied to Supplied.
Configuring the demand satisfier macro:
First you need to configure the macro. This is done by going to Function, Settings, Macro. Click Edit and Create new macro. Fill out the macro information accordingly.
Using the DemandSatisfier macro:
In the example below we have a shipment for the finished product Alu pipe bend to be shipped within the next 3 weeks.
By configuring the DemandSatisfier Macro to look for shipments within a 4 week horizon the macro then creates the orders necessary to fulfill these shipments,
taking into account the chosen planning strategy etc.
Differences between the IDS and the DemandSatisfier Macro.
As illustrated above the outcome is the same provided that the 2 methods are used under same circumstances and with same setup.
The difference being however that the IDS has more configuration options and shows you the demands to be met beforehand so that you may opt to exclude/include and/or
join the demands before satisfying these.
Example – advanced use of DemandSatisfier and TankPlanning macros.
This chapter will demonstrate the main features of the Batch module by following an example based on a simple milk processing factory (dairy). The examples includes
- Recipe based creation of process orders for the production of packaged and intermediate materials
- Splitting process orders into batch sizes that match the available equipment
- Adding CIP (Clean In Place) jobs
- Detailed forward schedule to actual equipment and storage tanks, using the version1 tank planning macro
Setting up the example
The plan with the example below (batchDemo.xml) can be found in the data/batchDemo folder in the ROB-EX client installation directory. Also important macros and further configuration
options are located in the data/batchDemo/custom folder ( ). To easily startup this plan with all the necessary configurations perform the following steps:
- Create a shortcut to “\bin\ROB-EX Gantt.exe”
- Add the following to the shortcut properties (copy/paste from below)
-Dscheduler.user.home="%USERPROFILE%\schBatchDemo" -Dscheduler.custom.dir=".\data\batchDemo\custom" en IE - Double click the shortcut to open the plan and click OK when asked to import configurations during startup
Example plan background and overview
In the example we will follow, the end product is packaged milk being packaged in different container sizes. The intermediate product is pasteurized milk. The challenges for the detailed
planning in this example are:
- Based on customer requirements the need for intermediate raw milk must be calculated. The production of the intermediate product must start well in advance to ensure adequate quantities
are available when packaging is scheduled to start. - Delivery times cannot be broken since a truck is typically waiting at a fixed point in time to pickup and deliver the milk to the end-customers
- The mix of end products vary a lot both by season, from week to week and even from day to day. So planning wise every day is potentially a new situation.
- The detailed scheduling needs to consider and take into account the different product dependent processing rates.
- Orders must be split into production batches that fits the different tank sizes
- Both processing equipment as well as storage tanks requires periodic cleaning (CIP). Only a limited no. of CIP equipments are available for the cleaning (in the example only a single CIP
equipment is available and must be shared between all processing and tank lines). - Named tanks and named packaging lines must be assigned to ensure a valid schedule that will execute without unexpected capacity shortage.
- The detailed scheduling must take equipments outage (e.g. maintenance) into consideration.
- The short shelf life of the products requires that the processing lead time through the factory is as short as possible.
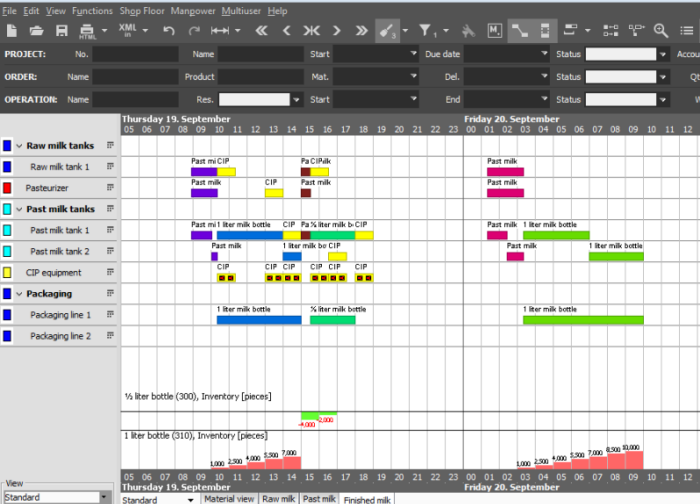
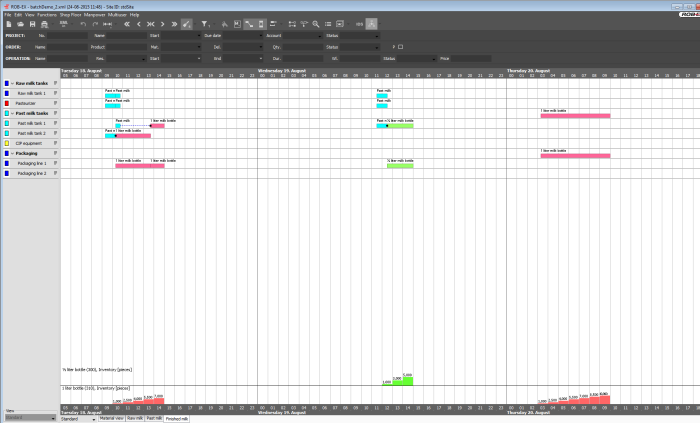
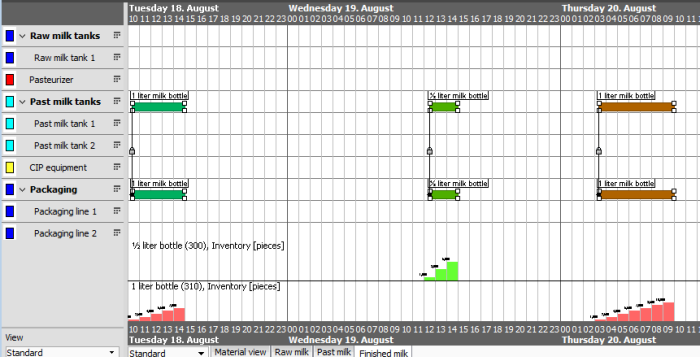
The end result of the steps outlined in this example are shown in the below picture. Orders in the Gantt chart have been generated and scheduled automatically based on customer requirements
(demands) entered or imported into ROB-EX as material shipments. The blue orders produce the intermediate material, pasteurized milk. The red and green orders are packaging orders consuming
the intermediate material. The yellow orders are CIP jobs, inserted whenever tanks have been emptied or whenever processing equipment (like the “Pasteurizer”) has been running without cleaning
for 20 hours.
By configuring the IDS to look for shipments within a 4 week horizon and with the materialtype = finished products the IDS returns this shipment when you activate the function Analyze demands.
By choosing to Satisfy demands it will create the orders necessary to fulfill these shipments, taking into account the chosen planning strategy, the Satisfy settings for the IDS configuration etc.,
and the state of demand is changed from Unsupplied to Supplied.
Configuring the demand satisfier macro:
First you need to configure the macro. This is done by going to Function, Settings, Macro. Click Edit and Create new macro. Fill out the macro information accordingly.
Using the DemandSatisfier macro:
In the example below we have a shipment for the finished product Alu pipe bend to be shipped within the next 3 weeks.
By configuring the DemandSatisfier Macro to look for shipments within a 4 week horizon the macro then creates the orders necessary to fulfill these shipments,
taking into account the chosen planning strategy etc.
Step 1: Creating process orders based on customer requirements
The following description is a step by step description of how the result above has been achieved.
To receive the result shown in the above example the macros DemandSatisfier have been used in combination with the the configuration explained in the following.
First start out loading the batchDemo.xml plan. Select a 5 day viewing horizon and move the Gantt chart so it has the same start date as shown in the picture below. Select the “Finished milk”
material view and notice how customer requirements have been imported into the ROB-EX plan as shipments. The demands are visualized as shown in the picture below.
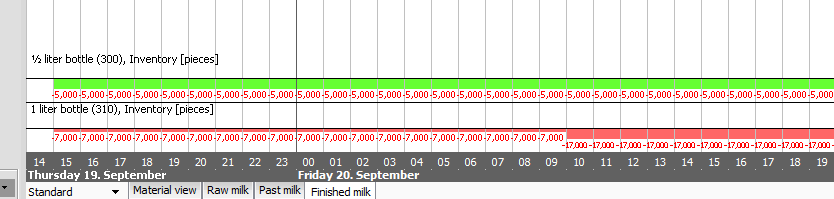
Three shipments have been created/imported. Two to ship “1 liter bottles”, where the first one is on 7000 pieces and the second one is on 10000 pieces. And one demand of
“ ½ liter bottles” of 5000 pieces.
With the customer requirements in place it is time to first generate process orders to fulfill the requirements. To perform this step, run the macro “1. Create Process Orders”
(the macro drop down list is available in the top toolbar on the far right side). This macro is configured to run the macro DemandSatisfier, which will analyze requirements for finished
products and meet these requirements by creating process orders with sizes matching the customer requirements (in this case filling orders on the “Packaging” lines are created).
The DemandSatisfier macro will also analyze previous BOM levels and create process orders for the intermediate product required by the filling orders. The result will look like shown below.
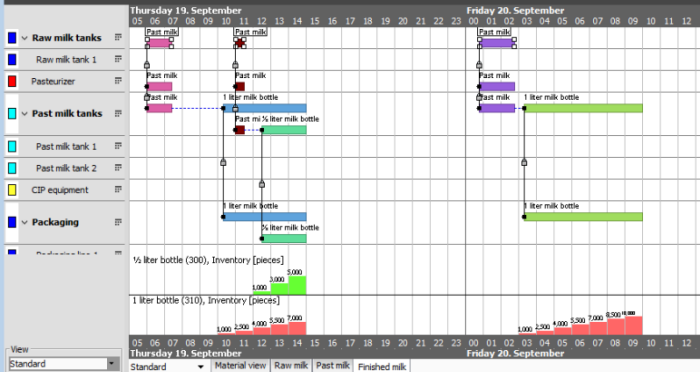
The result of running the macro is shown above. The red and green orders are packaging/filling orders consuming the intermediate material. Note that a filling order will occupy capacity
on both the packaging station and as well occupy the “Pasteurized milk tanks” group since a tank of this type will be occupied during the entire filling time. Also notice the blue dotted line
between the filling order and the intermediate order that produces the intermediate product. This connection symbolizes how material is reserved between intermediate and finished product orders.
Also notice the bottom inventory graphs, showing the projected development of the finished products. Notice how inventory builds up, up until the point where the shipment empties stock again.
A prerequisite for the DemandSatisfier macro is that template routes have been created with BOM lines producing the material for which customer requirements (shipments) have been imported.

I.e. the Packaging operation shown above has a producing BOM line of the 1 liter milk bottle in this case.

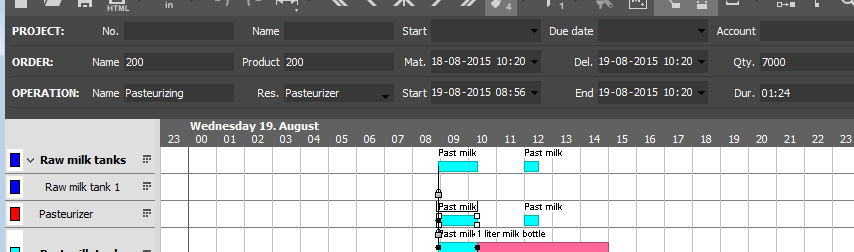
Correspondingly the “Past milk emptying” operation has a consuming BOM line consuming intermediate product “Pasteurized milk”. So this will be the demand for intermediate product.
Step 2: Adjusting batch sizes to fit the equipment
Now process orders have been created, the next step is to adjust the production batch sizes to fit on the available equipment. In our example from above, this means moving the tank operations
on the “Past milk” resource group down into actual tanks. While moving to actual tanks the original operations must be divided into sizes according to actual tank capacities.
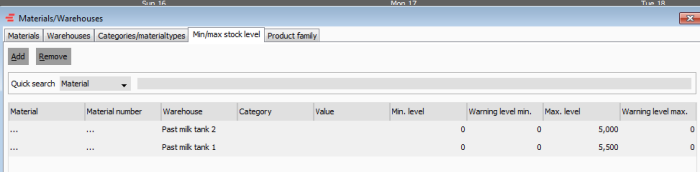
The amounts available in a tank are entered as a “Min/max stock level”. As shown below the “Past milk tank 1” can contain 5500 and “Past milk tank 2” can contain 5000.
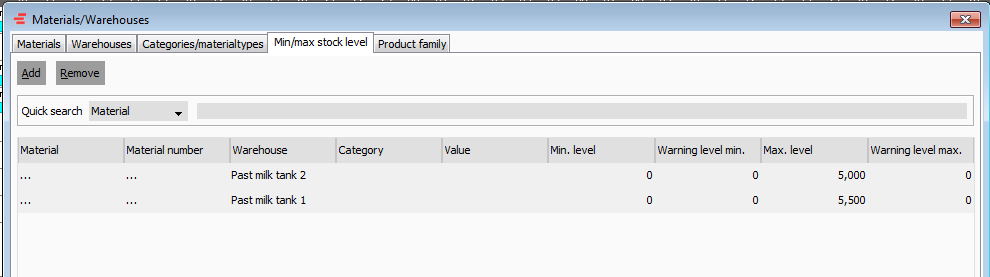
I.e. a production batch placed on tank “Past milk tank 1” must be adjusted in size to not exceed 5500 liters. In our example In that case the orders need to be broken down into smaller batches
because the “Past milk filling” operation produces 7000 liters, but the tanks (warehouses) to store the intermediate product can only contain respectively 5500 and 5000 liters.
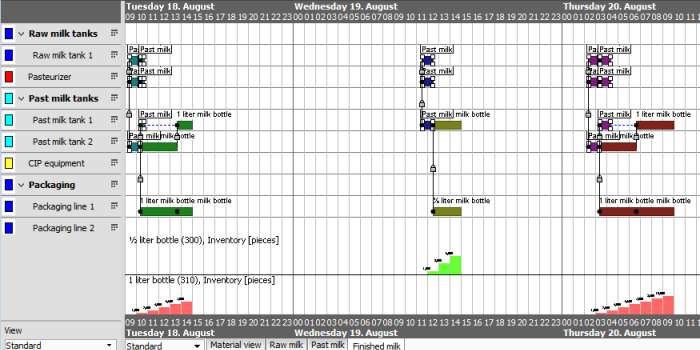
To execute “Tank Planning” run the macro “2. Tank Planning” from the macro drop down list in the top toolbar. This macro has been configured to auto-select the operations on the Raw Milk
Tanks group and then run a tank split on those. The result is that operations are moved from resource groups down to actual equipment and tanks. The original operations have been split into
sizes that matches the equipment.
The yellow operations are CIP orders. As it can be seen from the above picture, then CIP is planned once a tank has been emptied and before a new batch is started up. The actual CIP rule
is selected on the resource. I.e. for processing equipment the rule may be to clean with specified hourly intervals, as an example for every 20 hours. For tanks the rule is to clean every time the
tank is being emptied and also a CIP is generated in case the tank has been unused for 20 hours. For additional detail on the different CIP options see macro CreateCIP.
It is possible to manually move the intermediate pasteurization orders and following rerun the “1. Tank Planning” macro. The result is that a new planning of the tank-splits according to where
the pasteurization orders have been placed. I.e. it is a forward planning from the top material level – in this case pasteurization.
Advanced example using DemandSatisfier Macro with TankPlanning macro – version 2
Setting up the example
See above example and then load the plan batchdemo_2.
Example plan background and overview
See above example – advanced using DemandSatisfier macro in combination with TankPlanning macro – version 1.
End result using advanced using DemandSatisfier Macro with tankplanning version 2
The end result of the steps outlined in this example when using DemandSatisfier Macro with TankPlanning macro – version 2 will be the same as with using IDS, when the circumstances and preconditions are the same. It is merely a different way of going about the same tasks.
The end result is illustrated below. Orders in the Gantt chart have been generated and scheduled automatically based on customer requirements (demands) entered or imported into ROB-EX
as material shipments.
Step 1: Creating process orders based on customer requirements
The following description is a step by step description of how the result above has been achieved using DemandSatsifier Macro.
To receive the result shown in the above example the macros DemandSatisfier and TankPlanning have been used in combination with the configuration explained in the following.
First start out loading the batchDemo2.xml plan. Select a 3 day viewing horizon and move the Gantt chart so it start on Tuesday 18th August 2015. Select the “Finished milk” material view and
notice how customer requirements have been imported into the ROB-EX plan as shipments.
Three shipments have been created/imported. Two to ship “1 liter bottles”, where the first one is on 7000 pieces and the second one is on 10000 pieces. And one demand of “ ½ liter bottles”
of 5000 pieces.
With the customer requirements in place it is time to first generate process orders to fulfill the requirements. To perform this step, run the macro “DSM guide” (the macro drop down list is
available in the top toolbar on the far right side). This macro is configured to run the macro DemandSatisfier, which will analyze requirements for finished products and meet these requirements
by creating process orders with sizes matching the customer requirements (in this case filling orders on the “Packaging” lines are created).
The DemandSatisfier macro will also analyze previous BOM levels and create process orders for the intermediate product required by the filling orders. The result will look like shown below.
The result of running the macro is shown above. The red and green orders are packaging/filling orders consuming the intermediate material. Note that a filling order will occupy capacity on both
the packaging station and as well occupy the “Pasteurized milk tanks” group since a tank of this type will be occupied during the entire filling time.
Also notice the blue dotted line between the filling
order and the intermediate order that produces the intermediate product. This connection symbolizes how material is reserved between intermediate and finished product orders.
Also notice the bottom inventory graphs, showing the projected development of the finished products. Notice how inventory builds up, up until the point where the shipment empties stock again.
A prerequisite for the DemandSatisfier macro is that template routes have been created with BOM lines producing the material for which customer requirements (shipments) have been imported.
I.e. the Packaging operation shown above has a producing BOM line of the 1 liter milk bottle in this case.
Correspondingly the “Past milk emptying” operation has a consuming BOM line consuming intermediate product “Pasteurized milk”. So this will be the demand for intermediate product.
Step 2: Adjusting batch sizes to fit the equipment
Now process orders have been created, the next step is to adjust the production batch sizes to fit on the available equipment. In our example from above, this means moving the tank operations on the
“Past milk” resource group down into actual tanks. While moving to actual tanks the original operations must be divided into sizes according to actual tank capacities.
The amounts available in a tank are entered as a “Min/max stock level”. As shown below the “Past milk tank 1” can contain 5500 and “Past milk tank 2” can contain 5000.
I.e. a production batch placed on tank “Past milk tank 1” must be adjusted in size to not exceed 5500 liters. In our example In that case the orders need to be broken down into smaller batches because
the “Past milk filling” operation produces 7000 liters, but the tanks (warehouses) to store he intermediate product can only contain respectively 5500 and 5000 liters.
To execute “Tank Planning” run the macro “TP guide” from the macro drop down list in the top toolbar. This macro has been configured to auto-select the operations on the Raw Milk Tanks group and then
run a tank split on those. The result is that operations are moved from resource groups down to actual equipment and tanks. The original operations have been split into sizes that matches the equipment.
It is possible to manually move the intermediate pasteurization orders and following rerun the “TP guide” macro. The result is that a new planning of the tank-splits according to where the pasteurization orders have
been placed. I.e. it is a forward planning from the top material level – in this case pasteurization.
Advanced example using IDS
Setting up the example
See above example – advanced using DemandSatisfier macro in combination with TankPlanning macro – version 1.
Example plan background and overview
See above example – advanced using DemandSatisfier macro in combination with TankPlanning macro – version 1.
End result using IDS:
The end result of the steps outlined in this example when using IDS are shown in the below picture. Orders in the Gantt chart have been generated and scheduled automatically based on customer requirements (demands)
entered or imported into ROB-EX as material shipments.
Using IDS:
The following description is a step by step description of how the result above has been achieved using IDS.
To receive the result shown in the above example IDS and the macro TankPlanning have been used in combination with the configuration explained in the following.
First start out loading the batchDemo_2.xml plan. Select a 3 day viewing horizon and move the Gantt chart so it has the same start date as shown in the picture below.
Select the “Finished milk” material view and notice how customer requirements have been imported into the ROB-EX plan as shipments.
The demands are visualized as shown in the picture below.
Three shipments have been created/imported. Two to ship “1 liter bottles”, where the first one is on 7000 pieces and the second one is on 10000 pieces. And one demand of “ ½ liter bottles” of 5000 pieces.
With the customer requirements in place it is time to first generate process orders to fulfill the requirements. To perform this step, run the IDS to analyze for shipments of finished products.
Highlight and satisfy the demands (consider whether to join the demands first if appropriate), choose a scheduling operation and orders corresponding the demands will be created.
The result of running the IDS analyzing for shipment for finished products and satisfying these demands is shown above.
Next run the IDS to analyze for Consuming BOM-line, semifinished products, with Queuing enabled.
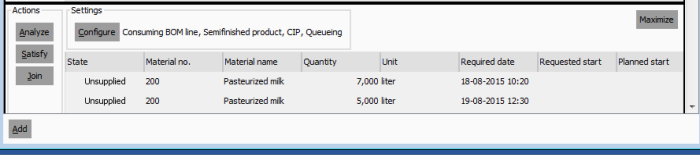
Highlight and satisfy the demands (consider whether to join the demands first if appropriate), choose a scheduling operation and orders corresponding the demands will be created.
The result of running the IDS analyzing for consuming BOM-lines for semifinished products is shown below.
Configuring the IDS
The IDS can be configured by pressing the ‘Configure’ button. It consists of three tabs – ‘Analyzer’, ‘Satisfier’ and ‘General’.
Analyzer tab
The analyzer tab keeps settings concerning the demands. Which types of demands to include, the period etc. A demand can be either a consuming order or a shipment transaction.
Satisfier tab
The satisfier tab controls the behavior of the created orders fulfilling the demands. It can be adjusted if they should be scheduled and which state they should be created in. If the ‘Schedule’ checkbox is checked the scheduling dialog will appear where a strategy can be selected – which will be applied on the newly created orders.
General tab
On the general tab a name and a description can be entered. If a name is entered that will be shown next to the ‘Configure’ button instead of all the selected parameters.
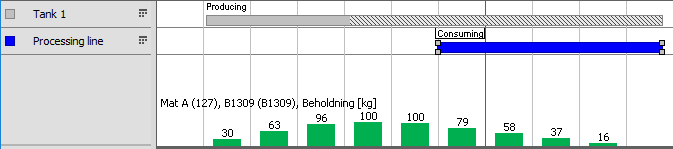
Max storage time
Max storage time can be illustrated on producing operations on warehouse based resources. It shows the shelf life / max storage time and when the warehouse is emptied.
Below illustration shows an operation producing material to the warehouse it is currently located on. The black extended part illustrates the shelf life / max storage time. It shows that the material can be used in that period. It also shows that the warehouse is never emptied within the max storage time period.

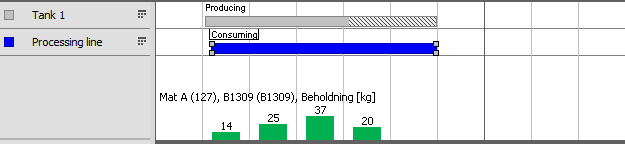
Below illustration shows that Tank 1 is emptied by the consuming operation. Thus the producing operation ends where it is emptied.
Here the consuming operation is moved to an earlier location so Tank 1 is emptied earlier.
How to setup and needed constraints:
- The operation must be the last one in the route
- The resource type must be a Storage tank. This is selected in Edit -> Resource
- The consumption method must NOT be linear over whole operation! Only linear over workload
- A warehouse must be linked to the resource. This is selected in Edit -> Resource. Warehouses must be created first
- It must have at least one producing BOM line, producing to same warehouse as linked to the resource. And it must not be disabled
- The consuming operations (transactions) must consume from the correct warehouse (the same as the producing produces to). Otherwise max storage time will not be refreshed.
Post your comment on this topic.