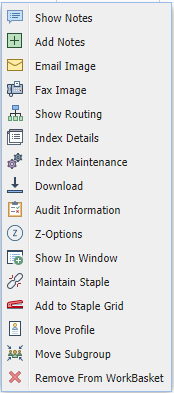
| Show Notes |
Display existing notes and add new notes.(Will only appear if notes exist.) |
| Add Notes |
Permits the user to type a note. If there is a note attached to an image, ![WorkBasket Notes Flag]() will appear at the left side of the index listing under the Flags column. will appear at the left side of the index listing under the Flags column. |
| Email Image |
Email the selected document. |
| Fax |
Contact RVI Support for requirements. |
| Show Routing |
Shows the sequence, route, date, and time associated with the routing event. |
| Index Details |
View the index values and file information associated with the document. This is an informational screen and does not permit the user to change any information displayed. If corrections need to be made, they must be accomplished using the Index Maintenance function. |
| Index Maintenance |
Permits the user to update the index information for the selected image. This option also allows for deletion of the document. |
| Download |
Save the selected document to local storage. |
| Audit Information |
Tracking the sequence of events associated with the document. |
| Z-Options |
Perform a user-defined function. Z-Options are setup on the IBM i. |
| Show In Window |
View the selected document(s) in a new window frame. |
| Maintain Staple |
Update an existing stapled bundle. Only appears when the record you are selecting contains the primary stapled document. |
| Add to Staple Grid |
Select a primary document then supporting documents from any system to the staple grid. Once all documents are in the staple grid the user can Finalize the staple process. Once the documents are stapled, if the primary document is viewed the system will automatically display the supporting documents that have been stapled.
(The staple grid is cleared automatically when the user logs off.) |
| Move Profile |
Move images to another routing profile if directed to this profile by mistake. When Move Profile is selected, the user will advance to the screen that prompts them to select the desired routing profile from a drop down list. This image will no longer be in this routing profile and no additional stops within the current routing profile will be active. The image will immediately enter into the first stop of the newly selected routing profile. Before this option is selected, be sure that you want to move the image to another profile as opposed to copying the image to another profile. |
| Move Subgroup |
Move the current image to a user defined subgroup within your workbasket. |
| Remove From WorkBasket |
Remove the selected record from the workbasket. |
| Back |
Return to the list of workbaskets. |
| Que Up For Approval |
Sequentially work all items in the workbasket routed for approval or disapproval. |
| Que Up For Batch Indexing |
Sequentially work all items in the workbasket waiting to be indexed. |
| Pop-A-Que |
Work items from a central routing queue. (Only available for users enrolled in Pop-A-Que.) |
| Records |
Number of items in the workbasket. |
| Display Options |
Includes: Display Checked Items allowing users to view all flagged items, Show Row Numbers to activate numerical designation of each row, and Grid To Excel to export the subfile list to an excel spreadsheet. |
| Workbasket Charts |
Graphical representation of a user’s workbasket with 4 options: Aged Items, Active-Forthcoming, Totals, and Approval History. Users can select from bar, pie, or line formats. |
| Back |
Return to the list of items in the current workbasket. |
| Email |
Email the selected document. |
| Index Details |
View the index values and file information associated with the document. This is an informational screen and does not permit the user to change any information displayed. If corrections need to be made, they must be accomplished using the Index Maintenance function. |
| Notes |
Permits the user to type a note and view existing notes. The icon will appear in red when a note exists. |
| Index Maintenance |
Permits the user to update the index information for the selected image. This option also allows for deletion of the document. |
| Approval |
Perform workflow approval on this item. |
| Remove From Basket |
Remove an item from your workbasket. When the current user is finished with the image, they must delete the image from their workbasket. This permits the next sequence number in this routing profile to access this image. |
| Package |
Displays a list of documents that make up the package. If there is a package and all documents in the package exists, ![Package]() will appear under the Flags column. If there is a package but some documents in the package are missing, will appear under the Flags column. If there is a package but some documents in the package are missing, ![Package Missing Documents]() will appear under the Flags column. View package documents by double-clicking the record. In the subfile list, missing items will be labeled (MISSING). (Button will only appear if a package exist.) will appear under the Flags column. View package documents by double-clicking the record. In the subfile list, missing items will be labeled (MISSING). (Button will only appear if a package exist.) |
| Audit Information |
Includes View, Workflow, and Approval audit. Display the history of the item including view, print, email, change, route, fax, cd, and signature requests. |
| Routing |
Send the image to another Profile or User. |
| Move Subgroup |
Move the current image to a user defined subgroup within your workbasket. |
| Move Profile |
Move images to another routing profile if directed to this profile by mistake. When Move Profile is selected, the user will advance to the screen that prompts them to select the desired routing profile from a drop down list. This image will no longer be in this routing profile and no additional stops within the current routing profile will be active. The image will immediately enter into the first stop of the newly selected routing profile. Before this option is selected, be sure that you want to move the image to another profile as opposed to copying the image to another profile. |
| Call Back |
Enter a target date that will trigger a future notification of an event that needs to occur and a descriptive message for the notification. If a call back reminder exists, ![Call Back Exists]() will appear under the Flags column. If the call back is currently due, will appear under the Flags column. If the call back is currently due, ![Call Back Currently Due]() will appear. If the call back is overdue, will appear. If the call back is overdue, ![Call Back Overdue]() will appear. will appear. |
| Download |
Save the selected document to local storage. |
| Return To Sender |
Return the document to the previous user in the routing sequence. This option will only appear if it can be determined that there is a previous user in the routing sequence. |
| Attach Document |
Choose a file(s) to attach to the existing document on display. Once a file is attached, it will be stapled to the primary document. |
![Workbasket Image Inquiry Right-Click Toolbar]()
 will appear at the left side of the index listing under the Flags column.
![Workbasket Inquiry Toolbar]()
![Workbasket Image Display Toolbar]()
 will appear under the Flags column. If there is a package but some documents in the package are missing,
  will appear under the Flags column. View package documents by double-clicking the record. In the subfile list, missing items will be labeled (MISSING). (Button will only appear if a package exist.)
 will appear under the Flags column. If the call back is currently due,
  will appear. If the call back is overdue,
  will appear.


Post your comment on this topic.