Each user logging into One Look must have a valid internet user id and password.
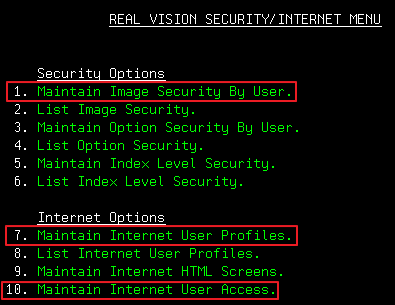
These instructions and results are based on the assumption that you are setting up a new internet user that does not currently exist under IBMi RVI Security/Internet Menu Options 1 Maintain Image Security By User, 7 Maintain Internet User Profiles, or 10 Maintain Internet User Access.
 |
Setting up One Look users using the IBM i Client
From an IBM i command line, type GO IMAGE
Option 1: Allow access ONLY to ALL unsecured systems:
- Select 11: Security/Internet Menu
- Select 7: Maintain Internet User Profiles
- F9 = Add User
- Specify an Internet User Id and Password
- Press < Enter >
Option 2: Allow access to ONLY specific secured systems:
- Select 11: Security/Internet Menu
- Select 10: Maintain Internet User Access
- F9 = Add User
- Specify an Internet User ID, Password and secured System ID
- Press < Enter > until you return to the Internet Profile Maintenance Screen
- F3 = Exit
- Select 1: Maintain Image Security By User
- Scroll to the bottom of the table
- Under the User ID column, specify the internet user id
- Under System ID Code column, specify the secure system id you created in Steps 1-5
- Press < Enter >
Steps 1 – 11 must be repeated for EVERY secured system id the user will need to access.
Option 3: Allow access to a combination of specific secured and unsecured systems:
- Select 11: Security/Internet Menu
- Select 10: Maintain Internet User Access
- F9 = Add User
- Specify an Internet User ID, Password and System ID
- Press < Enter > until you return to the Internet Profile Maintenance Screen
- F3 = Exit
Steps 1 – 5 must be repeated for EVERY system id (secured and unsecured) the user will need to access.
For all secured systems specified in Step 4, continue to Step 7.
- Select 1: Maintain Image Security By User
- Scroll to the bottom of the table
- Under User ID column, type the internet user id
- Under System ID Code column, specify the secured system id
Steps 7 – 10 must be repeated for EVERY secured system id the user will need to access.
Option 4: Allow access to ALL unsecured systems and SPECIFIC secured systems:
- Select 11: Security/Internet Menu
- Select 7: Maintain Internet User Profiles
- F9 = Add User
- Specify an Internet User Id, Password and unsecure System ID
- Press < Enter >
- F3 = Exit
- Select 1: Maintain Image Security By User
- Scroll to the bottom of the table
- Under the User ID column, specify the internet user id
- Under System ID Code column, specify the secure system id
- Press < Enter >
Steps 7 – 11 must be repeated for EVERY secured system id the user will need to access.


Post your comment on this topic.