To watch a video on this topic CLICK HERE
The user can sequentially work all images in the workbasket that have been routed for indexing.

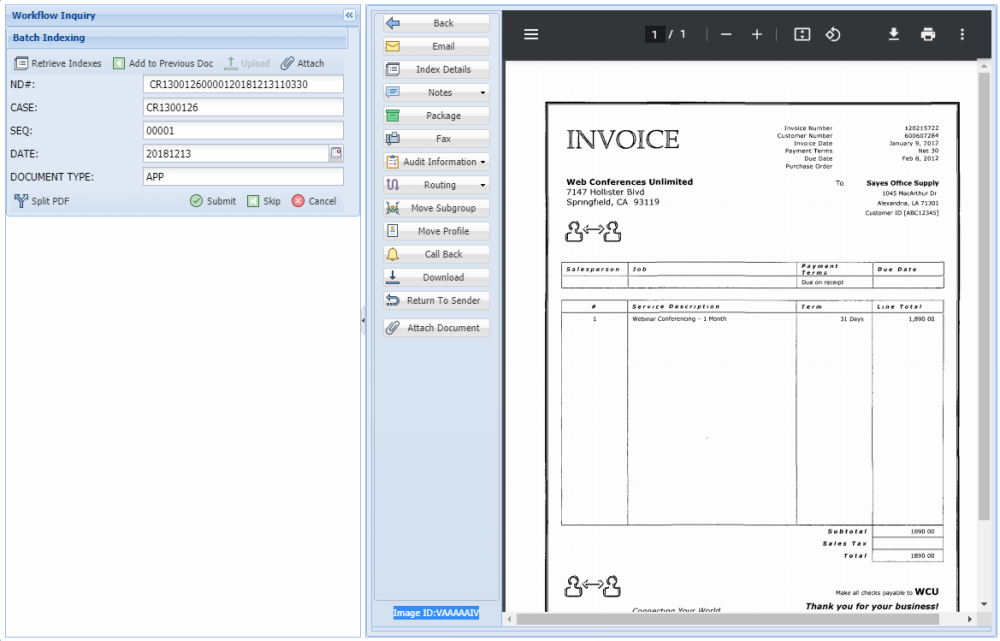
When the Queue Up For Batch Indexing option is selected, the user will see the entry screen above.
| Retrieve Indexes: | Used to retrieve index information from a customer’s database. Custom Feature Will only appear for customers specifically setup for this feature. Contact RVI Support for details on integrating this feature. |
| Add to Previous Doc: | Append the document in the window with the previously indexed document. |
| Upload: | Move the document selected during the Attach process to the RVI system. The Upload button will become active once the Attach option is used.The newly attached document will be available for viewing immediately after the upload. |
| Attach: | Add additional documents to the currently displayed document using the browse import feature. Select  to attach and move the document into the RVI system. to attach and move the document into the RVI system. |
| Indexes: | Automatically passed but changeable. If corrections need to be made the user can type over the existing values. |
| Submit: | Click Submit to complete the process. This will process the information and place the next available image into the window. |
| Skip: | Ignore the image in the window and hold it in the queue for future action. |
| Cancel: | Close the indexing window and return the image to full screen. |
| Back: | Return to the list of images available for batch indexing. |
| Email: | Email the selected document. |
| Index Details: | View the index values and file information associated with the document. This is an informational screen and does not permit the user to change any information displayed. If corrections need to be made, they must be accomplished using the Index Maintenance function. |
| Notes: | Permits the user to type a note and view existing notes. |
| Package: | Displays a list of documents that make up the package. Missing items will be labeled (MISSING). If there is a package,  will appear under the Flags column. View package documents by double-clicking the record.(The Package icon is only present when a package is setup.) will appear under the Flags column. View package documents by double-clicking the record.(The Package icon is only present when a package is setup.) |
| Fax: | Contact RVI Support for requirements. |
| Audit Information: | Includes View, Workflow, and Approval audit. Display the history of the item including view, print, email, change, route, fax, cd, and signature requests. |
| Routing: | Send the document to another Profile or User. |
| Move Subgroup: | Move the current image to a user defined subgroup within your workbasket. |
| Move Profile: | Move images to another routing profile if directed to this profile by mistake. When Move Profile is selected, the user will advance to the screen that prompts them to selected the desired routing profile from a drop down list. This image will no longer be in this routing profile and no additional stops within the current routing profile will be active. The image will immediately enter into the first stop of the newly selected routing profile. Before this option is selected, be sure that you want to move the image to another profile as opposed to copying the image to another profile. |
| Call Back: | Enter a target date that will trigger a future notification of an event that needs to occur and a descriptive message for the notification. If a call back reminder exists,  will appear under the Flags column. If the call back is currently due, will appear under the Flags column. If the call back is currently due,  will appear. If the call back is overdue, will appear. If the call back is overdue,  will appear. will appear. |
| Download: | Ability to save a PDF copy of the document. Users will be prompted to Open, Save, Save As, Save and Open, or Cancel. |
| Return To Sender: | Return the document to the previous user in the routing sequence. This option will only appear if it can be determined that there is a previous user in the routing sequence. |
| Attach Document: | Choose a file(s) to attach to the existing document on display. Once a file is attached, it will be stapled to the primary document. |


Post your comment on this topic.