
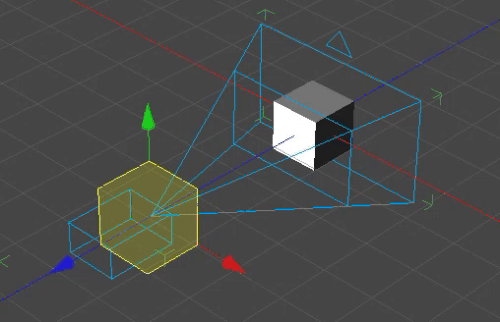
Cameras in SHAPE emulate cameras from the real world. These can be used to scout out viewpoints or for Visualizer points of view.
To Add a Camera go to:
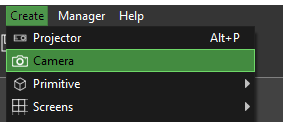
Menu Bar -> Create -> Camera
In the Scene hierarchy panel, Cameras have toggle options for blend, show objects, colour, visible in scene and lock.

![]() Enable: Toggle on/off rendering to output
Enable: Toggle on/off rendering to output![]() Visibility: Toggles the visibility of the projector in the scene viewport
Visibility: Toggles the visibility of the projector in the scene viewport![]() Show Objects: Toggles Camera output on/off
Show Objects: Toggles Camera output on/off![]() Blend: Toggles blend on/off
Blend: Toggles blend on/off![]() Colour: Choose a colour to visualise the projector wireframe and coverage.
Colour: Choose a colour to visualise the projector wireframe and coverage.![]() Lock: Locks all properties to stop unwanted or accidental changes.
Lock: Locks all properties to stop unwanted or accidental changes.
 Enable: Toggle on/off rendering to output
 Visibility: Toggles the visibility of the projector in the scene viewport
 Show Objects: Toggles Camera output on/off
 Blend: Toggles blend on/off
 Colour: Choose a colour to visualise the projector wireframe and coverage.
 Lock: Locks all properties to stop unwanted or accidental changes.
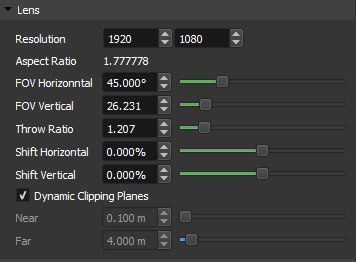
Lens
- Resolution: Resolution of the Camera
- Aspect Ratio: The aspect ratio of an image describes the proportional relationship between its width and height.
- FOV Horizontal: In SHAPE, field of view (FOV) is a term used to calculate the angle of the camera view. It is measured in degrees. You will notice if you change the FOV the Throw Ratio will change, this is because they are directly related.
- FOV Vertical: In SHAPE, field of view (FOV) is a term used to calculate the angle of the camera view. It is measured in degrees. You will notice if you change the FOV the Throw Ratio will change, this is because they are directly related.
- Throw Ratio: Throw Ratio refers to the ratio of the distance to the model to the width of the camera image. The larger the number the tighter the angle.
- Shift Horizontal: Changes the Horizontal Lens Shift.
- Shift Vertical: Changes the Vertical Lens Shift.
- Dynamic Clipping Planes: With this enabled, Clipping Planes, Near and Far will automatically set themselves.
- Near: This sets the closest plane camera will begin to render.
- Far: This sets the furthest plane camera will stop rendering.
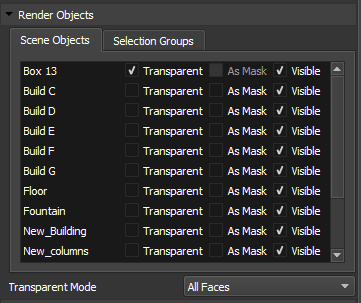
Render Objects
This panel lets you decide if you want objects to render as:
- Transparent: Allows content with alpha on that object to appear transparent from that camera.
- As Mask: Make the object render black essentially creating a 3D mask.
- Visible: Make the object visible in the scene
The Selection Group tab allows you to apply, Transparent, As Mask or Visible to every object in the Selection Group. Which is extremely useful when your project has 1000’s of objects.
Transparent mode will change how objects rendered with Transparency are treated, there are 3 options:
- Front Face Only: Only renders the faces which are visible to the camera and applies alpha to those faces, faces not visible to the camera do not get rendered
- Front Face Alpha Based: Renders all faces starting with the Front Faces and calculates alpha if the value is greater than .001 to reveal the back faces/ objects behind.
- All Faces: Renders all faces with alpha. Sometimes the back faces will get rendered on top of the front faces which can be undesirable so this mode should be used with caution.
 |
 |
 |
Statistics
- Models: Number of models the camera can see and is rendering.
- Vertexes: Number of Vertexes the camera can see and is rendering.
- Faces: Number of Faces the camera can see and is rendering.
Target

- Target: Choose an object for the Camera to always point at.
Output Properties
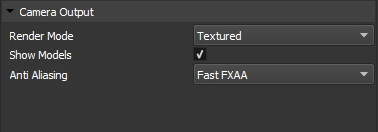
- Render Modes: Each projector can have different render modes. Textured will show video content from the Hippotizer. See below for reference
- Show Models: Toggles the visibility of objects on the output
- Anti Aliasing: Allows for Anti Aliasing to be set for projectors rendered output. None, Fast FXAA, FXAA
Render Modes
 |
 |
 |
 |
 |
 |
 |