User← Make Inactive and Reinitialize future shifts | People: Why Not? – Understanding Non Matches →
Add User
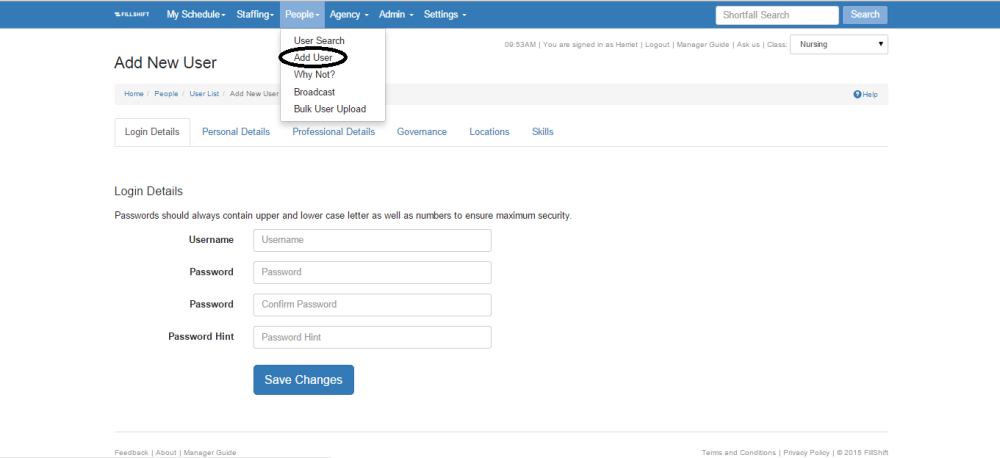
On the People tab, the Add User page is where you add new Users to the ShiftMatch System.
To add a new User:
- Complete the User’s Login Details, including:
- Username – the name the person will use to login to the ShiftMatch System, generally based on a pre-defined naming convention
- Password – the password the User will need to login to the ShiftMatch System. Entered twice.
- Password Hint – the hint that will be emailed to the User for a forgotten password
- Complete the User’s Personal Details, including:
- Cell phone number – while not mandatory, the User’s cell phone is the primary source of communication from ShiftMatch
- Email address – while not mandatory, the User’s email is the secondary source of ShiftMatch communication after the User’s cell phone
- First Name and Last Name
- Address
- Complete the User’s Professional Details including:
- Active – determines whether the User is active in the ShiftMatch System (after 12 weeks as inactive, the User moves to the archives)
- Date of Hire/Date of Termination Can now be added to a profile. Contact your ShiftMatch representative to have this function turned on.
- Experience Allowance (if applicable) – set only with the use of shift rate; determines extra pay rate. Rarely used.
- Limit Hours – sets the maximum number of hours the User can work per pay period. Set at 0 if no limit required
- Grading – the job grade associated to the User; the key variable in matching a User to a shift Shortfall
- Employment Type – the User’s employment type (eg: typically Full Time, Part Time or Casual)
- Class – the class associated to the User; used to further differentiate worker classification
- Role Type – the ShiftMatch role associated to the User; determines which ShiftMatch access and functions are available to the User
- Rating – a variable that may further differentiate worker classification (if not used, leave at Level 1)
- Additional Text – notes you want associated with the User
- Show Dept Location – whether or not you want the User to see Dept (Level 4) Locations
- Default Auto Accept to be on – if checked, the User will no longer receive a shift request message that requires a response.
Instead, when a shift request matches the User’s availability, they will simply receive a confirmation text that confirms the relevant details. - Pools – the pool(s) associated to the User; used to further differentiate worker classification
- Complete the User’s Governance Details including, for example:
- Registration # – the User’s professional registration number, if applicable
- Renewal – the renewal date for a specific certification (the date will trigger renewal reminders and ultimately suspend the User from the ShiftMatch System once expired).
- Complete the User’s Locations including:
- Locations – the locations the User can work (if the location is unchecked, the User will not see the location in the My Locations section – effectively preventing any Shortfall requests and matches)
The list of Locations is pre-set by Management, see Settings > Locations for more.
- Complete the User’s Skills including:
- Skill – specific industry skill(s) held by the User
The list of Skills is pre-set by Management, see Settings > Skill Grouping for more.
Click the “Save Changes” button at the bottom of the page.
The new User will now be added to the ShiftMatch System.
Next Topic: People: Why Not? – Understanding Non Matches →


Post your comment on this topic.