
Notifications can be sent to the user in the form of a message to inform the user about a situation.
There are two ways to create notifications:
1. From the Open Application tree, select the “Notification” sub-key in the “Integration” section

2. Go to the process designer
Select an activity in the Process Diagram section and then select “New”, “Edit” or “Delete” to set up or modify the notification using the notification button.
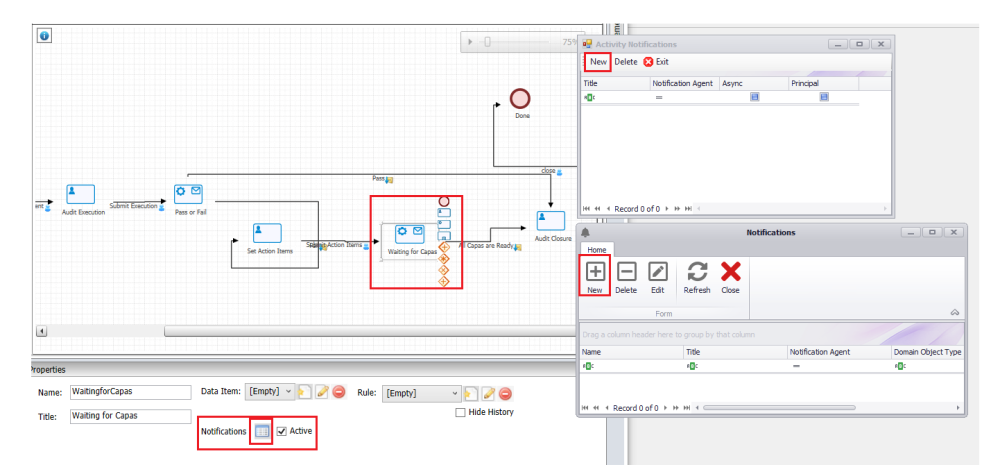
The following steps detail how to execute a notification:

Step 1: Select the required activity in the process design and press the  button in the properties panel.
Step 2: An “Activity Notifications” form will be displayed. To add a new notification, press the  button.
Step 3: Select “New” , “Delete” or Edit to manage the defined notifications in the list.
Step 4:Finally,select the  button next to the notification in the properties.
Select the New button in the notifications manager to bring up a menu where the user can define the details of the notification.

1. Name
The name of the notification can be specified in this field.
Note: The given name must follow C# naming conventions, or else an error message will be displayed when attempting to save.
2. Title
The title can be specified and will be displayed in other parts of the application as well.
3. Entity
When creating a notification, it is mandatory to specify its associated entity; select the associated entity from the drop-down list.
4. Subject Data Item and Body Data Item
Specify the Subject and Body templates of the Notification Agent here.
The title and text of the notification message are specified in the template.
New  : create a new template and connect it to the selected notification.
Edit ![]() : edit the selected template.
: edit the selected template.
Delete ![]() : button, delete the selected template.
: button, delete the selected template.
5. Notification Agent
Here you can select the type of notification that the user will receive.
Default: By choosing this type of notification, the message will be sent using the declaration type specified in the Admin.exe for that user.
E-mail: By choosing this type of notification, the message will sent to the user in the email specified in Admin.exe. (Activate email settings )
Automation Message: By choosing this type of notification, an automated message will be sent to the authorizing office. (Enable Plugin settings )
SMS: By choosing this type of notification, the message will be sent as a text message to the number specified in Admin.exe for that user. (Enable Sms settings)
Transcript: By selecting this type of notification, the “Tasktype” box will be activated to select the task to send the transcript.
6. Recipients
To send a notification to another user, use this  button; select the attribute containing the username.
Note: The selected attribute in this box should be linked to the users table in the list of entities.
7. Task Principals
If this option is selected, the notification will also be sent to the Task Principals in the process.
8. Task Type
After choosing the “Transcript” notification type, by selecting or defining the task in this box, the message in the form will be sent to the designated responsible person in the task.
Note: sent in the form of a declaration is a form for which the entity and form behavior are specified in the task.
Note: In this list, only the tasks defined in the notification form are displayed.
Select this button to create a new task and save it to the selected notification.
Select this button ![]() to edit the selected task.
to edit the selected task.
Select this button ![]() to remove the notification from selected task.
to remove the notification from selected task.
9. Save
Select this  button to save and add the notification to the notification list.