
NOTE: Before your Wireless neuroTHERMAL can be used, you must first pair it to your computer.
How to turn on/off your Wireless neuroTHERMAL
To turn on your Wireless neuroTHERMAL, press the orange trigger. When the Wireless neuroTHERMAL is on but not connected to the myINSiGHT™ Software, the LEDs will sweep back and forth. When the software connects to the Wireless neuroTHERMAL, the LEDs will remain solid indicating that the unit and computer are communicating. To turn off your Wireless neuroTHERMAL, simply press and hold down the orange trigger for three to five seconds. Note that the unit can only be powered down when it is not connected to the MyINSiGHT™ Software.
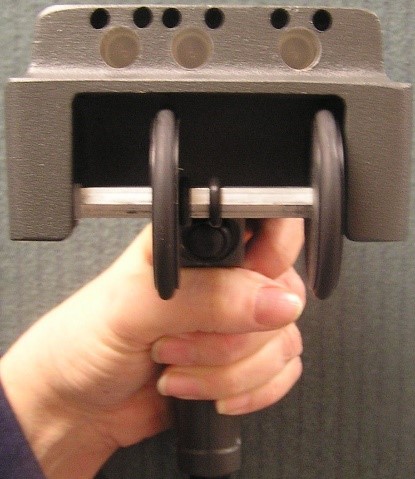
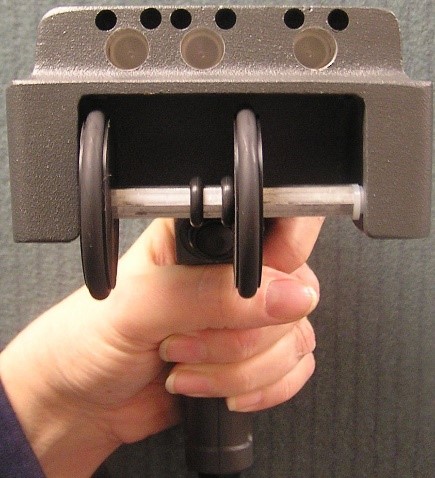
How to adjust the neuroTHERMAL for different sized spine
The T2 and T3 neuroTHERMALs have two non-contact thermal sensors. One is pointed to the left of the spine and the other to the right of the spine. The sensor placement can be adjusted to one of three positions to match the size of the patient.

Each of these sensors is housed in the black adjustable housings at the front of the device. There are three locators on the housing to adjust the sensors into one of three standard positions.
Each sensor is held into place by an adjustment thumbscrew, which is located on the underside of the sensor. To adjust the sensor position, simply loosen the thumbscrew by turning it counterclockwise. Slide the housing into the desired position and retighten the thumbscrew. The “adult” position is achieved by placing both housings into the outermost position. The “infant” position is achieved by placing both housings into the innermost position. The “child” position is achieved by placing both housings in the center position. Each of these positions is shown in the picture above.
The T1 scanner has three sensors: left, right and center. The T1 sensor does not have thumbscrews. The wheels simply snap in place. Press against the wheels with moderate pressure to slide them along their axle and snap them into the correct position for the body type.
| + Adult Mode+ | Child Mode | Infant Mode |
| The RIGHT hole is the one on the left side in the pictures below, the CENTER hole is right next to the RIGHT hole, the LEFT hole is by its self on the right side of this screen shot. In Adult Mode, the Left wheel in beside the Left hole and the Right Wheel is beside the Right hole. | In Child Mode, the Right wheel is slid to the center and now sits between the Right and Center holes. The Left Wheel stays by the Left hole. | In Infant Mode, the Left Wheel is slid to the center and now sits between the Left and Center holes. The Right Wheel stays by the Right hole. |
 |
 |
 |
How and why to use the optional plastic “eyebrows”
Two optional plastic inserts (the “eyebrows”) for your thermal scanner have been included with your system. Some clients have found the eyebrows useful in taking thermal measurements within the hairline of the upper cervical spine. The eyebrows help to clear a path through a patient’s hair. If you decide to use the eyebrows, the goal is to not touch the skin with them until you reach the hairline.
To install the eyebrows, first locate the holes above each of the sensors on the black housings. To insert an eyebrow, first squeeze it between your thumb and forefinger, and then push the eyebrow into the two holes above the sensor. If you do not wish to use the eyebrows, simply remove them.
Begin scanning with the eyebrows just above the skin. When you reach the hairline, gently press the eyebrows down on the skin to displace the hair. You can also use the eyebrows as locators to scan left and right C1.
How to care for your neuroTHERMAL’s Wheels
The neuroTHERMAL wheels can be wiped along the edge with an alcohol dampened cloth or swab.
How to charge your Wireless neuroTHERMAL
Your Wireless neuroTHERMAL includes a cable that is used to charge the unit’s internal battery. To charge the unit, plug one end of the cable into the jack at the end of the scanner’s handle and the other end into any USB port on your computer. A status LED indicates when the unit is charging by lighting yellow. When the unit is fully charged, the LED will be green. Note that the unit cannot function when the charging cable is connected, so it is important to always have the battery charged to a sufficient level to be used during scanning. The on-screen battery monitor will indicate the level of battery charge remaining.