Open the task pad and click the red Rolling Thermal Icon to open the Rolling Thermal Scan Screen.
Then select an existing patient from the list or add a patient using the Patient Window shown below.

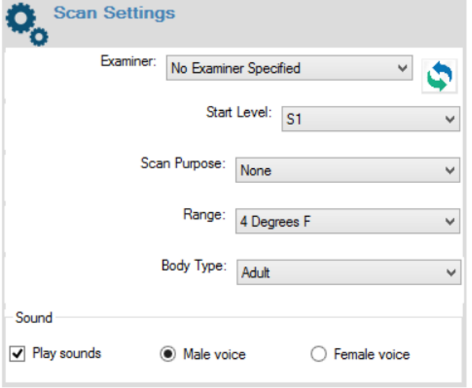
Before you begin the scan, verify that the settings are correct. For a Rolling Thermal Scan this includes selecting an Examiner and Sound settings as you do with the other scan types. But there are also several settings unique to the Rolling Thermal scan:

Start Level: The Rolling Thermal scan by default begins at S1. You can, however choose to begin at a level higher than S1, up to C2. If you choose a level higher than S1, the scan will not be eligible for a scan score or be included in a CORESCORE™ or CORESCORE™+.
Scan Purpose: You can note a purpose for the scan. Be default this is none, but you can mark the scan as:
- Pre: Marks the scan as performed prior to the patient receiving chiropractic care.
- Post: Marks the scan as performed after the patient was under Chiropractic care.
- Comparative: Marks the scan to be compared to another scan or set of scans.
Range: Setting the range does not affect the values of the readings, but it changes the min and max displayed on the real-time graph.
Body Type: Select Adult (default), Child or Infant. You must also adjust the wheels of your scanner, as described in the section below. Note that this is critical to obtaining valid temperature readings.


