Specify the desired location for saving the project and the filename, and select the file type 3D DWG (.dwg) in the Export Dialog window, then click ‘Save.’
Now, the “Transformations window” will open. Select any desired transformations and click ‘OK’ to proceed.’
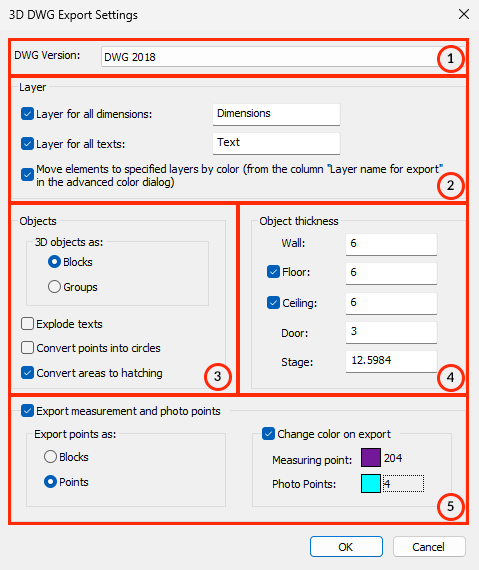
1. DWG Version
Here, the DWG version of the file that would be exported can be selected.
2. Layers
Layer for all dimensions: Optionally define a layer for all dimensions to be assigned during export
Layer for all text: Optionally define a layer for all text elements during export. _Note: Exploded text is no longer text and, therefore, not transformed by this option.
Convert layer names to numbers (e.g., for TopSolid): Layer names can be converted to numbers for software such as TopSolid that does not like long layer names. The number specified is the beginning number.
Move elements to specified layers by color (from the column ‘Layer name for export’): With this option, elements are assigned to the layer name based on the table in the Advanced Color Dialog.
3. Objects
3D objects as:
Blocks: a collection of objects that are combined into a single named entity.
Groups: a collection of objects grouped together temporarily for easier manipulation.
Explode texts: Texts will be exploded to polylines, not text elements. It is only used for exporting to software that does not recognize text elements.
Converts points into circles (Solidworks): All points will be transformed into circles during export. It is useful for software that does not recognize points.
Convert areas to hatching: Convert Face objects to Solid Hatch during export.
4. Object thickness
Wall: Add a specific thickness to all walls in the project.
Floor: If selected, this transformation will add a thickness to the floor drawing.
Celling: If selected, this transformation will add a thickness to the floor drawing.
Door: Add a specific thickness to all the doors in the project.
Stage: Add thickness to the stages of the project.
5. Export measurement and photo points
Export points as: Points can be exported as Blocks or Points
Color of exported points: The color of exported measurement points and the photo points can be changed here.
When clicking ‘OK’ the file will be exported to the specified location.


Post your comment on this topic.