
Quick Start/Tutorial 2 Video
Here is a (5 minute) video that goes through all the steps listed bellow:
Identify New Test Case
Lets create our own Amazon test case and make it more interesting by modifying existing action step:
- Open Browser and navigate to www.amazon.com
- (modify action) Select ‘Books’ for search department drop down and search for ‘Dune paperback’
- Select first item that appeared by index
- Add the item to cart
- Verify item was added to cart
Modify Action
We already have an amazon action created called ‘Search Amazon’ but what is missing is selecting a department from drop down next to the text field before clicking on Go. Since this department drop down selection logic belongs to search event we’ll be modifying ‘Search Amazon’ action instead of creating a new one.
- Click on Actions tab
- In left pane double click on ‘Search Amazon’ action, which can be found in multiple ways:
- Type in word ‘search’ in a text field above drop down with value ‘ALL’ to filter out
- On bottom of left pane click on ‘Actions Tree’ and expand ‘amazon’ or ‘search’ tag to see the action under them - Add a new parameter to opened ‘Search Amazon’ action in the right pane:
- Click on ‘Add Parameter’ button
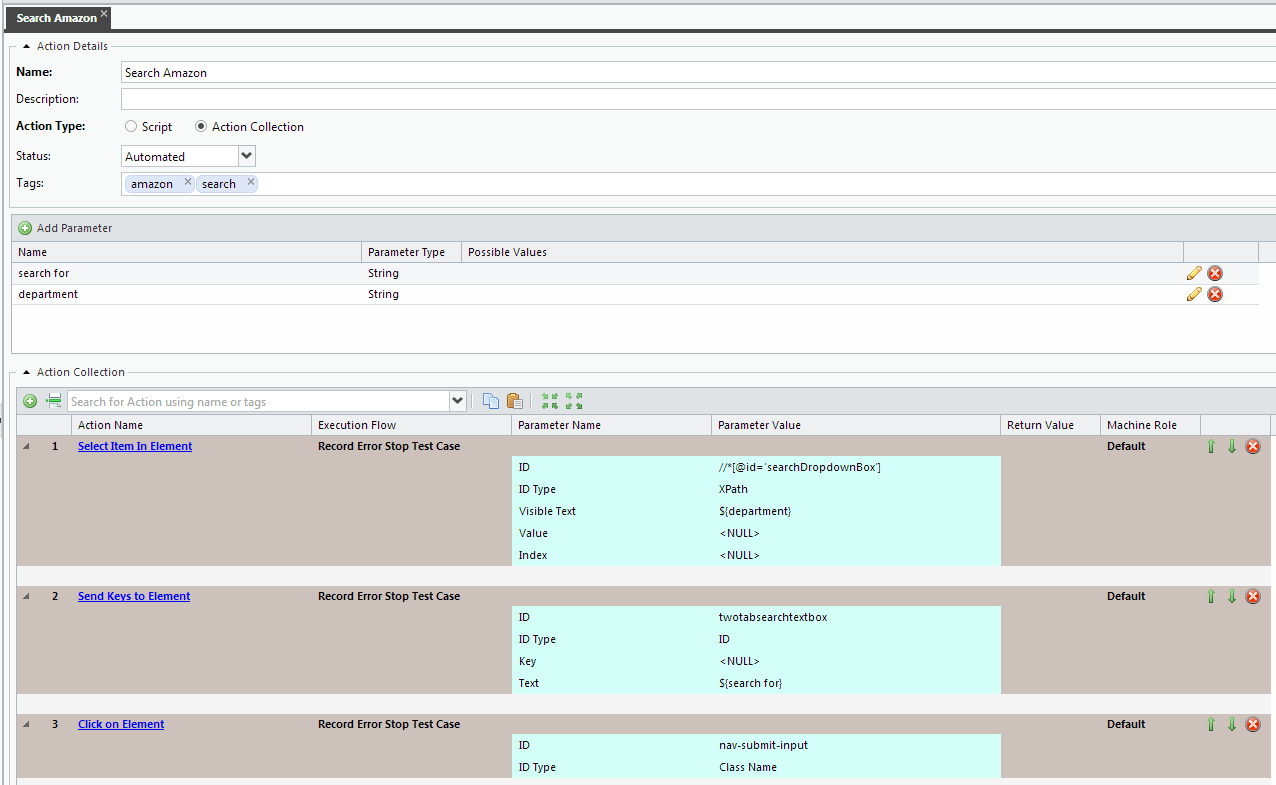
- Type in ‘department’ for name field and click on Update button - Because we are doing a simple selection from a drop down, we are going to use ‘Select Item In Element’ selenium action that comes with RedwoodHQ:
- From left pane find ‘Select Item In Element’ action (it’s under selenium tag)
- Left click and drag and drop ‘Select Item In Element’ action between two ‘Send Keys to Element’ actions on the right pane - Now we need to point the ‘Select Item In Element’ action against the object it will work with and we’ll use ‘Looking Glass’ tool to help us out with that:
- Click on ‘Looking Glass’ button ( white square with red circle)
- In a Looking Glass window select the browser you want to use and click on Open button
- In a new browser navigate to www.amazon.com
- In a Looking Glass window select the looking glass button, do a mouse over the word ‘All’ next to search text field in amazon website and left click
- Copy the xpath that appeared (which should look like this: //*[@id=‘searchDropdownBox’] ) and close Looking Glass window - Paste the xpath value you copied from Looking Glass in to ‘ID’ field for ‘Select Item In Element’ action
- Click on ‘ID Type’ field, click on drop down arrow for it and select ‘XPath’
- Now you need specify a value that will be used this ‘Select Item In Element’ action, since users will be specifying this as a parameter value you should click on ‘Visible Text’ field and from drop down select parameter variable ${ department } (this means it will use this variable as a value and since it’s a parameter it will take that value from user input from a test case)
- Since selecting department should be the first thing you do, click on the up green arrow for ‘Select Item In Element’ to move it up and make it as a first steps that this action executes
- Click on Save and you should see your action looking like this:
![]()
Create New Test Case
Now we have all the actions we need to make our test case automated.
- Click on Test Cases tab
- Click on ‘New Test Case’ button
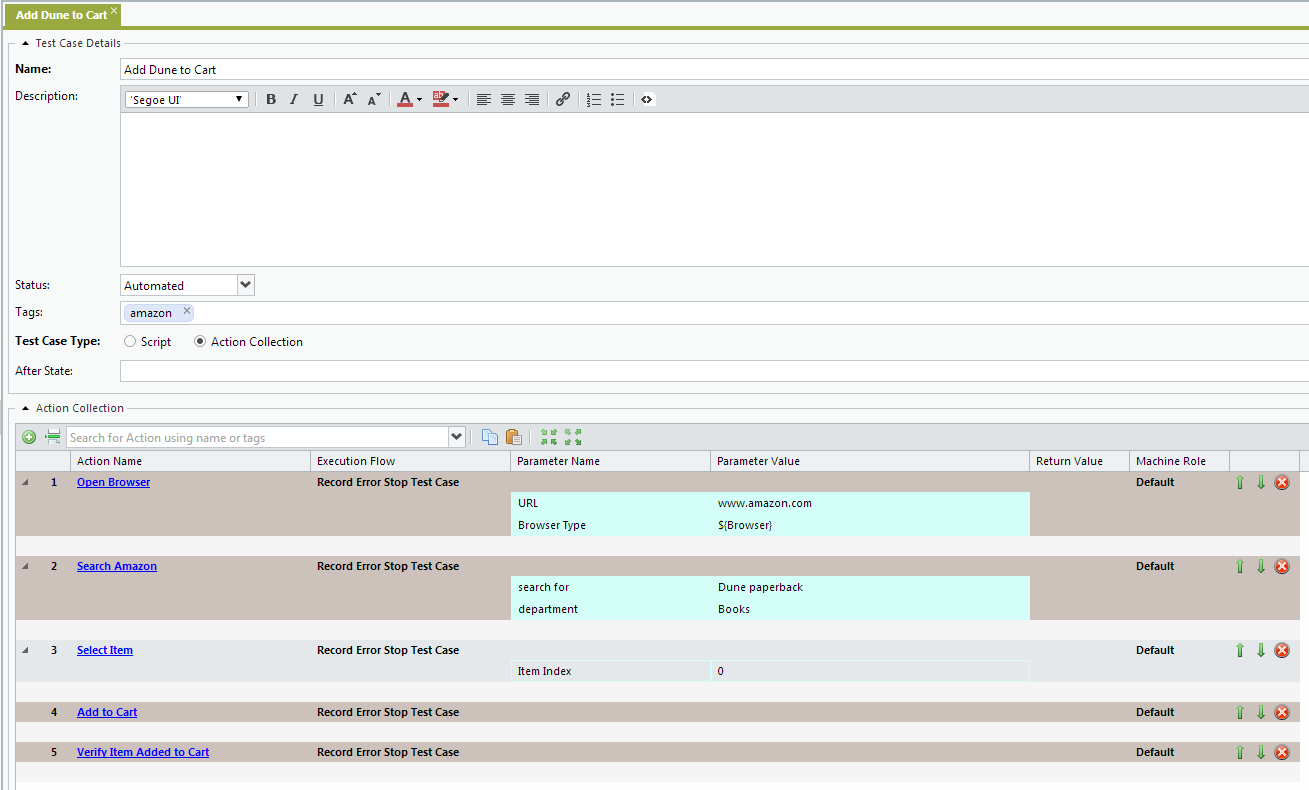
- Type in ‘Add Dune to Cart’ for name field
- Keep ‘Action Collection’ radio button selected
- For ‘Tags’ field, type in ‘amazon’ and press enter
- In the left pane expand ‘Actions Tree’ and drag and drop the following actions in to right pane one by one to generate the logical flow of our test case
- ‘Open Browser’ (selenium tag)
- ‘Search Amazon’ (amazon tag)
- ‘Select Item’ (amazon tag)
- ‘Add to Cart’ (amazon tag)
- ‘Verify Item Added to Cart’ (amazon tag) - Alternatively you could have began typing the name of action in ‘Search for action’ text field in the right pane ‘Action Collection’ part, select it with and click on ‘Add Action’ green button to the left to add that action to the bottom of the list.
- Now lets set the values for the actions. You can type in the value you want and press enter which will move cursor to the next field and next action.
- ‘Open Browser’:
URL = www.amazon.com
Browser Type = select ${ Browser } from drop down arrow
- ‘Search Amazon’
search for = Children of Dune
department = Books
- ‘Select Item’
Item Index = 0 - Now that we are happy with our test case, for ‘Status’ drop down (bellow Description text field) select value ‘Automated’
- Click on Save button and you should see your test case looking something like this:
![]()
Modify Test Set
Test case is ready for execution so lets add it to existing test set.
- Click on Execution tab
- In left pane click on ‘Test Sets’
- Click on Edit button for ‘Amazon Shopping’ test set (or double click on it)
- Expand ‘amazon’ tag and check the checkbox for ‘Add Dune to cart’ (or uncheck and then check ‘amazon’ check box which will now check all test cases which belong to that tag)
- Click on Save and click on Yes in message box
Execute
- In left pane click on ‘Executions’
- Under ‘All Executions’ click on ‘Amazon Shopping’ link
- Expand ‘Set Variables’ by clicking on little triangle button next to name
- For ‘Browser’ under ‘Set Variables’ select the browser you want to run the test cases against by clicking on the Value field for it (which should have ‘Firefox’ by default) and click on drop down arrow to specify other browser (Internet Explorer or Chrome)
- Under ‘Select Machines’ check the check box for ’127.0.0.1’ (agent was installed with RedwoodHQ server)
- Under ‘Test Cases’ check the check box for our new test case ‘Add Dune to Cart’
- Click on ‘Run Selected Execution’ green arrow button on top
- Test case will now run and then when it’s done the test case will have status of ‘Finished’ with result ‘Passed’
Post your comment on this topic.
Mustafa wrote: Apr 19, 2017
Amazing tutorial.
Thank you