Scripted Test Case
You can bypass the action driven approach completely and just have a test case that points directly at a script. We’ll use ‘Looking Glass’ record playback feature to quickly create a very simple test case for us but otherwise the code can be as simple or as complex as you want using Java/Groovy/Python/C# language and other libraries (more info on setting your own Jar(s) can be found here).
Create Script
- Click on Scripts tab
- Expand ‘src’ folder in left pane
- Right click on ‘src’ folder and select New -> Folder
- Type in ‘TestCases’ and click OK
- Now right click on ‘TestCases’ folder and select New -> Java Action
- Type in ‘VerifyIndianaJonesLinkBluRay.java’ and click OK
- Click on ‘Looking Glass’ button ( white square with red circle)
- Select Browsers -> and click on a browser you want to use for recording (eg Chrome) and click on Open button
- Click on ‘Code’ tab in Looking Glass
- Once the browser opens click on Record button (white square with red circle) and do the following steps:
- In a new browser navigate to www.amazon.com
- Type in ‘Indiana Jones Blu Ray’ in search text field
- Click on Go button
- Click on Record button again in Looking Glass to stop the recording - Now that we have this simple test code, lets make it more interesting by validating that text of the first link is the one we are looking for:
- Click on the Inspector tab
- Click on looking glass button to get object properties
- Do mouse over the first link that appears (which is: ‘Indiana Jones: The Complete Adventures’) and click on it
- Now copy the Xpath value we have for this element
- Click on Code tab and using Xpath value we have put an assert statement to validate that elements text value, so the final code in Looking Glass will look like this:driver.get("http://www.amazon.com/"); driver.findElement(By.xpath("//*[@id='twotabsearchtextbox']")).clear(); driver.findElement(By.xpath("//*[@id='twotabsearchtextbox']")).sendKeys("indiana jones blu ray"); driver.findElement(By.xpath("//*[@id='nav-search']/FORM[1]/DIV[2]/DIV[1]/INPUT[1]")).click(); org.junit.Assert.assertEquals(driver.findElement(By.xpath("//*[@id='result_0']/DIV[1]/DIV[1]/DIV[1]/DIV[2]/DIV[1]/DIV[1]/A[1]")).getText(),"Indiana Jones and the Temple of Doom"); - Click on Run button (green arrow) in Looking Glass to do a playback of the code you have and it should go through without any problems or errors
- Now that we have a working code we can copy paste it in to our VerifyIndianaJonesLinkBluRay.java test case in RedwoodHQ under run method and also add code to open the browser to work with (Firefox in this example) and set timeout to 30 seconds for elements, so the entire thing will look like this:
package TestCases; import java.util.*; import org.openqa.selenium.*; import org.openqa.selenium.WebDriver; import org.openqa.selenium.firefox.FirefoxDriver; class VerifyIndianaJonesLinkBluRay{ public void run(HashMap<String, Object> params){ WebDriver driver = new FirefoxDriver(); driver.manage().timeouts().implicitlyWait(30, java.util.concurrent.TimeUnit.SECONDS); driver.get("http://www.amazon.com/"); driver.findElement(By.xpath("//*[@id='twotabsearchtextbox']")).clear(); driver.findElement(By.xpath("//*[@id='twotabsearchtextbox']")).sendKeys("indiana jones blu ray"); driver.findElement(By.xpath("//*[@id='nav-search']/FORM[1]/DIV[2]/DIV[1]/INPUT[1]")).click(); org.junit.Assert.assertEquals(driver.findElement(By.xpath("//*[@id='result_0']/DIV[1]/DIV[1]/DIV[1]/DIV[2]/DIV[1]/DIV[1]/A[1]")).getText(),"Indiana Jones and the Temple of Doom"); } } - Click on Build button and it should compile successfully
Create Test Case
- Click on Test Cases tab
- Click on ‘New Test Case’ button
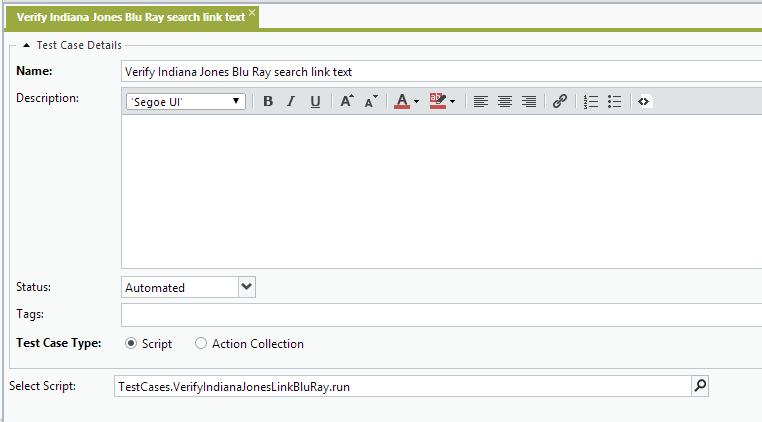
- Type in the following values for the new test case:
- Name = Verify Indiana Jones Blu Ray search link text
- Status = Automated
- Test Case Type = Script
- Select Script = TestCases.VerifyIndianaJonesLinkBluRay.run - Click on Save button and your test case should look like this:
Update Test Set
- Click on Execution tab
- In the left pane click on ‘Test Sets’
- Open Amazon Shopping test set, add a new test case to it and save it
Multithreaded Execution
Selenium supports multi browser execution on the same machine so lets update one of our machines to be able to handle multiple threads and then execute our new scripted test case.
Increase Thread Count
- Click on Execution tab
- In the left pane click on ‘Machines’
- Click on ‘Edit’ (pencil) button for ’127.0.0.1’ to edit this machine values
- For ‘Max Threads’ field type in value of ‘2’ and click on ‘Update’
- Now this machine can have 2 parallel test cases executed on it and you can easily specify the thread count even higher if you think the machine can handle it (based on type of test cases you execute)
Execute Parallel Test Cases
- In left pane click on ‘Executions’
- Under ‘All Executions’ click on ‘Amazon Shopping’ link
- Under ‘Select Machines’ check the check box for ’127.0.0.1’ (agent was installed with RedwoodHQ server)
- For ‘Threads’ column for the machine type in value of ‘2’ (so we’ll use 2 out of maximum threads of 2)
- Under ‘Test Cases’ check the check box for our new test case ‘Verify Indiana Jones Blu Ray search link text’ AND check the existing one ‘Add Star Trek to Cart’
- Click on ‘Run Selected Execution’ green arrow button on top
- Test case will now run in parallel and then when it’s done both test cases will have status of ‘Finished’ with result ‘Passed’
New Project
RedwoodHQ can have multiple projects to work with and each of them would have it’s own set of test cases and scripts. This allows for users to create an official project to work with (rather than a Sample one) and/or have different projects for different teams/applications to work in.
- Click on Settings tab
- In the left pane click on ‘Projects’
- Click on ‘Add Project’ button
- Type in Project Name as ‘Sample 2’ and for Project Template select ‘Selenium’ (if you select Default then an empty project with no samples or selenium libraries will be created) and click OK
- Wait for 5 minutes so back-end can generate appropriate project data
- In a top right corner select ‘Sample 2’ from ‘Choose Project’ drop down and click on Yes
- You are now in a new project where any Execution/Test Cases/Script changes will be specific to this project alone and not impact other ones


Post your comment on this topic.