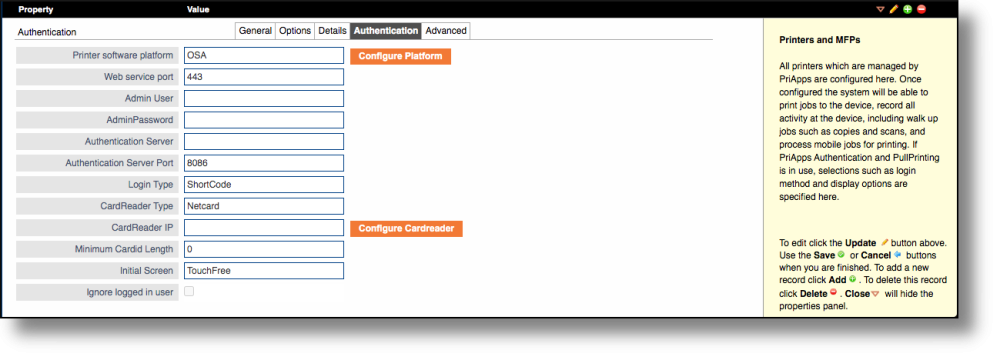
Most of the settings in the Authentication tab are configured automatically once the PriApps software has been installed on the device.
- Printer Platform – The manufacturer specific software platform of the device.
- Web Service Port – Port number used by the on-board Web Service of this MFP type.
- Admin User – The admin username of the device administrator.
- Admin Password – the password for the device administrator
- Authentication Server – The IP address or DNS name of the server running the PriApps Authentication Service which supports this MFP type. In all but exceptional cases this is the address of the current PriApps server.
- Authentication Server Port – Port number used by the PriApps Authentication Service which supports this MFP type.
- Login Type – The text Login Type available on this MFP in addition to ID Card or Mobile App login. Options are:
- None – No additional login type
- Full – Windows login and password
- Shortcode – Unique User Numeric code
- ShortcodePIN – Numeric code and additional numeric PIN
- SmartPIN – Mobile App Generated one-time Numeric code
- Card Reader Type – Method by which Card Reader is connected to this MFP. Options are:
- None – No Card Reader
- Direct – Reader directly plugged into MFP (IC mode)
- TTY – Reader directly plugged into MFP (Keyboard mode)
- NetCard – Reader independently connected to the network
- CardReader IP – the IP address of the Card Reader for this Managed Printer if it is independently connected to the network. Usually this will be via an interface box suitable for the reader.
- Minimum Card ID Length – Minimum Card ID Length is the smallest number of digits that must be read for a card id to be recognized. This is mostly needed for keyboard mode readers that do not end the card id with a newline
- Initial Screen – Specifies the screen that will be displayed for the user after a successful login. Some Options are dependent on the capability of the MFP make or model:
- Dashboard – displays the PriApps Dashboard offering users the option to select Print Release, Personalized Scan Workflows, Copy Control, Fax, or the default homepage of the device (options displayed depend on the capability of the device)
- PullPrint – displays the user’s list of print jobs in the PriApps PullPrint screen
- ScanApp – displays the default 3rd party scan app for the MFP (Manufacturer dependent)
- Landing – displays a default landing page (required for older Toshiba e-BRIDGE (eBX) MFPs only)
- TopScreen – displays the default MFP homepage of the MFP
- AppMenu – displays the screen showing applications installed on the MFP (Manufacturer dependent)
- Copy – displays the default copy functions of the MFP
- Scan – displays the default scan functions of the MFP
- eFiling – displays the default eFiling functions of the MFP
- Print – displays the default print functions of the MFP
- Touch-Free – displays the PriApps Touch-Free ‘Do Not Touch’ warning page and options
- Ignore Logged in User – Do not use the user currently logged in to the device for Pull Print and always show the login page
- Configure Platform button – The Configure Platform button will automatically configure a printer based on the values entered here. For Sharp, Toshiba, OKI and Xerox devices this will completely set up the device to work with PriApps. For Kyocera the embedded app must first have been installed using NetViewer. For Ricoh there are some additional steps that can only be done at the device panel
Last modified:
16 June 2022
Need more help with this?
Contact PriApps Support


