
To pull information from EPC, you will need to submit the following information:
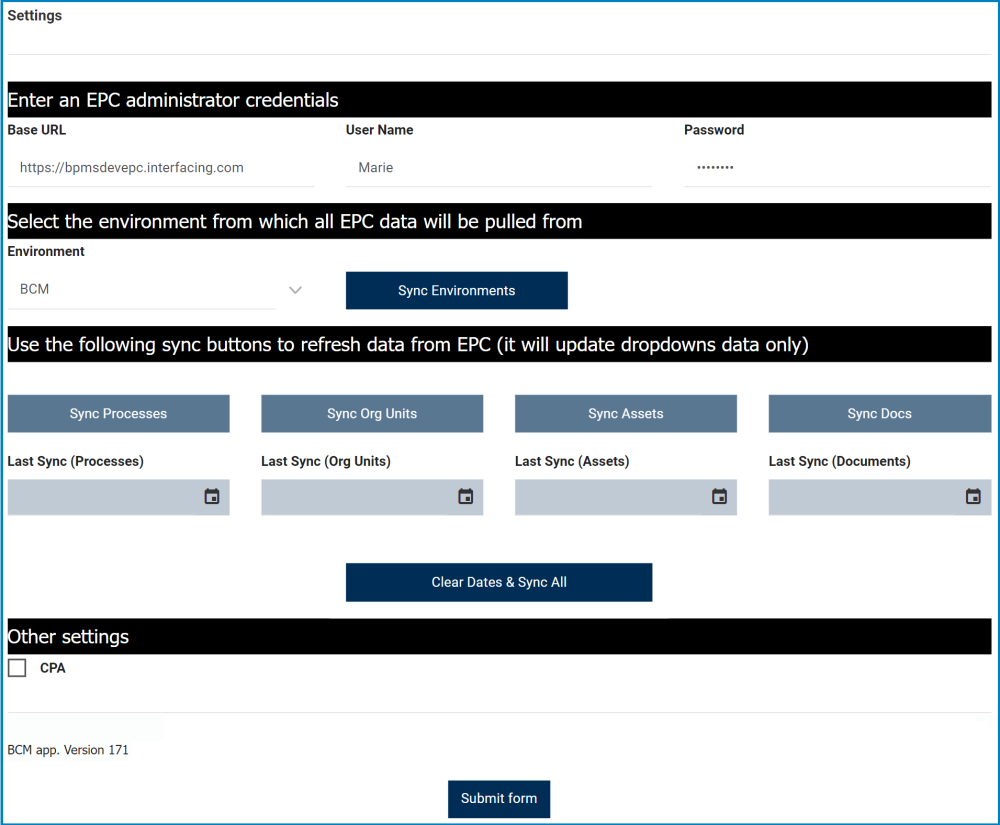
- Enter an EPC Administrator’s Credentials:
- Base URL: This is a text field that allows users to input the base URL.
- Base URL = the address of the respective server and/or address hosting EPC.
- Username: This is a text field that allows users to input the username of the EPC administrator.
- Password: This is a text field that allows users to input the password of the EPC administrator.
- Base URL: This is a text field that allows users to input the base URL.
- Select the Environment From Which All EPC Data Will Be Pulled:
- Environment: This is a single-select dropdown field that retrieves the list of environments from EPC. It allows users to select only one value at a time from the dropdown.
- Environment = the environment from which all EPC data will be pulled for use in the BCM application.
- The environment selection is a predefined attribute based on the EPC server to which the tool is pointing.
- Sync Environments: This button allows users to synchronize environments with EPC. Once it has been clicked on, the data pertaining to the selected environment that is stored in EPC will be synced with the data that is retrieved and displayed in the application.
- Environment: This is a single-select dropdown field that retrieves the list of environments from EPC. It allows users to select only one value at a time from the dropdown.
- Use the Following Sync Buttons to Refresh Data From EPC (It Will Update Dropdown Data Only):
- Sync Processes: This button allows users to synchronize processes with EPC. Once it has been clicked on, the data stored in EPC will be synced with the data that is retrieved and displayed in the dropdowns of the application.
- Only processes inside the selected environment will be synchronized.
- Last Sync (Processes): Once processes have been synced, this field is automatically populated with the date of the occurrence.
- Sync Org. Units: This button allows users to synchronize organizational units with EPC. Once it has been clicked on, the data stored in EPC will be synced with the data that is retrieved and displayed in the dropdowns of the application.
- Only organizational units inside the selected environment will be synchronized.
- Last Sync (Org. Units): Once org. units have been synced, this field is automatically populated with the date of the occurrence.
- Sync Assets: This button allows users to synchronize assets with EPC. Once it has been clicked on, the data stored in EPC will be synced with the data that is retrieved and displayed in the dropdowns of the application.
- Only assets inside the selected environment will be synchronized.
- Last Sync (Assets): Once assets have been synced, this field is automatically populated with the date of the occurrence.
- Sync Docs: This button allows users to synchronize documents with EPC. Once it has been clicked on, the data stored in EPC will be synced with the data that is retrieved and displayed in the dropdowns of the application.
- Only documents inside the selected environment will be synchronized.
- Last Sync (Documents): Once documents have been synced, this field is automatically populated with the date of the occurrence.
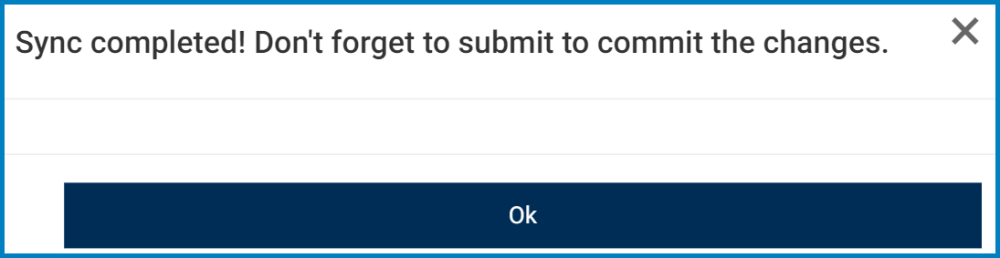
- Clear Dates & Sync All: This button allows users to clear the date fields and synchronize all modules (processes, org. units, assets, and documents) with EPC.
- Once the modules have been synced, the following confirmation message will appear in a pop-up window:
![]()
- To commit the changes, click on the OK button.
- This confirmation message will also appear when users select any of the Sync buttons described above.
- Once the modules have been synced, the following confirmation message will appear in a pop-up window:
- Sync Processes: This button allows users to synchronize processes with EPC. Once it has been clicked on, the data stored in EPC will be synced with the data that is retrieved and displayed in the dropdowns of the application.

- Other Settings:
- CPA: This is a checkbox which, if enabled, allows our live client to display their own logo on the forms instead of the Interfacing logo.
- Submit Form:
- Submit Form: This button allows users to submit the form.
Post your comment on this topic.