
Your 3D layers can be transformed along X, Y and Z axes.
3D layers have additional Viewer controls for transforming in 3D.
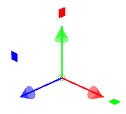
- A third, blue position arrow controls the Z axis (depth).
- Rotation is split into three separate wheels for the X, Y and Z axes.
Aside from these additional controls, transforming layers in 3D is functionally identical to transforming layers in 2D.
3D Properties
3D layers have a additional transform properties, which are available in the Controls panel and on the timeline.
- Opacity: The transparency of the clip.
- Anchor Point: Sets the location of the anchor point, with 0,0,0 being the center of the layer.
- Position: Moves the layer along the X, Y and Z axes.
- Scale: Enlarges and shrinks the layer. The X, Y and Z scales are linked by default so that your layer retains its original shape. You can unlink them using the chain icon.
- Orientation: Sets the starting orientation for the layer. This works separately to the rotation properties.
- Rotation: Rotates the layer around its anchor point. When in 3D the rotation properties are split into separate properties for X, Y an Z axes.
Alignment of Transform Controls
The alignment of the Viewer controls can be adjusted in the Options menu of the Viewer, at Options > Controls Alignment. The controls can be aligned to Local, World or View. This is useful if, for example, you have already rotated a layer to an arbitrary angle but wish to move it horizontally according to the floor plane, or according to the camera view.