
Render
The Render options control the default render settings used by HitFilm when new projects are created. The settings used by any individual project can still be edited at any time at File > Project Settings.
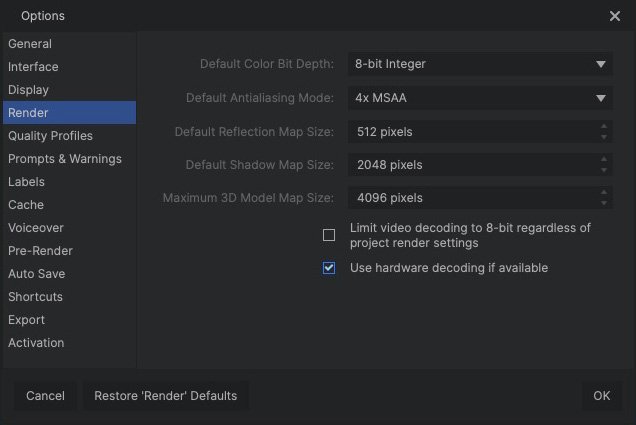
- Default Color Bit Depth: Higher bit depth creates higher fidelity images but will increase rendering times, especially on less powerful hardware.
- Default Antialiasing Mode: Antialiasing is used to create perceptibly higher quality edge detail. HitFilm supports multiple antialiasing types depending on the capabilities of your hardware. Higher numbers can give higher quality results, and may increase processing times.
- Default Reflection Map Size: The quality of 3D model reflections can be controlled using the resolution of the reflection maps. Larger reflection maps will create higher quality reflections at the cost of performance. The default setting of 512 pixels looks good in most circumstances other than close-ups.
- Default Shadow Map Size: The quality of shadows can be controlled using the resolution of the shadow maps. Larger shadow maps will create smoother edges on shadows, at the cost of performance.
- Default Maximum 3D Model Map Size: The quality of 3D model textures is dependent on the resolution of the texture maps. Larger texture maps will create higher quality reflections, but will also impact performance. Some hardware may not be capable of handling very high resolution maps.
- Limit video decoding to 8-bit regardless of project render settings: Processing 10-bit or 12-bit files at their native color depth offers improved visual quality, but may slow performance.
- Use hardware decoding if available: Enabling this option enables video decoding on your GPU, if your computer has a GPU which supports this. Depending on the format of your viddo and the hardware involved, this can provide significant performance improvements.
Color Bit Depth
HitFilm can operate in 8-bit integer, 16-bit or 32-bit float modes, or 16-bit or 32-bit linear modes.
- 8-Bit Integer is limited to 8 bits per channel, restricting colors between 0-255 values. 8-bit integer will render more quickly than 16-bit float.
- 16-Bit Float allows for increased dynamic range, retaining detail in highlights and shadows. 16-bit float will take longer to calculate and render, but produces higher quality results.
![]()
- 16-Bit Float – Linear Color While standard gamma color is adjusted to better correspond to human perception, Linear Color can make it easier to predict the results when blending colors and tones.
![]()
- 32-Bit Float allows for very high dynamic range, retaining maximum detail in highlights and shadows. This is particularly useful during grading or when designing visually extreme effects. 32-bit float will take longer to calculate and render, but produces the highest quality results. 32-bit Float is only available in HitFilm Pro.
- 32-Bit Float – Linear Color While standard gamma color is adjusted to better correspond to human perception, Linear Color can make it easier to predict the results when blending colors and tones.

You can change the color bit depth at any point in a project. One option is to carry out most of your work using the 8-bit integer mode, so you can work more quickly, then switch to a higher bit depth for the final render. 32-bit Float – Linear Color is only available in HitFilm Pro.
Antialiasing Mode:
Antialiasing is used to reduce ‘aliasing’ on diagonal lines during rendering. Antialiasing is always used during the final export and can be turned on and off while working inside HitFilm.
HitFilm Pro supports multiple antialiasing methods. The number and types of available methods will depend on your computer’s video card. The further down the list of available options the bigger the performance impact and the finer the rendering quality.
More information on CSAA (external resource).
More information on MSAA (external resource).
Reflection Map size:
The quality of 3D model reflections can be controlled using the reflection map. Larger reflection maps will create higher quality reflections at the cost of performance.
Note the difference in the images below. The first image has a reflection map resolution of just 256, which is too low for anything other than long distance shots:

Compare it to this version, which uses a reflection map resolution of 1024:

The reflection in the second image is much more defined. The default setting of 512 works well for most projects, but you may want to increase the reflection map size for close-ups or projects where visual fidelity is the priority. You can set the Reflection Map size to any value up to 4096 pixels.
Shadow Map Size:
This performs a similar function to the reflection map size, but for rendered 3D shadows. The default shadow resolution of 2048 pixels is suitable for many projects but can be adjusted to suit your specific needs. A lower resolution, such as 512, will create lower quality shadows with more visible edges. However, performance will be improved so for long distance shots this may be a good trade-off. Conversely, increasing the shadow map to 4096 pixels will create a higher quality shadow at the expense of performance. You can change the shadow map at any point during a project, so one approach is to use a small shadow map while working on your project, then increase it to the required resolution prior to final export.
Maximum 3D Model Map size ![]()
3D models usually include texture files. HitFilm supports diffuse, specular, normal and bump textures, each of which exists as a separate image file. Given that models can also include multiple materials, each with four available texture slots, the memory usage can become intensive if a model makes use of multiple textures. Some GPUs are unable to handle several 4K textures at full resolution, and even if your GPU is powerful enough it will still experience a performance impact.
This setting provides an easy way to manage texture files without needing to manually resize the textures outside of HitFilm. That maximum 3D model map size puts an upper cap on the resolution of all 3D model textures. Any textures larger than the maximum will be automatically downscaled to the maximum value. If your model uses multiple 6K textures, this is a convenient way to easily downscale them to 2K on the fly.
As this can be adjusted at any time, this is a highly efficient way to control quality and performance. While animating your models and setting up your scene you may not need high quality textures, so reducing the maximum to 512 can yield a major performance boost; you can then raise the max to 4096 prior to exporting.
Note that textures smaller than the maximum 3D model map size will not be affected.
Also take a look at the Introducing the Viewer chapter for information on managing performance while working on projects.