
A Rays element adds radial lines which emanate outward from a center point. The size, number, and appearance of the rays can be edited. All controls for editing a rays element are detailed below.
- Transform: This section contains all of the transform controls for the spot element.
- Blend Mode: Select the blend mode used to combine the element with the other elements that make up the flare.
- Brightness: Adjusts the brightness of the element.
- Saturation: Adjusts the saturation of the element, in relation to its selected color.
- Position: Specifies the position of the element on the X (horizontal) and Y (vertical) axes.
- Anchor: Allows you to move the element’s center of rotation away from the position.
- Scale: Alters the size of the element.
- Rotation: Rotates the element around the anchor point. When the anchor point is offset from the position, changing the rotation will spin the element in a circle with the radius of the position/anchor offset.
- Auto Rotate: Auto rotation allows the rotation of the element to be controlled by the movement of the hot spot.
- Off: Rotation is controlled manually.
- Towards Light: The element automatically rotates toward the hot spot position.
- Towards Center: The element automatically rotates toward the pivot position of the flare.
- Offset: Offsets the anchor point and position from the center line of the effect.
- Aspect Ratio: Defines the width of the element as a percentage of the height.
- Scale With: Determines how the size of the flare is controlled.
- Flare Size: Increasing the Scale of the Flare effect increases the size of the element.
- Layer Size: Increasing the size of the layer to which the flare effect is applied will increase the size of the element.
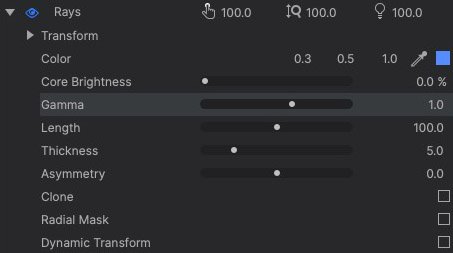
- Color: Choose a color for the selected element. Click the Swatch to open a color picker and choose any color. Use the pipette if you wish to select a color from anywhere in the HitFilm interface. Or manually edit the channel values to mix the color of your preference.
- Core Brightness: Adjusts the brightness of the rays. The effect will be more noticeable when the selected color is not pure white.
- Gamma: Adjusts the gamma of the element, which has the effect of altering the glow or feather surrounding the rays.
- Length: Changes the total length of the rays.
- Thickness: Determines how wide the rays are at the center of the effect.
- Asymmetry: Allows you to shift the rays so they are longer on one side of the center point than the other.
- Clone: Enable this option to create multiple instances of the rays.
- Number of Rays: Defines the number of copies which are created.
- Angle Increment: Select the angle, in degrees, between one set of rays and the next.
- Spread: Weights the rays toward one side, to add asymmetry.
- Position Range: The cloned rays can be set so they do not go through the center of the effect. This property determines the rang of offset, and the software will offset each ray by a randomized value within this range.
- Randomize: These controls randomize various aspects of the cloned rays. Enabling this option will reveal a series of additional controls, with which you can set the amount of randomization applied to different properties of the rays.
- Radial Mask: A radial mask cuts a radial section out of the element.
- Angle: Defines the size of the masked area, as the angle (in degrees) from the center line to each side of the mask.
- Fade: Feathers the edges of the selection to soften the transition.
- Rotation: Defines the angle of the center line of the radial mask.
- Loops: Specifies how many instances of the mask are present.
- Auto Rotate: Enabling auto rotation causes the mask angle to change as the flare moves.
- Off: No rotation is applied to the radial mask.
- Towards Light: As the flare is moved, the angle of the radial mask rotates to keep it pointed toward the hot spot of the flare.
- Towards Center: As the flare is moved, the angle of the radial mask rotates to keep it pointed toward the center of the flare.
- Towards Object: As the flare is moved, the angle of the radial mask rotates to keep it pointed toward the center of the object to which the flare is applied.
- Dynamic Transformation: Dynamic transformation alters the appearance of the element based on its position.
- Region: These controls define how the dynamic transformation is controlled.
- Animate From: Choose the region on which the animation will be based.
- Center: This option applies the transformation based on the element’s proximity to the center of the flare.
- Border: This option applies the transformation based on the element’s proximity to the edges of the frame.
- Light: This option applies the transformation based on the element’s proximity to the hot spot of the flare.
- Radius: Defines the percentage by which the the radius of the element can be altered by the dynamic transformation, as the flare moves.
- Falloff: Controls the interpolation of the transformation.
- Linear: Applies the transformation linearly across the animation region.
- Smooth: The animation is smoothed at the extreme ends of the animation region.
- Quadratic: Animation is smoothed more strongly, based on a quadratic curve.
- Invert: Inverts the region map, so the element gets smaller rather than larger, as it approaches the selected region.
- Animate From: Choose the region on which the animation will be based.
- Transform: These controls determine how the element will be modified as it gets nearer to the selected region.
- Source: Choose the source of movement from which the transformation will be calculated.
- Object Position: Moving the object to which the flare has been applied will alter the transformation.
- Light Position: Moving the hotspot of the flare will alter the transformation.
- Brightness: Determine how much the brightness of the element is affected by its proximity to the selected region.
- Scale: Determine how much the size of the element is affected by its proximity to the selected region.
- Radial Mask Angle: Controls the angle of any radial masks, based on the element’s proximity to the selected region.
- Source: Choose the source of movement from which the transformation will be calculated.
- Region: These controls define how the dynamic transformation is controlled.