
Elements of the Interface: Menus, Containers and Panels
The HitFilm interface is designed using a configuration of Menus, Containers and Panels, and is fully customizable. The top menubar provides organized access to many functions of the software. A container can hold multiple panels. Each panel will have a tab, and you can click any tab to make that panel visible in the container.
- Menus: HitFilm uses a standard top menubar to provide access to functions and settings of the software.
- Containers: Containers are rectangular sections of the interface which are used to organize panels. Any container can be resized, and the panels it contains can be customized.
- Panels: Panels exist as tabs within the interface containers. Each tab contains tools dedicated to specific functionality. Panels can be dragged from one container to another, or opened and closed as needed.

Containers
You can customize the size and layout of the containers in various ways:
- The size of containers can be adjusted by dragging on the container’s edges.
- Containers can be moved around the screen by clicking and dragging on an empty area of the container’s title bar.
- Dragging one container over another container will display a 4-way drop zone indicator.
![]()
As you drag the container onto any zone, a blue line appears along the corresponding edge of the container, indicating where the container will be placed when you drop it. Dropping the container onto the relevant zone will insert the container to the left/right/top/bottom of the affected container, wherever the blue line was.
The Container Hamburger Menu
Each container has a hamburger menu on the right-hand side of its title bar. This menu gives you access to controls for that container.
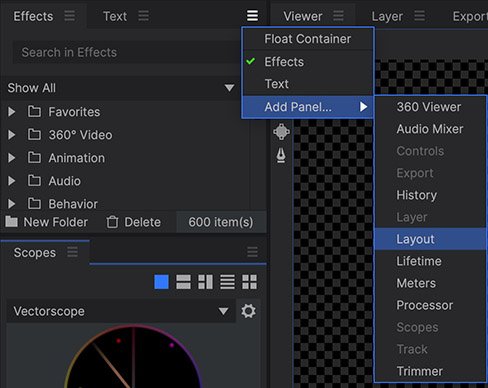
- Float Container: Select this option to float the container out of the main HitFilm interface, and into its own window. You can then drag that window to any location on your screen, or if you are using multiple displays on your system, you can drag the window to a secondary display.
- Select Panel…: All panels currently open in the container will be listed here. A green checkmark indicates the active panel. Select any panel from this list to make it the active panel. In the image above, Effects and Text are the current panels listed in the menu.
- Add Panel…: Use this menu to add additional panels to the menu. In the menu, all panels which are not currently open in the software will be available. Select any panel to open it into the container. Panels which are already open in the software will be greyed out.
Floating Containers
Containers can also be separated from the main interface and moved into their own ‘floating’ windows. These can then be dragged anywhere around your desktop. This can be useful for computer setups using multiple displays, for example.
To float a container, simply right click its title bar and select Float Container.
To move a floating container back into the main interface click the workspace icon in the floating container’s title bar.
You can also drag a floating panel back into the interface, by choosing a new container location and dragging the tab of the floating panel into the header of that container.
The Window Menu
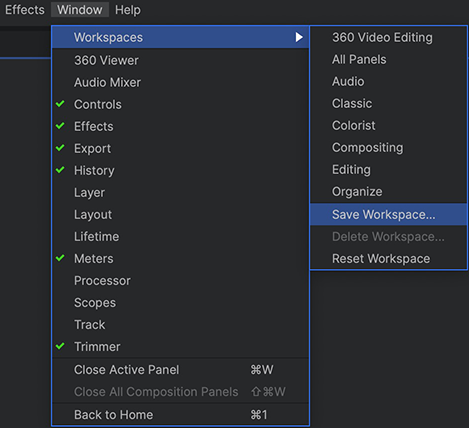
The Window menu is your center for navigating and customizing the interface. It displays controls for turning individual panels on and off, switching between workspaces, and managing your custom workspaces.
Panels
The largest area of the Window Menu lists the individual panels which make up the interface of the Edit Screen. Each panel can be shown or hidden, to limit the visible controls for what you need for your current task. Particularly if you have a smaller display, hiding controls that you don’t need will make more room for the controls you do need, so you can better see what you are doing and keep things efficient. Selecting any panel in the list will toggle its visibility. If the panel is not already open, it will be opened in a new container on the right side of the interface.
- Panels can be moved between containers by clicking and dragging on the panel’s tab.
- New panels can also be opened directly into any existing container, using the burger menu for that container.
- Any panel can also be closed through the burger menu for that panel.
Almost all panels included in the HitFilm interface are listed in the panels menu, and can be toggled visible or hidden at any time. A green check mark indicates visible panels. Panels without a check mark are currently hidden. Details about each panel are available on The Panels page of this manual.
Some panels are permanent, and must always be visible:
- Editor: The Editor timeline cannot be hidden, and is not listed in the Window menu.
- Media: The Media panel cannot be hidden, and is not listed in the Window menu.
- Text: The Text panel cannot be hidden, and is not listed in the Window menu.
- Viewer: The Viewer panel cannot be hidden, and is not listed in the Window menu.
Workspaces
Workspaces are preset combinations of panels in a specific layout, to help you quickly display the tools needed for specific tasks. HitFilm offers a variety of standard workspaces, to suit many common tasks.
- 360 Video Editing: Optimized for working with 360 degree video.
- All Panels: A feature-rich workspace with all panels enabled. Easy access to all editing and compositing features, if you have a large enough display to fit it.
- Audio: Focuses on the Audio mixer and other tools for editing and fine tuning your audio tracks.
- Classic: Based on the default layout in HitFilm 2 Ultimate. This retro option might be more familiar to users coming from a very early version of the software.
- Colorist: Scopes and large viewports facilitate accuracy and ease of use while you work on dialing in perfect colors.
- Compositing: Optimized for compositing, with emphasis on the controls and effects panels.
- Editing: Optimized for editing, with emphasis on the trimmer, media panel and viewer. This workspace is ideal for reviewing the contents of each clip in your media panel, selecting the portions you want to use in the trimmer, and adding them to the timeline.
- Organize: Makes it easier to organize complex projects, when you have numerous imported files to go through, select, and rename.
Designing Your Own Workspaces
If you customize the interface to use a different layout than any of the default workspaces, you can save your own layout to create a new workspace template. Details on how to customize the layout of the panels and containers that make up the HitFilm interface are provided above.
When you have a layout that you wish to save for later use, open the Window menu and select Workspace > Save Workspace. A new window will appear, where you can name your new workspace. After you click OK, your new workspace will be available through the Window > Workspaces menu.
Screens
The final item in the menu gives you direct access to the other screen of the interface.
- Back to Home: When you are on the Edit screen, this option will be shown, and takes you to the Home screen, where you can access online training content, the user manual, and a list of your recent projects.
- Back to Edit: When you are on the Home screen, this option is shown, and takes you to the Edit screen, where your projects are constructed and all editing and compositing is done.