
HitFilm can import composite shots from other HitFilm Projects, as well as project files created by certain other programs. Supported project formats include:
- HitFilm Composite Shots ( .hfcs )
- Imerge Pro Project files ( *.imerge )
- VEGAS Effects Project files ( *.vegfx )
- VEGAS Image Project files ( *.vegimg )
Importing HitFilm Composite Shots or VEGAS Effects Project Files
In structure, HitFilm composite shots and VEGAS Effects project files are essentially the same. Thus, the process of importing them into HitFilm is also the same. To import a composite shot:
- In the Media panel, locate the Import button and click the triangle next to it.
- Select Composite Shot from the import menu that appears. This opens a file browser window.
- Navigate to and select the .hfcs or .vegfxcs file that you wish to import.
- The composite shot will be imported, and appear in the Media panel.
Importing a Composite Shot with Embedded Composite Shots and Associated Media
At times you may need to import a composite shot that contains other embedded composite shots, or which contains multiple media files that would be laborious to relink manually. This can be done as well, by importing the composite shot directly from its original project, without exporting first.
To import a composite shot with all embedded composite shots and media:
- In the Media panel, locate the Import button and click the triangle next to it.
- Select Composite Shot from the import menu that appears. This opens a file browser window.
- Navigate to and select the .hfp or .vegfx project file that contains the composite shot you want to import.
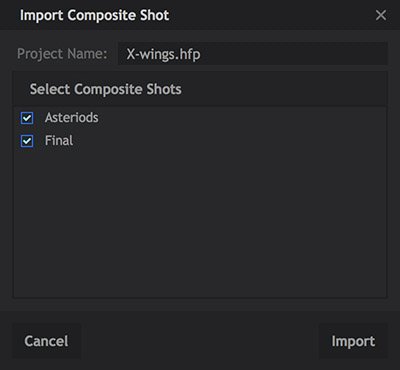
- A window will open listing all of the composite shot timelines contained in that project. Select the one(s) that you want to import using the checkboxes on the left.
![]()
- Click Import, and a new folder will be created in the Media panel. All assets required for the composite shot will be imported and placed in that folder. This includes media files and other composite shots embedded in the composite shot you chose for import.
Further information is available in Saving & Loading Projects.
Importing Project Files from Imerge Pro and VEGAS Image
Imerge Pro project files can be imported into HitFilm, where they can be used as still images. By importing the project file directly, you retain full editing capabilities over all separate components of the image. In structure, Imerge Pro project files and VEGAS Image project files are essentially the same. Thus, the process of importing them into HitFilm is the same as well.
To import an Imerge Pro or VEGAS Image project file:
- In the Media panel, click the Import button.
- Navigate to and select the .imerge or .vegimg file that you wish to import.
- The project will be imported, and appear in the Media panel.
Opening project files from HitFilm into Imerge Pro or VEGAS Image
Project files imported into HitFilm behave like still images. They can be added to any timeline as a single clip, and edited using any of the tools in HitFilm. But, you can also re-access the project itself, in Imerge Pro, to edit the layers, masks, or effects used in the Imerge Pro Project.
To open an Imerge pro project from HitFilm, back into Imerge Pro:
- In the HitFilm Media panel, right-click the .imerge file to access its contextual menu
- Select Open in Imerge… from the menu.
- Imerge Pro will launch, and the project will be opened.
- After making any desired changes in Imerge, Save the project again, to update the saved version on your hard drive.
- Close Imerge, and switch back to HitFilm. The contents of the project will be updated into HitFilm, so your changes are now visible.