
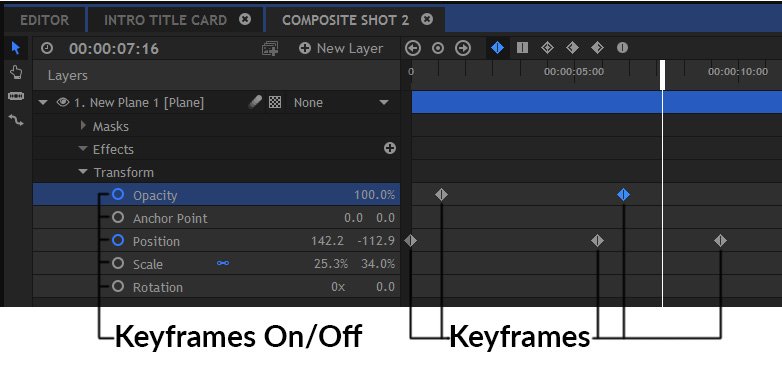
Keyframes are used to log any changes you make to properties. When you change a property value which has keyframes enabled, the new value will be stored on the current frame as a keyframe. By creating multiple keyframes on different frames you can change a value over time.
Activating Keyframing ![]()
![]()
Keyframing has to be explicitly turned on for each property you want to animate.
If keyframing is turned off, any changes you make will affect the setting for the duration of the layer. Moving to a different frame and making a further change will also make that change for the entire layer.
Once keyframing is turned on for a property, every time you make a change it is stored on that precise frame as a keyframe. You can the go to different frames and make adjustments to create multiple keyframes. HitFilm then animate the setting from one keyframe to the next.
To turn keyframing on and off click the circle to the left of the property. When activated the keyframe icon will turn blue and a new keyframe will be placed at the playhead’s current position.
Creating Keyframes
Every time you change a setting in HitFilm, a keyframe is placed on the timeline at the playhead position. Keyframes contain information about the changes you make.
HitFilm automatically interpolates from one keyframe value to the next. This means that you don’t need to animate every single frame.
For example: If you have a keyframe on frame 1 which positions a layer on the far left of the screen, then another keyframe on frame 24 positioning the layer on the far right, HitFilm will animate the layer moving from left to right over the course of those 24 frames.
To duplicate selected keyframes, you can hold CTRL (CMD on Mac) and drag the existing keyframes to a new location. The original keyframes will stay in position, while a new duplicate set is created at the time you drag to.
Viewing Keyframes
You can view the keyframes for any specific property by clicking the triangular arrow next to that property’s name, to open its details.
You can view only the properties which contain keyframes by using the keyboard shortcut U.
- U: Press the U key on your keyboard, and all properties on the timeline which currently contain keyframes will be opened to display their keyframes.
- UU: Press U a second time, and all properties whose values have been edited will be displayed, even if there are no keyframes present.
- UUU: Press U a third time, and the timeline display reverts to its original formatting, where all properties are available, whether they have been edited or not.
Navigating by Keyframes ![]()
![]()
![]()
Once you have created several keyframes it can be useful to quickly move between them on the timeline.
You can do this using the Previous/Next Keyframe controls at the top of the timeline, which jump your playhead between keyframes for the currently selected property.
You can also double-click on a keyframe on the timeline to jump the playhead to that position.
Adding and Removing Keyframes ![]()
![]()
Sometimes you may want to add or remove a keyframe to the current frame without actually changing any settings.
This can be done by clicking the Add/Remove Keyframe button at the top of the timeline (positioned between the keyframe navigation arrows).
If there is a keyframe on the current frame already, clicking the add/remove button will remove it.
If there is not a keyframe on the current frame, a new keyframe will be created using the settings from that frame.
Editing Keyframes
Once a keyframe has been created you can make further adjustments to its position and behaviour. To edit the value of an existing keyframe you first need to move the playhead to the keyframe. If you don’t do this, you will instead create a new keyframe on the current frame. The easiest way to do this is simply to double-click on the relevant keyframe.
Selecting Keyframes
Keyframes can be selected using the Select tool. Selected keyframes are highlighted in blue.
- Simply Click a keyframe to select it. Selecting a different keyframe will deselect the first one.
- Holding CTRL (CMD on Mac) while selecting keyframes enables you to select multiple keyframes.
- Multiple keyframes can also be selected by dragging a selection box.
Moving Keyframes
Selected keyframes can be moved around the timeline by dragging them with the mouse.
Keyframes can only be dragged horizontally on the timeline. They can’t be dragged onto other properties.
Selecting three or more keyframes and holding the ALT (OPT on Mac) key while dragging on the keyframe to the extreme left or right of the selection scales the keyframe positions.
Changing Temporal Interpolation
Interpolation affects how HitFilm animates from one keyframe to the next.
You can change the temporal interpolation by right clicking selected keyframes and exploring the Interpolation menu, or using the interpolation buttons along the top of the timeline. The interpolation menu also displays options for spatial interpolation, which you can find out about in the chapter Spatial Animation in the Viewer.
![]() Linear: Interpolates from one keyframe to the next without any smoothing. The value changes the same amount on each frame.
Linear: Interpolates from one keyframe to the next without any smoothing. The value changes the same amount on each frame.![]() Constant: Each keyframe value is held as a constant until the next one is reached. There is no interpolation.
Constant: Each keyframe value is held as a constant until the next one is reached. There is no interpolation.![]() Smooth: As the keyframe approaches, the size of the value change per frame will get smaller, resulting in a gradual adjustment into and out of the keyframe.
Smooth: As the keyframe approaches, the size of the value change per frame will get smaller, resulting in a gradual adjustment into and out of the keyframe.![]() Smooth In: The smoothing only occurs on the left of the keyframe.
Smooth In: The smoothing only occurs on the left of the keyframe.![]() Smooth Out: The smoothing only occurs on the right of the keyframe.
Smooth Out: The smoothing only occurs on the right of the keyframe.![]() Manual Bezier: The keyframe is smoothed, but you retain manual control over the amount of smoothing that is applied.
Manual Bezier: The keyframe is smoothed, but you retain manual control over the amount of smoothing that is applied.
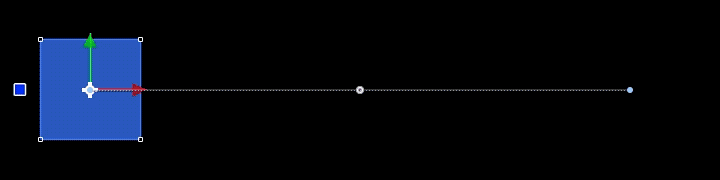
Temporal interpolation is represented on the value graph as a curve. A steeper curve represents more rapid and abrupt interpolation. See The Value Graph for details.
The temporal interpolation of a layer’s position property is also represented as dots on the motion path in the Viewer, with each dot representing a frame. Linear interpolation will show evenly spaced dots, as the value change on each frame is the same. Switching to smoothed keyframes will cause the dots to accumulate towards the keyframe, as more frames are used to create a more gradual value change. Therefore a denser cluster of dots indicate relatively slower value change, while sparser dots indicate faster change.
This example shows linear temporal interpolation, where the distance the layer moves is equal on every frame:

And here is the same animation with smooth temporal interpolation, where the movement is slower the closer you are to a keyframe. This makes the motion smoother at the keyframes, and allows the keyframed positions to register more clearly with the audience. In practical application, this often creates movement that feels more natural:
For more information see Spatial Animation in the Viewer.