
The five mask shapes can be accessed by click-holding on the Mask Shapes tool, then selecting a shape from the palette which is displayed. Each shape has specific controls and properties, as follows.
Rectangle Mask ![]()
The rectangle mask tool creates rectangular or square masks.

![]() Rectangular Mask: Click and drag to create a square or rectangular mask on the currently selected layer.
Rectangular Mask: Click and drag to create a square or rectangular mask on the currently selected layer.
- Hold SHIFT while dragging to create a perfect square.
- Hold ALT (OPTION on Mac) to center the mask at the original point you drag from. Releasing the mouse will set the shape.
- Double-click the rectangular mask icon to create a rectangle the exact height and width of your project.
Rounded Rectangle Mask ![]()
The rounded rectangle mask tool creates rectangular or square masks with a radius applied to the corners. The radius can be edited while creating the mask.
![]() Rounded Rectangle Mask: Click and drag to create a square or rectangular mask with rounded corners on the currently selected layer. The radius of the corners can be adjusted after the mask is created.
Rounded Rectangle Mask: Click and drag to create a square or rectangular mask with rounded corners on the currently selected layer. The radius of the corners can be adjusted after the mask is created.
- Hold SHIFT while dragging to constrain the mask to a rounded square.
- Hold ALT (OPTION on Mac) to center the mask at the original point you drag from. Releasing the mouse will set the shape.
- Double-click the rounded rectangle mask icon to create a rounded rectangle the exact height and width of your project.
Once a rounded rectangle shape is drawn, a Shape Editor Dialog is displayed, allowing you to specify details of the mask shape:

- Corner Radius: Adjusts the radius, in pixels, of the corners of the mask. Smaller numbers produce a sharper corner. The maximum value will be equal to half the length of the shortest side of the mask.
Ellipse Mask ![]()
The ellipse mask tool creates elliptical or circular masks.
![]() Elliptical Mask: Click and drag to create a circular or elliptical mask on the currently selected layer.
Elliptical Mask: Click and drag to create a circular or elliptical mask on the currently selected layer.
- Hold SHIFT while dragging to create a perfect circle.
- Hold ALT (OPTION on Mac) to center the mask at the original point you drag from. Releasing the mouse will set the shape.
- Double-click the elliptical mask icon to create an oval the exact height and width of your project.
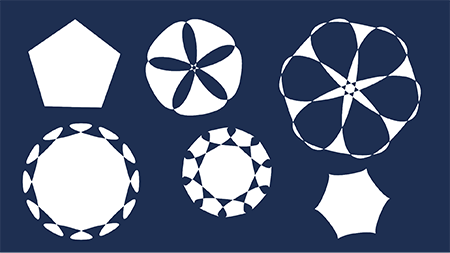
Polygon Mask ![]()
The polygon mask tool creates geometric shapes and patterns based on regular polygons. By adjusting the number and radius of the points, a wide variety of shapes can be created, as demonstrated by the examples shown here.
![]() Polygon Mask: Click and drag to create a geometric polygonal mask with sides of equal length. The quantity and roundness of the points can be adjusted after the mask is created. The mask will be centered at the point where you click.
Polygon Mask: Click and drag to create a geometric polygonal mask with sides of equal length. The quantity and roundness of the points can be adjusted after the mask is created. The mask will be centered at the point where you click.
Once a polygon shape is drawn, a Shape Editor Dialog is displayed, allowing you to specify details of the mask shape:
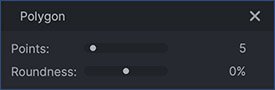
- Points: Defines the number of vertices in the polygon shape. You can select any value between 3 and 40.
- Roundness: By default the faces of the shape are straight, but you can curve them using the roundness setting. Positive values curve the segments outward, and negative values curve them inward. Larger values will cause the segments to overlap, creating detailed repeating patterns.
Star Mask ![]()
The star mask tool creates geometric shapes and patterns based on regular non-convex polygons. By adjusting the number and radius of the points, a wide variety of shapes can be created, as demonstrated by the examples shown here.
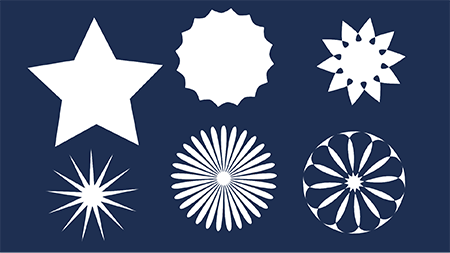
![]() Star Mask: Click and drag to create a star-shaped mask with arms of equal length and width. The quantity and length of the arms, and the roundness of the inner and outer points can be adjusted after the mask is created. The mask will be centered at the point where you click.
Star Mask: Click and drag to create a star-shaped mask with arms of equal length and width. The quantity and length of the arms, and the roundness of the inner and outer points can be adjusted after the mask is created. The mask will be centered at the point where you click.
Once a star shape is drawn, a Shape Editor Dialog is displayed, allowing you to specify details of the mask shape:
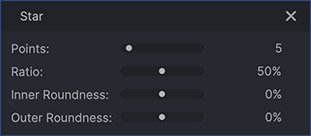
- Points: Defines the number of arms in the star shape. You can select any value between 3 and 40.
- Ratio: Specifies the diameter of the solid center of the star, as a percentage of the total radius. Lower numbers make the arms of the star longer.
- Inner Roundness: Adjusts the curve of the line segments at the inner vertices of the star shape. Positive values curve the segments inward, making the arms thinner, and negative values curve them outward, making the arms thicker. Larger values will cause the segments to overlap, creating detailed repeating patterns.
- Outer Roundness: Adjusts the curve of the vertices at the end of the star arms. Positive values curve the segments outward, making the arms thicker, and negative values curve them inwards, creating beads at the end of the arms. Larger values will cause the segments to overlap, creating detailed repeating patterns.
Freehand Mask ![]()
![]() Freehand Mask: Draws a sequence of straight or curved line segments, to create any shape you desire. Clicking and dragging creates a curved line, while clicking and releasing creates a linear, straight line. The shape of curved points can be further adjusted using the extension handles.
Freehand Mask: Draws a sequence of straight or curved line segments, to create any shape you desire. Clicking and dragging creates a curved line, while clicking and releasing creates a linear, straight line. The shape of curved points can be further adjusted using the extension handles.
- Click to add a new linear point to the mask path.
- Click-drag to add a curved point to the mask path. The direction and distance you drag will define the curve of the mask segment.