
The Layout panel includes quick and precise tools for alignment, for positioning a single layer, or for evenly distributing multiple layers within the frame.

The specific controls which are available will vary based on the current selection.
Orientation ![]()
![]()
![]()
![]()
The orientation controls at the top of the layout panel enable you to instantly flip or rotate your selection in either direction
![]() Mirror Vertical: Flips the selection around a vertical axis, so the left side of the image becomes the right, and the right side becomes the left.
Mirror Vertical: Flips the selection around a vertical axis, so the left side of the image becomes the right, and the right side becomes the left.![]() Mirror Horizontal: Flops the selection around a horizontal axis, so the top becomes the bottom and the bottom becomes the top.
Mirror Horizontal: Flops the selection around a horizontal axis, so the top becomes the bottom and the bottom becomes the top.![]() Rotate Counterclockwise: Rotates the layer 90 degrees to the left, so the right side becomes the top, and the top becomes the left side.
Rotate Counterclockwise: Rotates the layer 90 degrees to the left, so the right side becomes the top, and the top becomes the left side.![]() Rotate Clockwise: Rotates the layer 90 degrees to the right, so the left side becomes the top, and the top becomes the right side.
Rotate Clockwise: Rotates the layer 90 degrees to the right, so the left side becomes the top, and the top becomes the right side.
Anchor Points
The top section of the panel features controls for anchor point selection and precisely positioning the layer based on the selected anchor point.
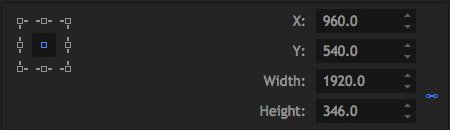
The square array of small boxes on the left of the Layout Panel is the control point selection. You can click any of these points to set that corner or side of the selection as the anchor point from which the selection will be adjusted. When you select multiple layers, there isn’t a visible bounding box on the viewer surrounding them all, but the Layout controls still operate based on a bounding box that defines the overall size of the entire selection.
The values on the right show the exact position of the selection on the X and Y axis, and its current exact pixel dimensions. The primary Scale control, in the transform controls for the layer, uses a percentage of the original size. The scale controls in the layout panel use an exact size in pixels instead. The width and height are linked by default, but you can unlink them by clicking the chain icon to their right.
Alignment
The lower half of the Layout panel contains the Alignment and Distribution controls, which allow you to very quickly reposition your selection.
Align To
Align To can instantly reposition the selected layers within the selection, or within the resolution of the Timeline. If you have a single layer selected, Align To Timeline is selected automatically. You can click any of the icons to move the layer in relation to the timeline’s resolution.
Align To: Timeline
![]() Align Left: Aligns the left edge of the selected layer with the left edge of the frame.
Align Left: Aligns the left edge of the selected layer with the left edge of the frame.![]() Align Horizontally: Centers the selected layer horizontally within the frame.
Align Horizontally: Centers the selected layer horizontally within the frame.![]() Align Right: Aligns the right edge of the selected layer with the right edge of the frame.
Align Right: Aligns the right edge of the selected layer with the right edge of the frame.
![]() Align Top: Aligns the top edge of the selected layer with the top edge of the frame.
Align Top: Aligns the top edge of the selected layer with the top edge of the frame.![]() Align Vertically: Centers the selected layer vertically within the frame.
Align Vertically: Centers the selected layer vertically within the frame.![]() Align Bottom: Aligns the bottom edge of the selected layer with the bottom edge of the frame.
Align Bottom: Aligns the bottom edge of the selected layer with the bottom edge of the frame.
When you have multiple layers selected, Align To Timeline will move all of the selected layers at once, to the alignment you choose, but you can also choose Align To Selection. The software creates an invisible bounding box based on the outermost edges of all selected layers, and you can move the layers within that bounding box.
Align To: Selection
![]() Align Left: Aligns the left edge of all selected layers with the left edge of the selected layer that is farthest to the left.
Align Left: Aligns the left edge of all selected layers with the left edge of the selected layer that is farthest to the left.![]() Align Horizontally: Centers all selected layers between the left and right edges of the selection.
Align Horizontally: Centers all selected layers between the left and right edges of the selection.![]() Align Right: Aligns the right edge of all selected layers with the right edge of the selected layer that is farthest to the left.
Align Right: Aligns the right edge of all selected layers with the right edge of the selected layer that is farthest to the left.
![]() Align Top: Aligns the top edge of all selected layers with the top edge of the selection.
Align Top: Aligns the top edge of all selected layers with the top edge of the selection.![]() Align Vertically: Centers all selected layers between the top and bottom edges of the selection.
Align Vertically: Centers all selected layers between the top and bottom edges of the selection.![]() Align Bottom: Aligns the bottom edge of all selected layers with the bottom edge of the selection.
Align Bottom: Aligns the bottom edge of all selected layers with the bottom edge of the selection.
Distribute clips
The Distribute controls allow you to evenly space multiple layers very quickly, along either a horizontal or vertical axis.
![]() Distribute Top: Spaces the selected layers evenly, based on the top pixel in each layer. The highest and lowest layers included in the selection remain in place, and all other layers will shift vertically to create even spacing.
Distribute Top: Spaces the selected layers evenly, based on the top pixel in each layer. The highest and lowest layers included in the selection remain in place, and all other layers will shift vertically to create even spacing.![]() Distribute Vertically: Spaces the selected layers evenly, based on the center pixel in each layer. The highest and lowest layers included in the selection remain in place, and all other layers will shift vertically to create even spacing.
Distribute Vertically: Spaces the selected layers evenly, based on the center pixel in each layer. The highest and lowest layers included in the selection remain in place, and all other layers will shift vertically to create even spacing.![]() Distribute Bottom: Spaces the selected layers evenly, based on the bottom pixel in each layer. The highest and lowest layers included in the selection remain in place, and all other layers will shift vertically to create even spacing.
Distribute Bottom: Spaces the selected layers evenly, based on the bottom pixel in each layer. The highest and lowest layers included in the selection remain in place, and all other layers will shift vertically to create even spacing.
![]() Distribute Left: Spaces the selected layers evenly, based on the left-most pixel in each layer. The layers farthest to the left and farthest to the right remain in place, and all other layers will shift horizontally to create even spacing.
Distribute Left: Spaces the selected layers evenly, based on the left-most pixel in each layer. The layers farthest to the left and farthest to the right remain in place, and all other layers will shift horizontally to create even spacing.![]() Distribute Horizontally: Spaces the selected layers evenly, based on the center pixel in each layer. The layers farthest to the left and farthest to the right remain in place, and all other layers will shift horizontally to create even spacing.
Distribute Horizontally: Spaces the selected layers evenly, based on the center pixel in each layer. The layers farthest to the left and farthest to the right remain in place, and all other layers will shift horizontally to create even spacing.![]() Distribute Right: Spaces the selected layers evenly, based on the right-most pixel in each layer. The layers farthest to the left and farthest to the right remain in place, and all other layers will shift horizontally to create even spacing.
Distribute Right: Spaces the selected layers evenly, based on the right-most pixel in each layer. The layers farthest to the left and farthest to the right remain in place, and all other layers will shift horizontally to create even spacing.