
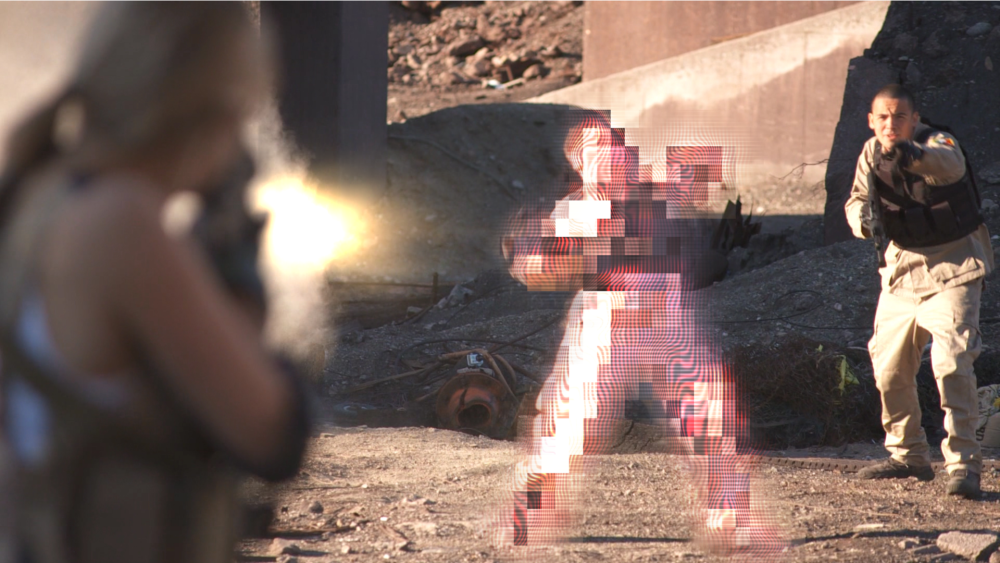
Custom-built for Freddie Wong’s Video Game High School web series. Creates a digital glitching appearance which was used for characters disappearing out of the game after being shot.
- View: Select the component of the effect you wish to see.
- Result: Shows the final result, with all components of the effect enabled.
- Pixelation: Shows only the pixelation component of the effect, with its associated controls.
- Wavy Lines: Shows only the wavy lines component of the effect, with its associated controls.
- Horizontal Lines: Shows only the horizontal lines component of the effect, with its associated controls.
- Mask: Select another layer from the timeline to be used as a mask for the effect. The results of the effect will only be visible within the area of the selected layer.
Pixelation
- Strength: Higher values make the pixelation more obvious.
- Source Frame Shift: The pixelation can be based on a different frame of the layer the effect is applied to, to create a temporal glitching. Select the amount of frame shift used with this control.
- Mask Erode/Expand: When a Mask is selected, this control adjusts the exact size of the mask area. Negative values contract the mask, and positive values expand the mask.
- Horizontal Blocks: Sets the number of horizontal blocks in the effect. Lower values create larger blocks.
- Vertical Blocks: Sets the number of vertical blocks in the effect. Lower values create larger blocks.
Wavy Lines
- Strength: Higher values make the wavy lines more obvious.
- Source Frame Shift: The distortion of the wavy lines can be based on a different frame of the layer the effect is applied to, to create a temporal glitching. Select the amount of frame shift used with this control.
Lines
- Frequency: Controls the number of wavy lines. Higher values create more lines.
- Sharpness: Defines how separate and distinct the lines are. Higher values blur the lines together more.
- Angle: Rotate the knob to set the angle of the wavy lines. The angle sets the direction of frequency, and is perpendicular to the lines themselves.
- Smooth Source: The wavy lines are distorted based on a depth map created form the underlying layer. Increasing this value applies a blur to the layer before calculating the depth map, to smooth the distortion.
Color
- This effect has a built-in version of the Color Correction Wheels effect that modifies the wavy lines specifically. For full details on these controls, see the Color Correction page of this manual.
Displacement
- Smooth Source: The wavy lines are displaced based on selected channels of the underlying layer. Increasing this value applies a blur to the selected channels before calculating the displacement, to smooth the distortion.
- Horizontal Displacement: Sets the distance, in pixels, of the horizontal displacement.
- Vertical Displacement: Sets the distance, in pixels, of the vertical displacement.
- Horizontal Displacement Channel: Select the channel of the underlying layer that will be used to calculate the horizontal displacement.
- Vertical Displacement Channel: Select the channel of the underlying layer that will be used to calculate the vertical displacement.
Horizontal Lines
- Strength: Higher values make the horizontal lines more obvious.
- Source Frame Shift: The distortion of the horizontal lines can be based on a different frame of the layer the effect is applied to, to create a temporal glitching. Select the amount of frame shift used with this control.
Inverted Lines
- Frequency: Controls the number of horizontal lines. Higher values create more lines.
- Sharpness: Defines how separate and distinct the lines are. Higher values blur the lines together more.
- Angle: By default these lines are horizontal, as the name implies, but you can rotate the knob to set the angle of the horizontal lines.
- Brightness: Sets the brightness of the inverted lines. Lower values create brighter lines.
- Offset: Controls the overall brightness of the layer. Higher values create a darker image.
- Smooth Source: Increasing this value applies a blur to the layer before calculating the depth map, to smooth the distortion. Lower values make the shapes in the underlying layer more apparent.
Brightness Contrast
- Brightness: Adjusts the brightness of the final, altered image.
- Contrast: Adjusts the contrast of the final, altered image.