This is where the users of the application are registered, as well as the interfaces that each user can access. The information displayed on the login screen comes from the users screen as shown in the example below.

The figure below shows the shortcut button used to call up the users screen (SYS003-USERS).

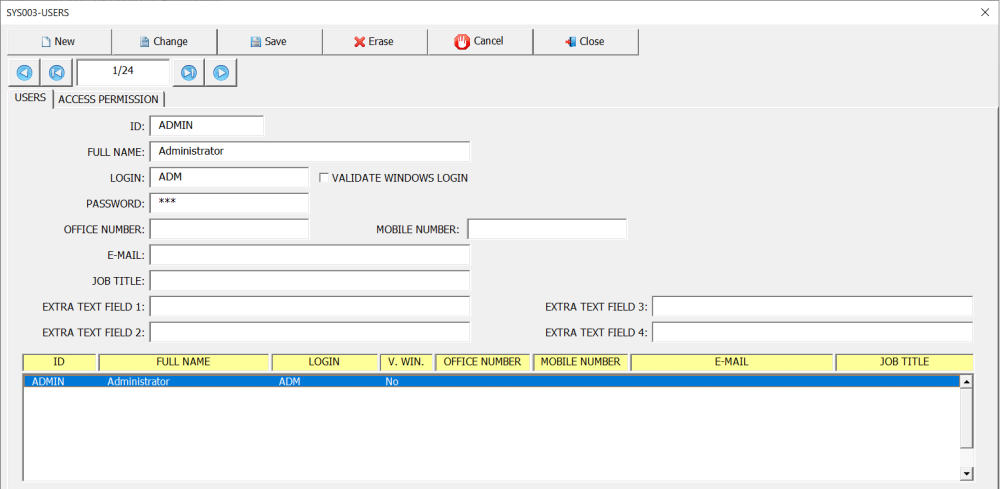
When clicking the (Users) button, the following screen is displayed.

By default, the admin user is already registered. This user cannot be deleted and the parameters (ID, Full Name and Login) cannot be changed.
To add a new record, click on the (New) button and fill in the fields as shown in the example below.

The main fields to be filled in are described below:
- ID: An identifier such as the user’s registration number.
- FULL NAME: Fill in the user’s full name.
- LOGIN: User login.
- PASSWORD: Password (Optional).
- VALIDATE WINDOWS LOGIN (Optional):
If this check box is checked and the login of the registered user is the same as that of Windows, when opening the application, the system automatically validates, that is, the user does not need to enter his login or password in the login screen when opening the application. - The other fields are all optional.
Configuring access permissions
In this tab, the names of all user interfaces created through the option (Screen Design) will appear, allowing you to configure access permissions individually for each user. Once a new user has been registered, it is necessary to define the screens he will be able to access. To configure a user’s access permissions, follow these steps:
- Select the user in question;
- Select the (Access Permission) tab;
- Move to the table called (Screens with allowed access) the screens that the user should have access to;
- Move to the table called (Screens without access allowed) the screens that the user should not have access to.
The example below shows how to configure access permissions for a given user. In this example, the user (Anna R. Roberts) was allowed access to the (Employee Registration) and (Eight disciplines problem solving (8D)) screens.


Post your comment on this topic.