
Fields are data input/output elements, in which they display the information contained in the database and allow the user to enter new information into the system.
Field types
There are 3 basic types of fields as described below.
Field for typing
Input fields allow the user to enter information such as text, date/time and numeric values. This field type has 3 parts as shown below:

- (Label) Text used to indicate the purpose of the field, that is, it informs the user what he must fill in;
- (Field) Typeable element. This is where the user will fill in the information;
- Filter button. Automatically added by the application according to the data type (numeric, text, date/time). Once the interface is ready, the user can use these filters to select the information. This element is not visible during the design process, being visible only when opening the interface. When the interface is in edit mode, this button can have another function according to the data type.
- Date/time field: When clicking on the button, a calendar is shown to assist in data entry;
- Numeric field (when primary key): Searches for the next sequential value.
Drop-Down List Field
A drop-down list consists of a list and a checkbox. The list presents the options a user can select and the checkbox displays the current selection.
The figure below shows the 5 parts of the drop-down list:

- (Label) Text used to indicate the purpose of the field, that is, it tells the user what he should select;
- (Field) Selection field where an item from the list that the user selected is displayed;
- Filter button;
- Button used to show/hide the selection list;
- List where the items that the user can select are displayed.
Document storage field
A field for storing documents allows you to save files such as spreadsheets, text documents, photos, videos and others in the database.
The figure below shows the 3 parts of the field:

- (Label) Text used to indicate the purpose of the field, that is, it informs the user what he must fill in;
- (Field) Displays the name and extension of the stored file
- Open/select file button. When the interface is in editing mode, that is, when it allows the user to enter data, clicking on this button opens a selection box where it is possible to select the file to be stored. When the interface is in normal mode, clicking this button displays the file stored in the database.
Adding fields to the interface
The tab (Field Config) is where the interface fields are created.

For each inserted record, a corresponding field is created in the table (whose name is defined in the “Screen Config” tab, “Page name” field) of the database. The fields that are part of the tab (Field Config) will be listed below, according to the figure below:

(1) Field Description
This is where the field name is defined. The name must be suggestive in such a way that the user, when using the interface, knows what it means and can fill it in properly.
(2) Link to Page
This option is used to define the relationship between two tables.
When an interface has more than one tab (table), by default, the relationship between the tables is always in relation to the first created table.
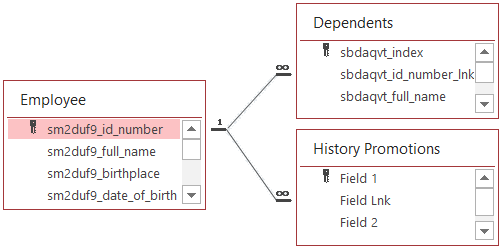
Let’s assume that in the example of the interface for registering Employees and their dependents, a third tab was added to register the employee’s promotion history. In this case, we want both the table (Dependents) and the new table to be related to the main table (Employee).
By default, the application automatically creates the relationship between the first table created, in this case the table (Employee) and the other tables (Dependents and History Promotions) as shown in the figure below:
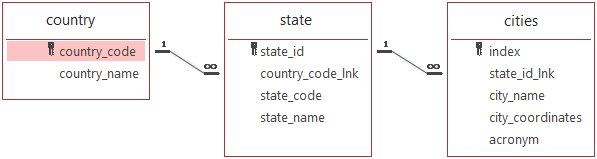
Let’s suppose now that we are going to create an interface for registering countries, their states and cities. The first tab will contain the list of countries, the second tab the list of states and the third tab the list of cities.
We want that when we select a record from the countries tab, only the states belonging to the selected country are shown in the states tab. Likewise, we want to show on the cities tab only the cities belonging to the state selected on the states tab. So, we need to create a relationship between the tables as shown below:
To create the relationship between the table (state) and the table (cities) as shown in the figure above, when creating the first record of the table (cities), click on the button shown below and select the table (state).


(3) Data Type
Used to select the type of data that the field will store. The available data types are shown in the table below:

(4) Drop-down List
Option used to transform the field into a drop-down list, as shown in the example below.

Follow the guidelines described below to select fields from the drop-down list:
(A) Select the table where the desired information is located (Data Source);
(B) Select the field identified by the symbol (*). This field is mandatory;
(C) Selecting a second field that contains relevant information is highly recommended;
(D) It is recommended to order the list in order to facilitate the selection by the user. Normally the sorting is done in the field (C).

(5) Filling Mandatory
Use to define if the field is mandatory or not.
If the field is defined as mandatory, the end user will only be able to save the interface data when these fields are properly filled in. When the interface is in edit mode, mandatory fields are highlighted in “light yellow” color as shown in the following image.

(6) Control Tip Text
Used to show a short explanatory text to the end user of the interface. This text is displayed when the user hovers the mouse cursor over the field.

(7) Totals
For numeric fields, you can automatically create totals fields.
The following figure shows an example of using totals.

(8) Show List
This option allows you to insert a list with some of the fields created in the interface.
This list allows the end user to have a better view of the data in addition to facilitating navigation between records. Using the arrow buttons (right/left), move the desired fields from the “Table Fields” column to the “Fields Shown in the List” column. Use the arrow buttons (up/down) to configure the order of the fields.

Post your comment on this topic.
Marcos wrote: May 22, 2025
Dear Dan, it is possible to calculate the field (age) when saving the record. You can create a "workflow" for this. Below is a step by step guide on how you can do this.
Follow these steps:
1 – Click on “Screen Design” in the “Design Tools” tab;
2- In “Screen Config” select the desired interface;
3- In “Button Events Config” click on “New”;
4- Select “Save” in “Button Event”;
5- Click on “Save” to save the data;
6- After saving, click on the “Script” button;
7- Click on “Expression (CE)”;
8- A screen called “Precess: Build Expression” will open. Click on “New”;
9- In field (A) select {This process}.{Expr 1};
10- In field (B) select “Today()”;
11- In “Operators” select the minus sign (-);
12- In field (C) select the “Date of birth” field and then click “Save”;
13- Click “New”.
14- In field (A) select the “Age” field;
15- In field (B) select {This process}.{Expr 1};
16- In “Operators” select the division sign (/);
17- In field (C) select the “Constant(Numeric)” field and in the “Contante (123)” field write 365;
18- Click “Save” and then “Apply and Exit”;
19- Perform routing using the “Enable routing” option. After clicking “Enable routing”, click “Start” and then “Expr.-1”.
20- Finally click “Save”, returning to the “DES001” screen. Now, when you click save in the interface, the “Age” field will be calculated based on the date in the “Date of Birth” field.
It is worth noting that this field is only calculated when the interface record is saved.
Below is the link to the topic related to “Expressions”, you can get more information in this topic.
https://www.manula.com/manuals/smart-builder-tool/users-guide/1/en/topic/object-expression
Dan wrote: May 22, 2025
Is there a way to create custom calculated fields in the Excel AppMaker? For example, I’d like to calculate the current age of an employee based on a user-entered "Birth Date" field. Can this be done dynamically using a formula like =TODAY() - [Birth Date], or something equivalent within the VBA structure?