Interface Design Overview
The Interface Design feature of the Smart UI add-in was created to help organize and integrate information from multiple related worksheets, improving data management and visualization.
Main purposes of this feature
- Organize related data
You can create an organized tabbed interface, where each main tab displays central information, such as:- Orders → Items, Payments, Deliveries;
- Projects → Tasks, Costs, Team Members;
- Customers → Contacts, Addresses, Support History.
Each main tab (e.g., Orders) contains the primary information, while secondary pages (subpages) display detailed data related to the main tab (Items, Payments, Deliveries). Each subpage automatically inherits the primary tab’s key, ensuring data consistency without complex formulas. To achieve this functionality, secondary worksheets must contain a linking field that correlates their records to the main worksheet.
- Group independent tables
This feature also allows you to create independent tabs to group multiple reference tables, even if they are not directly related. It is ideal for organizing tables frequently used in dropdown menus or auxiliary forms, providing a clear and structured interface.
- Clearly define data headers
By using Interface Design, you can specify exactly which row in your worksheet contains the data header. Without this specification, the add-in will attempt to automatically detect the header row, which might cause errors if multiple similar data rows are present. Additionally, this option lets you select precisely which fields appear in the list at the bottom of the interface, offering greater flexibility and customization.
How to Set Up an Interface with Smart UI
To begin customizing the interface, click the Interface Design button located in the Smart UI ribbon.

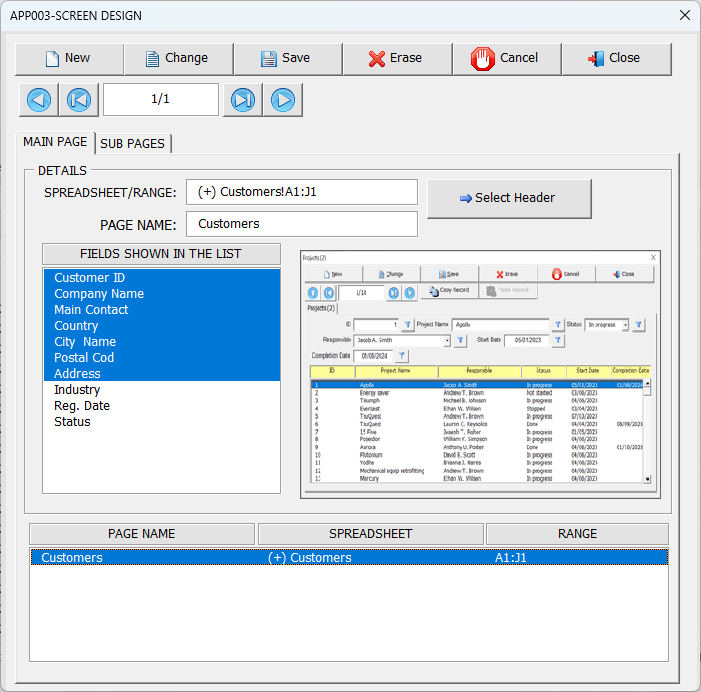
Below are simplified steps to quickly set up an interface using the Interface Design feature of the Smart UI add-in. In this example, we will use the worksheets: Customers → Contacts and Support History.

Setting Up the Main Page
- Click the Interface Design button on the Smart UI ribbon.
- In the opened interface (APP003 – SCREEN DESIGN), select the Main Page tab and click New.
- Click the Select Header button.
- Select the Customers worksheet, highlight the cells in the header row, and click Apply.
- In the Page Name field, enter a clear name for the main tab (e.g., Customers).
- Under Fields Shown in the List, select up to 10 relevant fields to appear in the interface’s lower list.
- Click Save.

Setting Up Subpages
- Now select the Sub Pages tab in the Interface Design interface.
- Click New.
- Click Select Header, choose the Contacts worksheet, select the header row cells, and click Apply.
- In the Page Name field, enter the name of the subpage (e.g., Contacts).
- Choose the most important fields under Fields Shown in the List.
- Under Connection Fields Between Pages, define the link between pages:
- Main Page: select the primary key (e.g., Customer ID).
- Sub Page: select the corresponding field (e.g., Custom. ID).
- Click Save.
- Repeat these steps for other subpages, such as Support History.

Completion
When finished, click Close. Now, whenever you click Run User Interface, Smart UI will automatically display the configured interface with organized tabs and automatic filtering between main pages and subpages.

Download Example File
To better understand how the Interface Design feature works, you can download the example file used in this guide.
This file includes all the configurations demonstrated in the tutorial, including main pages, subpages, and the tab structure. Open it with Smart UI to explore and test the interface as shown in the steps above.
Click here to download the example file
Watch the Example in Action
The video below demonstrates everything covered in this guide.
You’ll see how the interface was configured step by step and how Smart UI organizes the data into tabs with automatic filtering between main pages and subpages.
Watching the example in action can help reinforce your understanding and give you ideas for building your own interfaces.


Post your comment on this topic.