
General points
The WLIP does not necessarily need any local configuration at all – in many cases it should only be necessary to connect the logger to an Internet-enabled network connection and to register and configure the logger’s account at weatherlink.com. But some users may prefer to connect WLIP to local software as well as or instead of uploading to weatherlink.com or, if any problems are encountered with uploads to weatherlink.com, then some checks from local software can be helpful for troubleshooting.
But if you do wish to use some of the diagnostic steps outlined below, you will need to be running a Windows PC. The WLIP firmware updater is only currently available as a Windows utility and only Weatherlink for Windows (ie and not Weatherlink for Mac) supports the IP logger.
Please remember that communications from local software to a WLIP logger must typically happen with the PC running the software connected to the same subnet of the same network as the logger. This will almost always be the case anyway for small and domestic networks, but networks in larger organisations may need checking more carefully. And note also that the WLIP logger is intended as a network device and not for connecting directly to a PC – communications occurs via the local network, not via a wired connection direct from logger to PC.
Using WLIP with Weatherlink for Windows
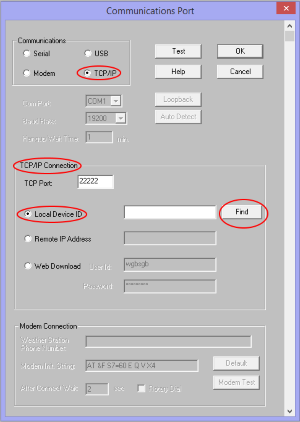
The Communications Port dialogue in Weatherlink for Windows (see right for example – and accessed from the main WL Setup menu) provides tools for checking and configuring the WLIP logger.
To set communications for the WLIP logger, select the TCP/IP option at the top as the Communications option.This will enable the TCP/IP panel midway down the dialogue.
Do not attempt to change the TCP port away from its default value of 22222 (unless you have some very unusual and specific reason for doing so) – there is hardly ever any need to change this value.
For local diagnostic purposes you will usually want to select the ‘Local Device ID’ option (even if the normal TCP/IP mode might be ‘Web Download’ for instance). The textbox to the right will often be blank at this stage, although it should fill in with the logger’s DID value (its MAC address in other words) if a logger is found.
Click the Find button.
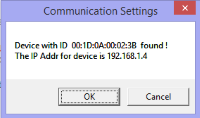
Weatherlink will search the local network and if a WLIP logger can be found then a small message will pop up as shown left, displaying the IP address of the logger, along with its DID/MAC address. Make a careful note of the IP address for future reference. If, however, you see an error message to the effect that no logger can be found then there may be a couple of causes:
- In certain network configurations, eg the logger being cabled to a network access device that communicates with the rest of the network via WiFi, it may sometimes not be possible for the Windows software to ‘discover’ the logger automatically. In this case, and if the logger’s IP address is known (eg from the router’s table of IP allocations or from a network scanner) then it may well be worth entering this IP address into the ‘Remote IP address box and selecting this option. You may be able to establish communications with the logger via this route even though it may be on the local network rather than remote.
- A problem with the logger not being functional for some reason and that will have to be followed up with closer investigation of the logger;
If WLIP uploads to weatherlink.com are not working but you can find the logger with a valid IP address as outlined above then it’s worth checking whether the local Weatherlink software can receive data direct from the logger across the local network. We would suggest working as follows:
- Create a new test station in Weatherlink. (Even if you already have a station set up to receive data eg by Web Download, it may well be worth setting up a new station simply to avoid test data potentially getting mixed up with existing data. But remember to switch the station back to your normal station once testing is complete.)
- Configure the new test station to use the ‘Local Device ID’ setting in the Communications Port dialogue, as above;
- Try running the Bulletin screen (which often takes a couple of minutes to initialise with a WLIP logger) and downloading a block of archive data;
If both Bulletin and archive data are flowing normally then any problems with uploads to weatherlink.com are almost certainly being caused not by the logger but by a failure of the data to flow out on to the Internet at the router – typically this will be a firewall issue that will need sorting out by your local network support.
NB In the uncommon scenario that two or more WLIP loggers are connected to the same network, you will need to repeat the process of pressing the Find button and checking any reported IP against its DID until you find the particular logger of interest.
If you do routinely use the Web Download option, remember to reselect this in the Communications Port dialogue and check that the account credentials are still correct before concluding this troubleshooting process.
Using WeatherlinkIP with other third-party software
The WeatherlinkIP can in principle be used with any other third-party programs such as Cumulus or Weather Display that supports network loggers, ie that can connect to WLIP across a network. Any special set-up advice should be available via the instructions or forum for the particular program in question but in general all that should be needed for set-up is to know the IP address of the WLIP (see next section below) and to be aware that the default port for operation is 22222.
Finding the IP address for the WLIP logger
There are actually a number of different ways to establish the IP address of a WLIP logger:
- Use the Weatherlink for Windows software as outlined in the section above;
- Run the first step of the WLIP firmware updater (see the Firmware Update topic);
- Inspect the DHCP table in your router settings, which (depending on the router model) may allow you to see the assigned IP address directly. Look for an entry termed something like ‘View attached devices’ in the router interface and then look for Davis as the manufacturer or the MAC address (DID) of the logger;
- Run a simple network scanner such as AngryIP and look for Davis as the manufacturer or the MAC address (DID) of the logger;
Viewing the WLIP web interface
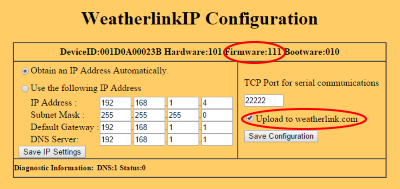 It is sometimes overlooked that the WLIP logger does have its own very basic web interface (see right).
You must know the IP address of the WLIP logger before this web interface can be called up. (See section above for finding the IP address.) Once known, this IP address can simply be entered into the address bar of any standard web browser (Internet Explorer, Chrome etc) as, for example, http://192.168.1.7 (but obviously replacing the IP address with your own value). This should cause the web interface to be displayed, although it may take some seconds before the logger responds and occasionally it may require one or two further attempts to display the interface.
The purpose of the interface is to provide a means of making very basic changes to the logger’s configuration, but it also reports the details of the logger’s current configuration, e.g. the current firmware version is shown highlighted at the top.
In practice, most users will hardly, if ever, need to change these settings and our strong advice is not even to try playing with the settings – with the wrong values it is easily possible to stop the logger communication at all on the network and the logger is then potentially useless for ever. You have been warned!
But for the rare occasions when some change to the settings may be required, there are two main settings to consider:
- Switching the logger from automatic assignment of IP address (DHCP) to manual assignment. Note that all values in the various network settings will need to be 100% correct before the settings are saved;
- Turning off the automatic uploads to weatherlink.com – see the checkbox to the right of the configuration screen. This setting may occasionally be preferred for maximum reliability if the prime use of the WLIP logger is to feed data across the local network to a computer for local processing and uploads to weatherlink.com are of no interest.
Resetting the logger’s IP address
This trick is rarely needed because either the logger has been left on the DHCP setting to receive an IP address automatically (the recommended option) or a fixed IP address has been set but is known unambiguously. But occasionally there’s a scenario where a fixed IP address has been set but a note of the address used have been lost and the logger is invisible on any available network. In this case, the logger’s IP address can effectively be reset by using the ARP command eg in the Command Prompt window of a Windows PC. The form of the required command is:
ARP – s 192.168.0.123 00:1d:0A:12:34:45
In this example, 192.168.0.123 is the IP address that you want the logger to use and 00:1d:0A:12:34:45 is the MAC address (Device ID) of your IP logger. Obviously the IP address and the DID parameters need replacing with your own (unique) network/logger-specific parameters and also need typing with some care to avoid typos and syntax errors. Once this ARP command has been successfully executed, the logger’s web interface should be contactable by entering the new IP address in a web browser. The logger can then be reset to get an IP address automatically and the console+logger rebooted. Normal access to the logger should be possible thereafter, allowing procedures like firmware updates to be completed.
Post your comment on this topic.