This page describes the various anemometers in use with Davis stations and details some of their elements.
Vantage Vue
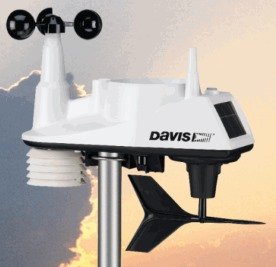
 6357 Vue ISS
The cups (7342.178) and vane (7345.297) are both readily available as spare parts. Note that both cups and vane are unique to Vue station and are not interchangeable with the corresponding 7911/6410 VP2 anemometer parts.
The design of the Vue ISS has evolved over the years as outlined in the Vue ISS topic and some wind components are version-specific. Please refer to that topic for more details.
The design of the shafts and bearings for both speed and direction sensors allows for these components to be replaced separately if, for example, the speed bearing starts to wear and becomes stiffer to turn. The relevant spare parts are known as ‘cartridges’. The wind speed cartridge is the same across all Vue versions and is part 7345.271. The design of the wind direction cartridge has evolved as the ISS case design has changed and is version specific, with the relevant parts being 7345.274 (rev A-G) and 7345.395 (rev M onwards).
The speed sensor in versions A-F was a reed switch fitted on the separate temp/hum sensor board. In rev G this board was no longer separate but made part of the hard-wired sensor harness and in rev M onwards the reed switch was replaced by a solid-state speed sensor. This latter part should rarely give problems but if it should go faulty then the only fix is a new harness or ISS, as discussed under the Vue ISS topic.
The actual sensor for wind direction is a Hall Effect magnetic component, and has been fitted ever since the Vue was launched. This component rarely gives problems, but if it does go faulty then a new main PCBA (rev A-G) or wiring harness (rev M onwards) is required.
All other Davis anemometers
Overview
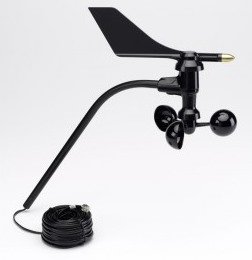
 Current 6410 anemometer
All Davis stations other than the Vue have used a separate anemometer. These include the Vantage Pro 2 (VP2) model as well as the older VP1 and Weather Monitor II & Wizard III stations, which have all used variations on the same basic anemometer design. (NB There was a further anemometer variant sold with the EZ-Mount versions of the WMII and Wizard III stations for a few years after launch in 2000 and which had a 90° curved arm, but again the only material difference is in the shape of the arm.)
All of these anemometer versions use essentially the same sensing mechanism with a 20K potentiometer for sensing wind direction and a magnetic sensor (previously a reed switch but now a sold-state sensor) for counting revolutions of the wind cups in a standard 2.25 second gating window. There is a good write-up online of many of the technical details, including a wiring diagram, of the previous version of the Davis 6410 anemometer which can be seen at: www.wxforum.net/wxtech/Anemometer-Vane.htm which is well worth reading for anyone who wishes to try repairing one of these anemometers themselves. But do be aware that this doesn’t cover the current version of the anemometer.
VP2-type anemometers are all supplied with 12m cable attached which is soldered inside the anemometer body and therefore cannot easily be shortened or detached. The only way of shortening is for the user to cut off the unwanted distal length of cable and to crimp a new RJ11 plug on the new cable end. All VP2-type anemometers (ie 7911 and 6410) bought as spares are supplied fully complete, ie including cable, pole-mount bracket (not shown in these pictures), vane, cups etc.
Anemometer versions
The detailed design of the anemometer has evolved over the years and there have been three main versions thus far:
- The original 6410 VP1/VP2 unit that was used for many years from about 2000-2013 with only minor changes during that time;
- The revised 6410 anemometer (see image above right) introduced in about 2013 and incorporating a replaceable speed bearing and solid-state speed sensor;
- The older 7911 anemometer that was used for the WMII and Wizard III stations and on which the 6410 was based;
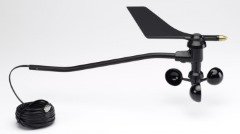
 Later 7911 anemometer
Although the 7911 anemometer always retained its separate numbering, there were only minor differences between the 7911 and 6410 anemometers and, for example, the 6410 unit is fully plug-compatible with the older WMII and WWIII stations. While the 7911 unit is still listed, there is usually no good reason not to fit a 6410 anemometer instead if a 7911 needs replacing. (Also, the original and revised versions of the 6410 unit are fully interchangeable with one another as complete anemometers, though individual spares such as wind cups are not necessarily intermixable.)
In practical terms, there are only two aspects to the anemometer design that need comment: First, the most obvious visual difference between versions is in the shape of the anemometer arm. The 7911 unit started off with a completely straight arm, which later was given a slight upward offset. This upward arm angle is much more pronounced in the 6410 unit, which is less attractive as a perch for birds. Both 7911 and 6410 anemometers are supplied complete with a support bracket for pole-mounting into which the arm fits. The different brackets for 7911 and 6410 are obviously tailored to the different arm angles.
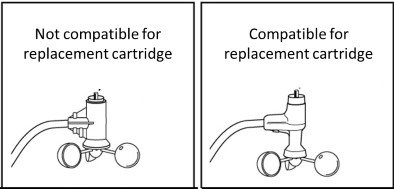
 Old vs new 6410 anemometer body design
Second, and as noted above, the latest (post-2013) anemometer version introduces a replaceable speed bearing as part of what’s known as the ‘Wind speed bearing cartridge’, available separately as part 7345.953. Note that this is only possible with the revised design and so it’s important to be able to distinguish between versions, as per the graphic shown on the right. Look carefully and you’ll notice that the moulding immediately above the cups is significantly different between old and new. And whereas the old version was effectively a single body component, the new version has the body in two parts with the lower wind cartridge part being securely held in place with a single screw located immediately below where the arm enters the anemometer body.
Around 2013 the older all-black wind vane was replaced with a new brass-tipped version. And if you have this brass-tipped vane then it’s also likely that you have the newer anemometer version overall. But the two changes weren’t synchronised and so it’s important to check the body shape as well to tell which version you have.
The solid state speed sensor should hopefully greatly reduce the incidence of reed switch failure that was a common issue with the original 6410 design (though we obviously won’t get hard evidence of improved reliability until the design has been widely used in the field for 5 years or more). However, greater switch reliability may now put more emphasis on the speed bearing, which of course does have to make many millions of revolutions during its service life. So having the speed bearing replaceable at reasonable cost does bode well for the overall life expectancy of a new 6410 anemometer. One other advantage of the separate bearing is that design improvements can continue to be made to the bearing cartridge, which can then be applied retrospectively to existing compatible anemometers at relatively low cost.
Wind cups
Recent Vue & VP2 anemometer versions
For VP2-type anemometers sourced since about 2003/4 the only replacement wind cups likely to be relevant is part 7905L – the large cups with horizontal magnet. For the revised (as from about 2013) 6410 anemometer, the magnet was moved into the wind speed cartridge and so in principle the cups no longer need their built-in magnet. However, no new spare cups without magnet appears to have been released by Davis and so 7905L seems to remain as the standard cups part, whether the magnet is needed or not.
The 7905L cups obviously need to be set as ‘large’ wherever there is a choice on the console settings for wind speed.
Vue cups, although quite similar in 7905L, these have no magnet and remain a distinct part as 7342.178. These Vue cups are not interchangeable with the 6410 anemometer.
Older anemometer types
Anemometers bought before about 2003/4 (and maybe at least a year or two subsequently, if old stock remained in the supply chain) have more cups variation as detailed below. In practice, an anemometer that is now 12 years or more old really needs replacing completely – anemometers do have only a finite service life. So the information below is essentially academic and here for reference only.
Large and small: Wind cups for VP2-type anemometers have been available in two cup sizes – small and large. The 7911 (WMII-type) units were originally small cups only (in ca 2000 and before). But for many years now both anemometer types have been sold only with large cups (though small cups are still available as spares) and large is the only size that is likely to be relevant to the great majority of users. Large cups start spinning at lower wind speeds than the smaller version and for general use there is no need ever to think of using small cups. Even for anemometers originally supplied with small cups, the large cups are the best replacement.
The only circumstance in which small cups were suggested was in localities where extremely high winds (eg hurricane force – 100mph and above) may be encountered because smaller cups may perform a little better under these extreme conditions, presumably because of their lower wind resistance, though this isn’t stated explicitly anywhere. The downside of small cups is obviously their more limited performance at more moderate wind speeds.
Construction: for some years’ now, both small and large cups have been of a single all-in-one moulding. Previously, the large cups were each moulded separately and clicked in to the hub assembly. But this older design is more prone to wind damage and there is no reason not to replace the old version with the newer all-in-one moulding.
Magnet orientation: In 2003, Davis changed the orientation of the magnet in the wind cups in the interests of greater accuracy and reliability. (The magnet in the cups passing a reed switch in the anemometer body was the mechanism by which revolutions of the cups were counted, though a slightly different method is used in the revised 6410 version – see below).
The magnet is visible on the underside of the cups In the original version, the magnet was oriented vertically (ie parallel to the spindle on which the cups sit) and the magnet is only visible end-on as a bright dot. In the post-2003 version the orientation became horizontal and the magnet can be clearly seen as a small rod.
Fitting new cups with the wrong orientation will not work reliably. If the anemometer body needs cups with a vertical magnet then this is the type that must be fitted and vice versa. Look at the existing cups before ordering a new set of cups.
As a result of using both large & small cups and vertical & horizontal magnets, three distinct types of spare cups have been available:
- Large cups: 7905L (horizontal) and 7903L (vertical);
- Small cups: 7903S (vertical); (To our knowledge, there has never been a 7905S part);
In practice, only 7905L is likely to be commonly needed.
Console cup size setting: TBA
Repairing 6410-type anemometers
Just to reiterate: while a few components such as wind vane and wind cups can be replaced on the Davis anemometers and cable damage is usually repairable, loss of wind speed or direction usually means a new anemometer unless you’re prepared to entertain DIY repairs. The one exception to this is that any issues with the wind speed bearing on post-2013 units can usually be fixed with a new wind speed bearing cartridge.
But, in general, other than using these readily-available spare parts, providing diagnosis, repair, post-repair checks, warranty, shipping etc for faulty anemometers is just not commercially viable for dealers. For users who do wish to try their hand at repairs themselves, here are some additional resources:
- The write-up of the previous version of the Davis 6410 anemometer referred to above at: www.wxforum.net/wxtech/Anemometer-Vane.htm is a good starting point. But do remember that this doesn’t currently cover the revised (post-2013) version of the anemometer and important details may differ, including eg the colour coding of the wiring.
- For specific pictorial instructions in replacing the reed switch in older anemometer versions take a look also at: www.cjoint.com/15ma/ECAj5A762FD_changement_ils.pdf and www.chatteris.biz/blog/davis-6410-anemometer-reed-bearing-replacement-2000-2013-version/
- Text instructions for disassembling the revised 6410 version and replacing the direction potentiometer, courtesy of Tony Pennell;


Post your comment on this topic.