
From Lightning Conductor Web Part (LCWP) 2013 version 2.1.0.0, you can add calculated columns to your LCWP views.
Microsoft® SharePoint® allows you to add a calculated column to a list or library. By creating a formula in these calculated columns, you can include data from other columns and perform functions to calculate dates and times, perform mathematical equations, or manipulate text. In calculated columns, formulas are based on Microsoft® Excel® functions and syntax, but there are some limitations on the functions you can use and some subtleties in the syntax. You can find more information about the various kinds of formulas you can use in a SharePoint calculated column in the Microsoft article Calculated Field Formulas.
Using the Lightning Conductor Web Part, you add calculations similar to those you can add to a SharePoint calculated column, plus you can add almost any calculation that you want. The advantage of using a LCWP calculated column is that the calculation is executed every time the page is displayed, whereas with a list / library calculated column, the formula is only executed when the list item or file is modified. Also, the LCWP calculated column, is not based on Microsoft Excel formulas, but on C# based operators, calculations, and functions.
As with other columns, LCWP calculated columns allow you to apply conditional formatting on the calculated value, filter on the calculated column, as well as sort or group by the result of the calculation. This page contains information on how to add a LCWP calculated column and information on formulas you can use.
Adding a Calculated Column
To add a LCWP calculated column, use the following steps:
- Click the Add calculated column
 icon in the top right hand corner of the Columns Configuration section on the Configure Display Provider step.
The Add calculated column dialog box is displayed, which contains three sections:
 icon in the top right hand corner of the
 - Column name: In the text box, type a name for the column.
- Column type: Select one of the following values: String, DateTime, Integer, Double or Boolean. You must select the data type that is to be calculated. This may not be the same value as the columns involved in the calculation.
- Expression: Use this section to create the formula for the calculated column. A formula can contain functions, column references, operators, and constants. To insert a column reference, select the column in the dropdown list and then click Insert field.

You must not type the column reference, but instead, use the drop-down list to insert references to columns. Examples of formulas can be found later on this page.
Once you have finished configuring the formula, click Save.
The Add calculated column dialog box closes and the new calculated column is displayed at the top of the columns in the Columns Configuration section.
Select the check box to the left of the column if you wish to display the column in the LCWP.

To edit the calculated column, click the Edit calculated column
To delete the calculated column, click the Remove calculated column
Information on calculated column formulas
This section contains examples of formulas you can use in the LCWP calculated column.
Text formulas
You can use formulas to manipulate text, such as combining or concatenating the values from multiple columns, comparing the contents of columns, removing characters or spaces, and repeating characters.
- To combine two or more columns, use the addition operator ( + ), for example to create a calculated column, fullname, which concatenates the columns, Firstname and Lastname, use the following formula:
[Firstname]+" "+[Lastname]
- Use String properties, for example, to find the length of the values stored in the Title column:
[Title].Length
- Use String methods, for example,
- To convert a string stored in the Title column to lower case,
[Title].ToLower() - To retrieve a substring for values stored in the Title column, starting from character position 5, for a length of 6 characters,
[Title].Substring(5,6) - To remove all spaces for values stored in the Title column,
[Title].Replace(" ","")
Date and time formulas
You can use formulas to perform calculations that are based on dates and times, such as finding the day of the week, adding a number of days, months, or years to a date, calculating the difference between two dates, and converting time to a decimal value.
- Use DateTime properties, such as, displaying the day of the week for values stored in the Created column,
[Created].Value.DayOfWeek
- Use the DateTime methods to add a date/time component to a column, for example to add two hours to the Created column, use the following formula,
[Created].Value.AddHours(2).ToString(“YYYY-MM-DD HH:MM”)
- Calculate the difference between two dates, use the subtraction operator ( – ) and then use TimeSpan properties to present the difference as required. For example, when using a task list, create a calculated column using the following formula to display the number of days to complete a task.
([DueDate].Value-[StartDate].Value).TotalDays
Conditional Formulas
You can use formulas to test the condition of a statement and return a value. Conditional expressions take the form of a ternary operator called the conditional expression operator, ?:, which use the following format:
(condition)?(evaluate if condition was true):(evaluate if condition was false)
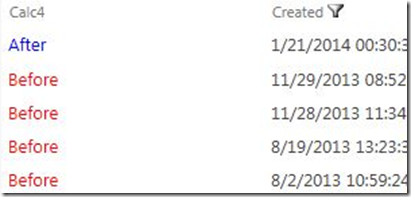
For example, if you want to create a calculated column that contains either Before or After, depending on the year the item / file was created, then the formula would look similar to:
([Created].Value.Year<DateTime.Now.Year)?"Before":"After"
Also, if the LCWP conditional formatting feature does not satisfy all your need, you can apply formatting as part of your calculated column, for example,
([Created].Value.Year<DateTime.Now.Year)?"<font style=‘color:red;’>Before</font>":"<font style=‘color:blue;’>After</font>"
This would result in a Lightning Conductor Web Part displaying data similar to the following screenshot.
Mathematical Formula
You can use formulas to perform a variety of mathematical calculations, such as adding ( + ), subtracting ( – ), multiplying ( * ), dividing numbers ( / ), remainder after dividing a number by a second number ( % ) ; and using the Math Fields and Math Methods. For example:
- Round values in the NoTasks column to the nearest integral value:
Math.Round([NoTasks].Value)
- Calculate the area of a circle when the value of the radius is saved in the Radius column:
Math.Pow([Radius].Value,2)*Math.PI
Post your comment on this topic.