
The notes here primarily deal with problems arising with installing the Weatherlink for Windows program for use with USB loggers. Of course there are various other combinations of logger type and computer/operating system that a limited number of users may be running – it may still be useful to review the comments here together with the following pointers:
- Even if you’re planning to use other third-party software (e.g. Cumulus or Weather Display) routinely on a Windows PC, it’s suggested that you still install the Weatherlink program as a first step – this is the simplest way of checking that the logger is working correctly and gives access to certain settings that other software may not provide;
- Users of Weatherlink for Mac should see the specific Mac topic;
- Users of the old (now discontinued) WeatherlinkIP logger should first get their logger uploading successfully to the weatherlink.com network (as described in the notes with the logger). If any problems persist then review the WeatherlinkIP topic.
IMPORTANT: In principle, troubleshooting new installations is no different to fixing established configurations that may have developed a problem. But to make it easier for new users, some of the key points to check are summarised on this page. However if the problem remains unresolved then users will need to read through the rest of the more detailed notes that are available under individual logger topics on the main menu here.
Also: The notes here focus on issues to do with faults during the installation process itself or a complete inability to establish communications with the logger. If, for example, the problem is only to do with archive downloads (ie real-time data can be seen OK on the Bulletin screen of Weatherlink) then see the archive download errors topic.
As a starting point, it’s worth noting that the Davis Weatherlink software is in active use by many thousands of users around the world and on all Windows platforms from Windows XP right up to Windows 10. There are no known incompatibilities whatsoever between Weatherlink and any relatively recent version of Windows. (NB However if you are using Windows 10 after Build 10240 and attempting to connect in USB mode then you may encounter a temporary bug requiring a USB driver rollback as a fix – please see the Windows compatibility topic. This bug was introduced in a Windows update in Dec 2015 and should be fixed in all more recent Windows versions.)
Faults with the logger hardware are also extremely rare. If you are experiencing a problem post-installation it is highly likely that some aspect of the installation instructions has been overlooked or perhaps you are using a PC with a very unusual or very locked-down configuration that is preventing Weatherlink from installing correctly, but the notes below should help pinpoint the problem.
Basic checks
If a new installation is not working, the first remedy to try is simply to reboot the console (read the linked topic to be sure you understand the process) and also the PC, which will often fix simple faults.
If this is a problem arising after a move to a new PC or following attempted updates to Windows or Weatherlink then see the Migration and update problems topic.
The full version of the Weatherlink program used to be supplied on a CD but this has now been superseded by a download from the weatherlink.com website. New Weatherlink installations must use the FULL version, ie be run from the CD if supplied or as a full download and installed from an account with Administrator permissions. The Weatherlink updates that can also be downloaded from the weatherlink.com website are just that – updates. They require a pre-existing WL installation on the PC hard drive to update. You cannot create a brand new WL installation from an update download alone. If you’re having problems installing Weatherlink then double-check that you did indeed download the full version and not an update.
To start configuring the Weatherlink program, you must obviously be able to launch the program and without it crashing. If you cannot successfully reach this stage then there is some fundamental issue with the installation process which needs sorting out (e.g. is the CD damaged, is the CD drive malfunctioning, is the PC configuration perhaps locked down too tightly, are you trying to install to a location other than C:\Weatherlink etc). If you have any uncommon USB devices attached to the PC then it may be worth trying disconnecting these and trying to launch WL again – it’s not impossible that there could be some clash of USB drivers.
If you do encounter apparent problems with Weatherlink crashing them try at least once to reinstall Weatherlink – the installation may be able to complete successfully the second time around. Remember that the Weatherlink program should be installed to the C:\Weatherlink folder – attempting to install in other locations can cause problems. Remember also that the USB cable should not be connected during installation – this can interfere with activation of the USB driver until the PC is rebooted. But if problems persist then you will need to contact support.
But unless some specific problem was noted in installing or running Weatherlink, it is rarely helpful to attempt a reinstall – this should be left as a last resort.
The further comments below assume that you can indeed launch the Weatherlink program and that it is not immediately crashing.
The next most likely cause of problems if the USB logger is in use is that the logger mode is not correctly set – see next section.
Communications port and logger mode
Background
When the Weatherlink program runs for the first time it automatically launches what is termed the ‘Walkthrough’ dialogue. (The walkthrough can also be triggered at any time simply by selecting the Setup|Walkthrough menu option.) The Walkthough ensures that all of the basic Weatherlink settings are configured according to the user’s preferences. Many of these settings are indeed just preferences (such as measurement units) or there to ensure conformity with local standards (e.g. timezone) and all of which can amended subsequently by choosing the appropriate menu option (and without running Walkthrough again).
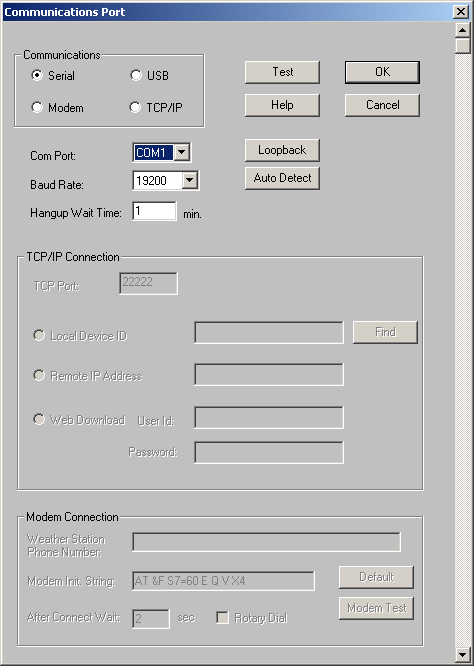 But the one critical step is the second one, entitled ‘ Communications Port’. This launches the larger ‘Communications Port’ dialogue (see right), which can also be accessed from the Setup|Communications Port menu option. If this option is not correctly set up then you will not be able talk to the logger at all, so accurate configuration is vital.
It is really important to appreciate that the USB logger can run in two distinct modes which are termed ‘serial’ (or VCP) and USBXpress. (Yes, even though the logger has a USB connection, one of its operational modes is called ‘serial’.) Understanding the logger modes is actually quite easy, but does take a number of words to explain – please read the notes below with care.
Software can only talk to the logger if the software also utilises the same communications mode to which the logger is currently set, ie serial or USBXpress. If a software program tries to talk to the logger in the ‘wrong’ mode then it will not receive a response and it will appear that communications between logger and computer are broken. More details about the two logger modes and specifically about diagnosing the current logger mode will be found in the Understanding USB logger modes topic, but here is a brief summary of how the logger mode is used:
The USBXpress mode is called simply ‘USB’ for short and the serial or VCP (Virtual Comm Port) mode is termed ‘serial’. In the ‘serial’ mode the logger behaves as if it were a standard RS232 serial device, despite the physical connection being USB in nature. This means that data is received by PC software as if it were being received on a numbered comm port (COM1, COM2 etc) except of course that the COM port is an imaginary or virtual one rather than a real physical COM port. The key point is that if software is configured to expect data on a serial COM port then the correct COM port number must be set in the software (unless the software is clever enough to auto-detect the logger’s COM port number, which can work well but is not always infallible).
In summary, if the logger is set to USB mode then software must also be set to expect data in USB mode. And conversely if serial mode is set on the logger then software must be configured to look for incoming data on a serial port with the correct COM port number. The logger remembers which mode it is set to even when powered off, hence the possibility of a mismatch between logger mode and what the software is expecting, especially if new software is being evaluated.
Three other key points:
- There is no practical difference between USB and serial modes – the two are directly equivalent and one is no faster nor more accurate than the other;
- At present the only software that can use USB mode is the Davis Weatherlink software. If you’re planning only to use the Weatherlink software then USB mode is the simplest to set up.(because it can be configured automatically and does not require the user to identify which COM port number to set). But no other software currently seems able to use USB mode and so, if you’re planning to use any other software than Weatherlink be sure to select serial mode and NOT USB mode.
- The logger mode can be switched from serial to USB or vice versa with appropriate software commands. However, while the switch from serial to USB can be made by any software that implements the appropriate command (which Weatherlink does do), the switch back from USB to serial can only be made by a special utility called ‘CP210x USB to serial converter’ which is installed along with Weatherlink. (Note that this converter utility is not part of Weatherlink and is not accessible from within the Weatherlink program. Instead, it will be found on the Windows Start Button or (Windows 8) Start Screen.);
In practice
So, one possible cause of a communications failure in new installations (or if new software is being evaluated) is that the logger mode does not match what the software is expecting.
The logger is supplied set to serial mode and so should intrinsically work with all compatible software (provided the ‘serial’ communication port option has been selected and the correct COM port number has been set). But if there appear to be communication problems with the logger then it is always worth confirming that the logger is indeed set to the expected mode (ie either serial or USB) as described in detail in the Understanding USB logger modes topic.
Further checks
Baud rate
Double-check also that the Baud rate on the console is definitely set to 19200. (The Baud rate must be correctly set for all types of data logger, including USB and IP, because the underlying data stream across all types of protocol is always a serial stream.) Exact instructions for checking the Baud rate will vary according to whether you have a Vue or VP2 station, but the basic principle is to enter Setup mode on the console and then the last setting in the Setup settings sequence is the Baud rate. (NB The Baud rate setting is only visible when the logger is both present and correctly installed in the console.) A shortcut to seeing the Baud rate is to enter Setup mode and then to press the Bar key (which takes you backwards through the setup sequence, as opposed to pressing the Done button briefly which cycles through the settings in the normal forward direction.) Remember to exit Setup mode once the check is done.
Installation Failure
Assuming that installation is being attempted while logged in with an account with Adminstrator permissions, this would suggest that there’s something fundamentally wrong or misconfigured with the PC or Windows configuration or that whatever security measures are installed are being overzealous. These possibilities are really beyond the scope of the support notes here (and indeed more an issue for your local PC/Windows support arrangements – it’s not something that Davis dealers will usually be able to help with), but reasons could include, for example, a damaged CD or CD drive or an active local security policy that’s not allowing WL to install fully or security/anti-malware software that is being similarly too protective – there are all possibilities to check further.
So, if there’s any possibility that your security software may be blocking correct installation of Weatherlink then it may well be worth disabling security for a brief period while the WL installation is re-run (and then of course remembering to re-enable the security program).
It’s also always worth trying a second attempt at installation if the first attempt fails. Another fall-back plan, where possible, is to try installing Weatherlink on a different PC – if successful, this will at least rule out a damaged CD and might help to highlight what is different about the first PC’s configuration.
USB driver not installed or not loading correctly
For the USB logger to work correctly under Windows, it needs a USB ‘driver’ to be loaded, which reads the data coming into the PC’s USB port and presents it to the Weatherlink program via the expected protocol. (Actually, there are two different USB drivers that are used depending on whether the logger is in serial/VCP or USB mode, but for present purposes it’s simplest just to think of a single driver utility.)
The driver is actually a completely separate piece of software to the main Weatherlink program and is written by the maker of the USB chip (a company called Silicon Labs) and nothing directly to do with Davis at all. But Davis do distribute the latest tried and tested version of the USB driver as part of the Weatherlink package and arrange for it to be loaded as well as the Weatherlink program.So if you have installed the latest version of the Weatherlink software then this should also install the latest USB driver version, which is a good reason always to install the latest WL update. In particular, new versions of Windows sometimes need new driver versions and so occasionally, if there has been a significant change to Windows, Weatherlink may not work until updated to the latest version.
In rare circumstances, Weatherlink may not be able to install the driver correctly into the Windows environment and you may see an error message relating to a driver failure (in the case of the serial/VCP driver, this message typically includes the name CP210x or similar, which is the part number for the USB chip in the logger). To be clear, this is usually an indication that the Weatherlink program itself has installed correctly but that the program cannot receive data from the USB port because the separate USB driver is not working correctly for some reason.
It is not at all easy to diagnose why the driver may not be operational because this can reflect a deep-seated Windows issue rather any problem with the Weatherlink installation itself. If the driver is loading when the logger is plugged in but is not functional then it may be possible to see the driver listed in Windows Device Manager but with a yellow exclamation mark beside it. (See the Understanding USB logger modes topic for further details.) This may be useful in diagnosing the problem but doesn’t help much in resolving it.
If a failure of the USB driver is suspected then there are four approaches to fixing the problem:
- Simply try again to install Weatherlink, double-checking that all of the standard requirements have been met, ie install with the logger not connected and from an account with Admin rights, etc etc;
- If you have extra security software running then turn this off just for the duration of the installation – this could be preventing the USB driver from being loaded into its correct Windows location and registering correctly;
- Check that you have no other USB devices installed that might be interfering with the Weatherlink installation – this is fairly unlikely, but not totally out of the question. In extremis, you may need to uninstall any competing software or drivers that you may identify;
- If all other approaches fail then you can try downloading the CP210x driver package as a separate entity direct from the Silicon Labs website and seeing if that will install more completely;
Overall Summary Checklist
Finally, if all of the above together with the detailed notes under related topics still doesn’t suggest a solution then please confirm that all of the following points have been checked before seeking further support. If you’re not sure what any of the points mean then please read the explanatory notes that are available in various places here.
- Did the Weatherlink installation appear to complete correctly and without errors? If not then see the Installation Failure section above.
- Does the Weatherlink program definitely start and run without crashing (even if it cannot connect to the logger)?
- Have both console and PC been rebooted, exactly as described in the reboot the console topic?
- Were the correct number of beeps heard?
- For USB loggers especially, have you double-checked that the logger mode and the Communications Port setting inside the WL program are not mismatched? See the ‘Communications Port & Logger Mode note above if you’re unsure about this.
- If using Serial mode, have you tried (and if necessary retried) clicking the AutoDetect button to identify the correct Com port?
- Are you using Windows 10? If so, you may be encountering a USB driver issue. Please see the Windows compatibility topic
- Is the console baud rate definitely set to 19200?
- Are you sure that Weatherlink was installed from an account with Administrator permissions?
- Was Weatherlink first installed from an original CD and definitely into the C:\Weatherlink folder and not elsewhere?
- If applicable, has Weatherlink been updated to the latest available version via a download from the Davis website?
- If it’s a USB logger, have you tried using other USB ports on the PC?
- Have you tried reinstalling the Weatherlink software? (Subject to [1] above, not usually necessary but in extremis…)
- If possible, have you tried installing Weatherlink to a different PC to check that the original PC’s configuration is not somehow blocking correct operation of Weatherlink?
Post your comment on this topic.
Diana wrote: Sep 5, 2015
I wish Davis would take a look at the type of true troubleshooting information you are providing and incorporate it into their site. The manuals are ok., but in my experience the Davis site and manuals offer nothing in comparison to what you have offered here. Example; downloading driver pkg directly from Silicon Labs. Genius! Thank you.