
The [Unit Test] view section is located on the right of the screen. The [Unit Test] view combines the test and coverage information and provides it in a single view.

Toolbar menu in the Unit Test view
| Toolbar icon | Description |
|---|---|
| |
Hides all test view trees. |
| |
Displays by unique test name. |
| |
Displays all the tests. |
| |
Displays only the tests that the test result is Failure/Error. |
| |
Displays only the tests that the test result is Failure. |
| |
Displays only the tests that the test result is Error. |
| |
Displays only the tests that the test result is Success. |
| |
Displays only the tests that the function to be tested has been changed. |
| |
Displays only the tests that the test execution is not ensured. |
| |
Displays only the test that the host result and the target result are different. |
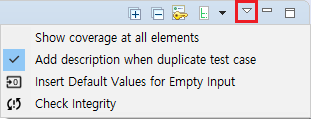
Pull-down menu in the Unit Test view (▽)
| Menu name | Description |
|---|---|
| Show coverage at all elements | Displays the coverage in all items. (function, test, test case) |
Dashboard in Unit Test

| Menu | Description |
|---|---|
 |
Runs unit tests. |
 |
Shows success, Failure, error and total of test case. |
 |
Selects the coverage type to be displayed in the [Unit Test] view. (statement, branch, MC/DC, function call) |
 |
Shows the selected kind of full coverage. |
Search
In the Unit Test view, you can search functions, tests and test cases by file, function, test, status (success, failure, error) and issue name.

Status search keyword
| Keyword | Description |
|---|---|
%TEST_SUCCESS% |
Test success |
%TEST_FAILURE% %TEST_ERROR% |
Test failure/error |
%TEST_FAILURE% |
Test failure |
%TEST_ERROR% |
Test error |
%TEST_HAS_NOT_FUNCTION% |
Function changed |
%TEST_NOT_GUARANTEE% |
Run not guaranteed |
%TEST_RESULT_DIFFERENT% |
Host/Target result different |
Structure of the Unit Test view
The Unit Test view presents the hierarchy structure of [Function]-[Test]-[Test case]. If there are more than 100 test cases in a test, they are grouped in groups of 100 to represent a group.
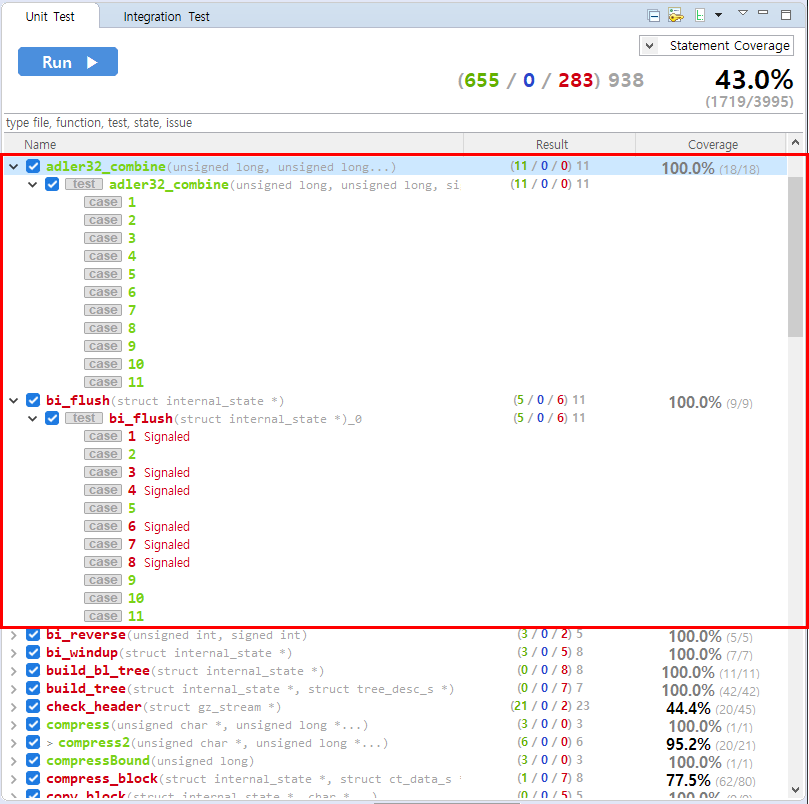
Item icons in the Unit Test view
| Item icon | Description |
|---|---|
| None | Function |
| Test | |
| Test case, Test case group |
Item status color in the Unit Test view
The execution information of functions, tests, and test cases in the Unit Test view is represented by colors.
| Color | Description |
|---|---|
| Green | Function/Test: If the execution result of all the test cases under it is success. Test case: The result of execution is success. |
| Blue | Function/Test: If only test cases with failure and no test cases with errors exist under it. Test case: The result of execution is failure. |
| Red | Function/Test: If test cases with error exist under it. Test case: The result of execution is error. |
| Orange | Function/Test: All test cases have not been executed under it and test cases that are not guaranteed to run exist. Test case: Run not guaranteed. |
| Black | Function/Test: All test cases under it have not been executed. Test case: Not been executed. |
Function node
The Function node provides the function name, the coverage and the test case execution results (success, failure, error and total).
Double-click on a function node to check the location of the function in the Source Code Editor window.

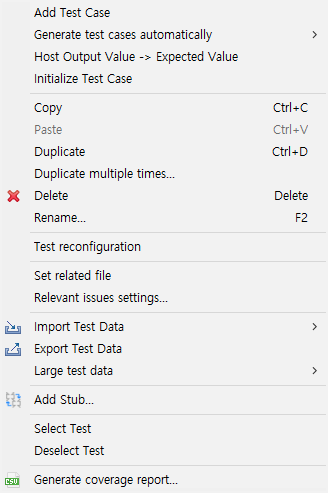
Context menu of the function node
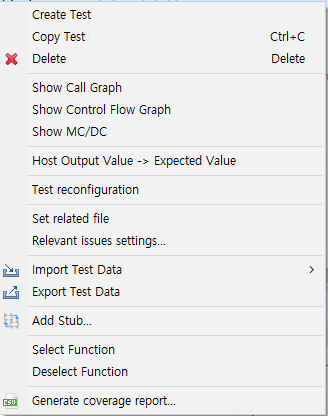
| Context menu | Description |
|---|---|
| Create Test | Creates a test of the selected function. |
| Copy Test | Copies tests of the selected function. |
| Delete | Deletes tests and test cases of the selected function. |
| Show call graph | Shows the function call graph of the selected function. |
| Show control flow graph | Shows the control flow graph of the selected function. |
| Show MC/DC | Shows MC/DC of the selected function. |
| Host output value -> Expected value | Pastes the host output value to the expected value. |
| Target output value -> Expected value | Pastes the target output value to the expected value. |
| Set related file | Selects the files containing that test. |
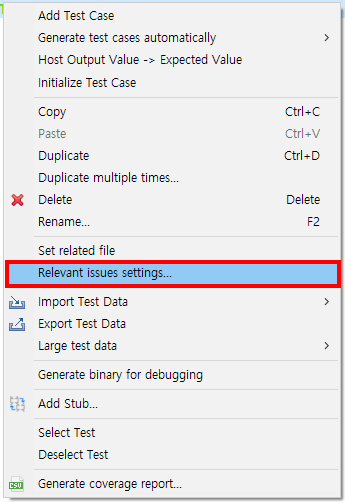
| Relevant issues settings | Associates the selected test with the issue of the management tool. |
| Import Test Data | Imports the test data saved in local. |
| Export Test Data | Exports the test data to local. |
| Add Stub | Adds the stub to the selected test. |
| Select Function | Selects the checkbox of all the functions selected by a mouse. |
| Deselect Function | Deselects the checkbox of all functions selected by a mouse. |
| Generate coverage report | Exports the selected test coverage to the selected path. |
Test node
The test node provides coverage, test case execution results(success, failure, error, total).
Double-click on a test node to open its Test Editor.
Context menu of the test node
| Context menu | Description |
|---|---|
| Add Test Case | Adds the test case to the unit test selected. |
| Generate test cases automatically | Creates the test case in various ways. |
| Host output value -> Expected value | Pastes the host output value to the expected value. |
| Target output value -> Expected value | Pastes the target output value to the expected value. |
| Initialize Test case | Delete all the test cases. |
| Copy | Copies the test and test case. |
| Paste | Pastes the test and test case. |
| Duplicate | Duplicates the test and test case. |
| Duplicate multiple times | Duplicates tests and test cases as many as the number entered. |
| Delete | Deletes the test and test case. |
| Rename | Modifies the test name. |
| Set related file | Selects the files containing that test. |
| Relevant issues settings | Associates the selected test with the issue of the management tool. |
| Import test data | Imports the test data saved in local. |
| Export test data | Exports the test data in local. |
| Large test data | Exports it locally or registers the file written by the user to the target test as a test case. |
| Add Stub | Adds the stub to the selected test. |
| Select tests | Checks all checkbox of the tests selected. |
| Deselect tests | Checks all checkbox of the tests selected. |
| Generate coverage report | Exports the selected test coverage to the selected path. |
- Rule for exporting test data
When you try to export test data, if the test data for the same test as the test exported before exist in the export location, it creates the test data by numbering the file automatically.
The numbering convention is “test name_#No.”.
Ex) test_1_test0.csv, test_1_test0_0.csv, test_1_test1.csv ……
- Rule for importing test data
When importing the test data, if you select multiple test data numbered with the test name, it imports those files by merging them.
Import test data
You can import the test data in various formats (csv, xlsx, txt, json).
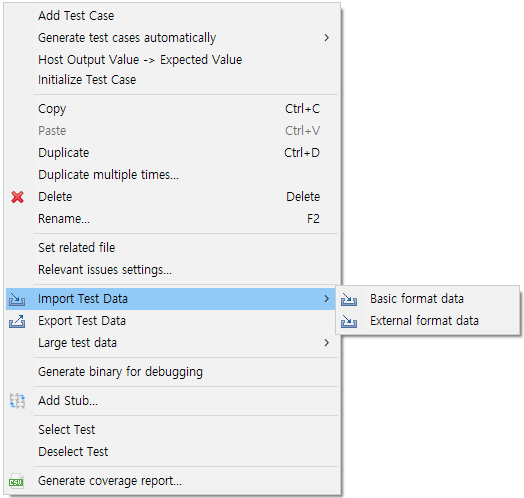
- In the context menu of Unit Test view, click [Import Test Data] and select either [Basic format data] or [External format data].
- If you select [Basic format data], the test data with the format exported from the CT is imported.
- If you select [External format data], the test data is imported from the files in various formats (csv, xlsx, txt, json).

Generate test cases automatically
It creates a test case by using Flat/Pairwise/Random combination, Generates with Function Generator, and Search-based Test case Generation (CS Labs).
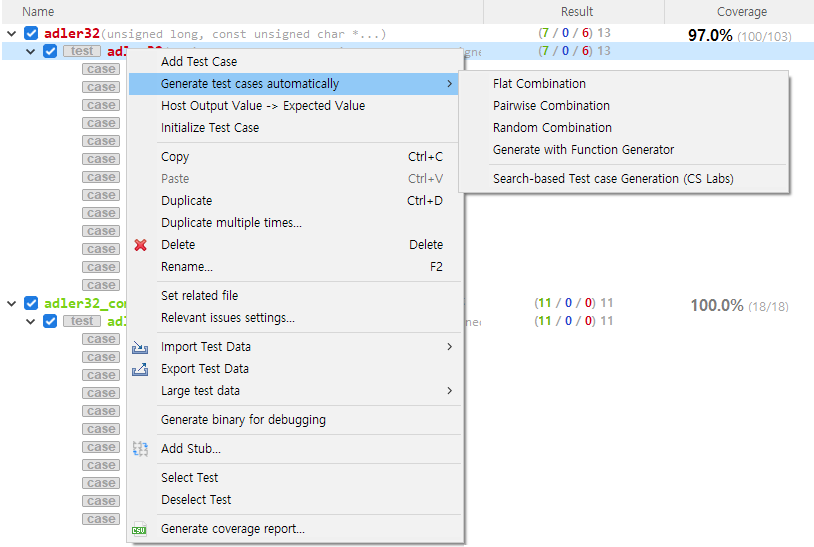
- In the context menu of Unit Test or Integration test view, click [Generate test cases automatically] and select one among [Flat Combination], [Pairwise Combination], [Random Combination], [Generate with Function Generator] and [Search-based Test case Generation (CS Labs)].
| Method | Description |
|---|---|
| FLAT | Combines simply based on variables having the largest number of test data. |
| PAIR WISE | Combines so that each selected parameter data is paired at least once with the parameter data other than itself. ※ The number of variable partitions must be more than 2 and less than 52 |
| RANDOM | Combines the test data as many as the number of test cases that the user defines any value between the minimum value and the maximum value for the variable partition of input parameters. |
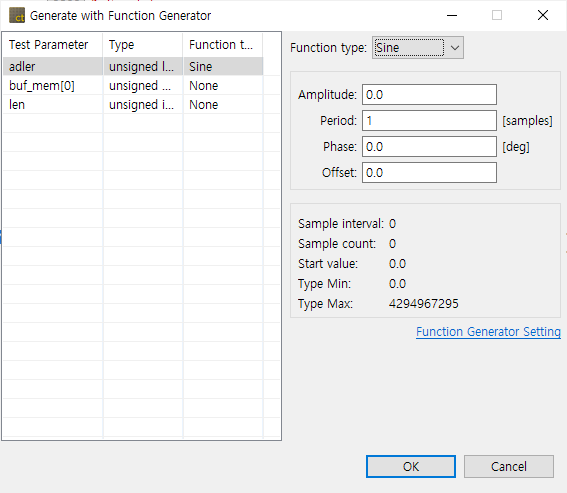
| Generate with Function Generator | Creates a test case by using six function types. (Ramps, Random, Range, Sine, Toggle, and Single Value) |
| Search-based Test case Generation (CS Labs) | Creates a test case by using AVM, which is a local search algorithm. ※ Currently, only C language supported |
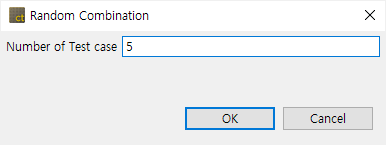
- If you select [Random combination], the Random combination window is displayed so that the user can enter the number of test cases.
- If you select [Generate with Function generator], you can select the function type (Ramps, Sine, Random, Toggle, Range, Single value and None) and change the settings of the function selected via the settings of the function generator. In [Project property settings], the function generator information can be set.
Common settings
You can change the value in [Project] -> [Properties] with the setting value common to each function. In [Project property settings], the function generator information can be set.
| Setting | Description |
|---|---|
| Sample interval | The interval of samples to be sampled from the function |
| Number of sample | The number of samples to be sampled from the function(The number of test cases) |
| Start value | The default value at which the function is started (the values are created based on the start value) |
| Minimum value of type | The minimum value of variable partition (if the return value of the function is less than the minimum value of type, the minimum value of type is returned.) |
| Maximum value of type | The maximum value of variable partition (if the return value of the function is greater than the maximum value of type, the maximum value of type is returned.) |
Ramps function
It is a function that creates a pulse by using Pre, Post and Hold values. If the number of samples is greater than the period of the function, the function is called recursively.
| Setting | Description |
|---|---|
| Pre delay | The time to last Pre/Post sample value |
| Rise samples | The time to rise from Pre/Post sample value to Hold sample value |
| Hold samples | The time to last Hold sample value |
| Fall samples | The time to fall from Hold sample value to Pre/Post sample value |
| Post delay | The time to last Pre/Post sample value |
| Pre/Post delay value | Pre/Post delay sample value |
| Hold value | Hold sample value |
Random function
It is a function that creates a random value between the minimum value (Min) and the maximum value (Max).
| Setting | Description |
|---|---|
| Min | The minimum value of random range |
| Max | The maximum value of random range |
Range function
It is a function that creates values that increments or decrements by a certain interval (Step Size) between the minimum value of type and the maximum value of type.
| Setting | Description |
|---|---|
| Step size | The size of increment or decrement value |
| Hold | The number of times that the Step size holds |
| Rising | The function type that rises by the Step size Ex) if the step size is 30, 0,30,60…… |
| Falling Step | The function type that falls by the Step size Ex) if the step size is 30, 100,70,40…… |
| Alternate | If the result value of function meets the minimum/maximum value of type, the function type that changes to rise or fall. Ex) if the step size is 30 and the maximum/minimum value are 0~100, 0,30,60,90,60,30,0…… |
Sine function
It is a function that creates Sine value. If the number of samples is greater than the period of the function, the function is called recursively.
| Setting | Description |
|---|---|
| Amplitude | The amplitude of Sine function |
| Period | The period of Sine function |
| Phase | The phase of Sine function |
| Offset | The offset of Sine function |
Toggle function
It is a function that creates FirstValue and SecondValue repeatedly.
| Setting | Description |
|---|---|
| First value | The first value that is repeated in Toggle function |
| Second value | The second value that is repeated in Toggle function |
SingleValue function
It is a function that returns only a constant single value.
| Setting | Description |
|---|---|
| Value | The value to be created |
None
It does not create a function.
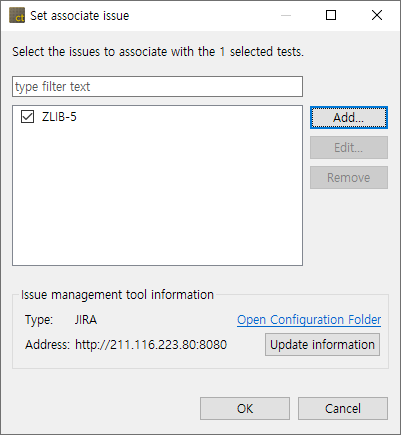
Relevant issues settings
It associates the selected test with the issue in the issue management tool registered. The CT supports the following issue management tools: JIRA, Trac, Redmine, Mantis, Bugzilla.
- In the context menu of Unit Test view, click [Relevant issues settings…].
![]()
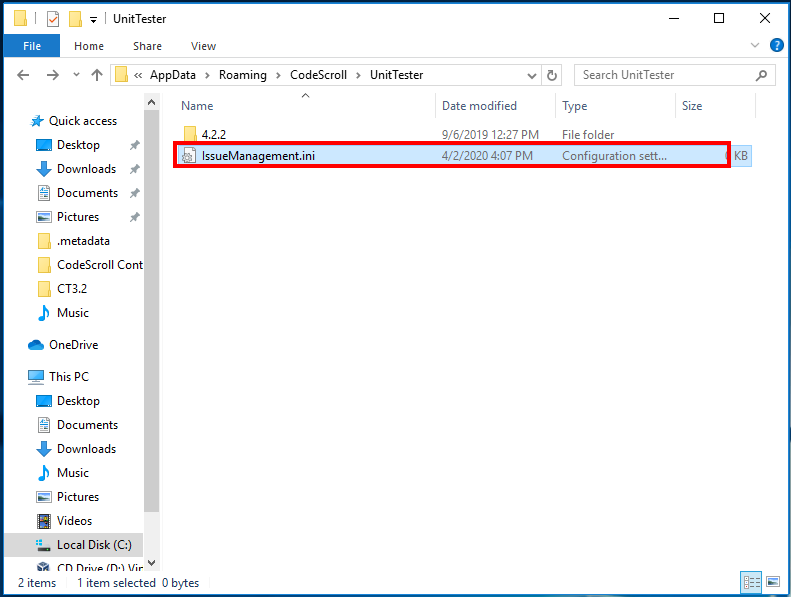
- Enter the information of the issue management tool in the configuration file (IssueManagement.ini).
![]()
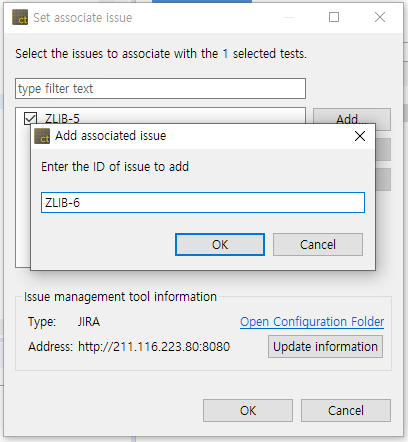
- Add the issues to be associated with the test.
![]()
- Check the checked issue list and click [OK].
![]()
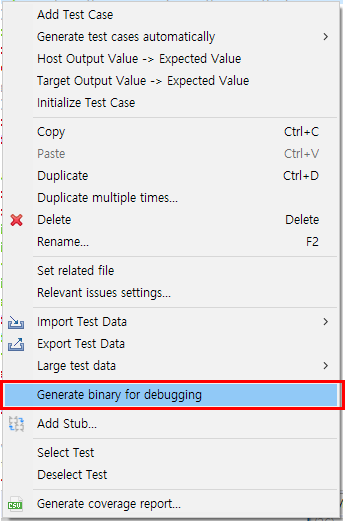
Generate a binary for debugging
- Right-click it in Unit Test or Integration Test view. From the context menu, select [Generate binary for debugging] menu to generate a binary for debugging.
![]()
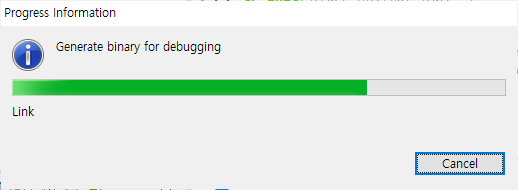
- You can check the progress status information for the Generate binary for debugging. Also, a window indicating the location of the result file is opened.
![]()
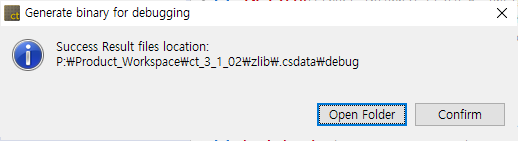
- Click [Open Folder] to move to the directory where the result for the Create a binary debugging is saved or click [Confirm] to exit the Generate binary for debugging.
![]()
- If the project uses “Visual studio CL compiler”, it executes “vsjitdebugger” automatically.
Results for the Generate binary for debugging
The list created when the user executes [Generate binary for debugging] function is as the figure below, and it creates the binary (testrun.exe) for debugging suitable to the user’s environment. The user can debug the testrun.exe file directly by using a debugging tool suitable to the toolchain of the target project.
The list of files generated when the [Generate binary for debugging] is performed is shown below.
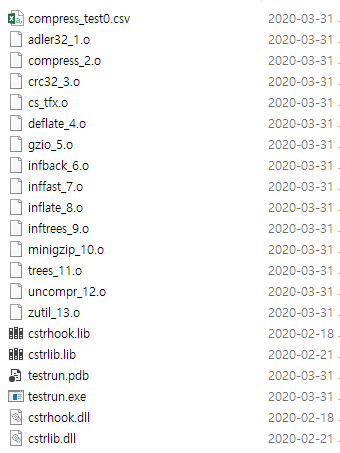
- File list when using Visual Studio CL compiler
- testrun.exe: binary for debugging
- *.csv: Input value for a test
Need more help with this?
Don’t hesitate to contact us here.