
This walkthrough demonstrates how to configure the Data Viewer App Part, to display non completed task items.
If you have any questions please submit them on our web site page: Support Request.
This walkthrough demonstrates the following tasks:
- Selecting the SharePoint List data source provider and the GridView display provider, if not already selected.
- Limiting the App Part to display only task items.
- Select the columns you wish to display in the App Part and filter to display only tasks that are not completed, and add a calculated column to calculate the number of days between the task item start and due dates.
- Configure how you wish to display the data from the task columns.
Prerequisites
You need the following components to complete this walkthrough:
- An Office 365™ tenant.
- Data Viewer app.
If you have not already done so, complete the following steps:
Requirements
The Data Viewer App Part should be configured to:
- Display only task items that are not completed in the current site collection.
- The columns to be displayed are (in order): Task Name, Assigned To, Task Status, Priority, Due Date and % Complete.
- Only non-completed task items are displayed in ascending order using the due date. Where the due date is the same for more than one task item, they should be listed in % Completed order, where the task item which is least completed appears first.
- Task items are grouped by Priority, with (1) High priority task items displayed first.
- The values in the % Complete column should be aligned to the right.
- Any task whose due date has passed, all values in the entire task item row should have a font color of red.
- A column should be created that contains the total number of days given to complete a task, that is, the calculation between the Due Date, the Start Date, plus one day.
- The Task Name column should be linked to the task item’s property page.
- No more than 30 task items should be displayed in the App Part.
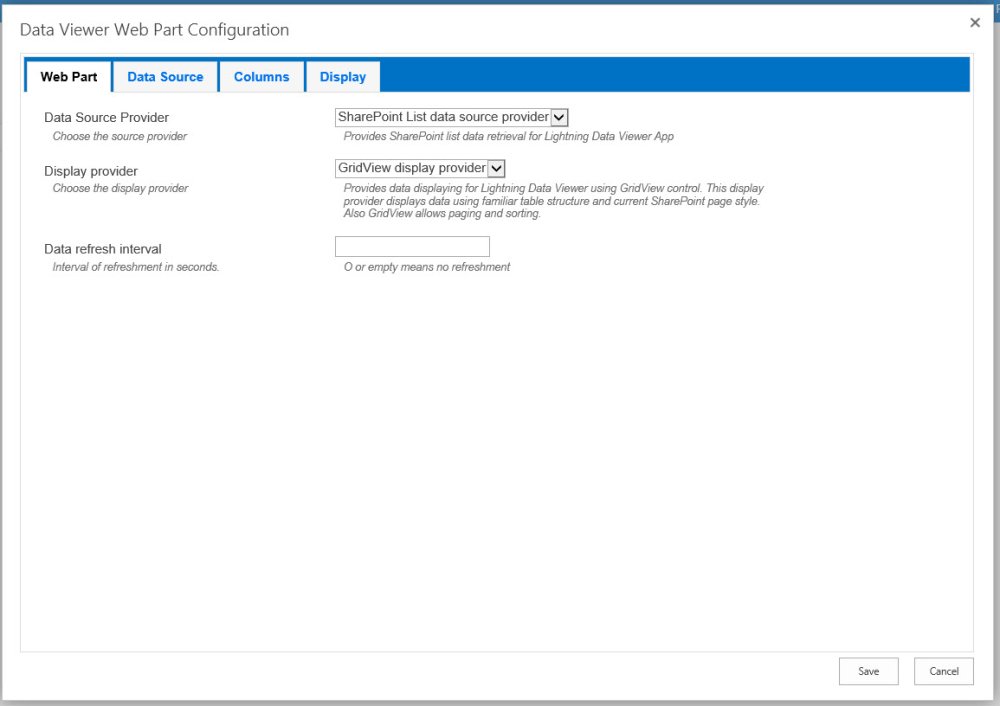
Select the Data and Display Providers
- From the Actions menu, select Configure the app.

The Data Viewer App Configuration dialog is displayed. - On the Web Part tab:

- In the Data Source Provider section, select SharePoint List data source provider, if not already selected.
- In the Display provider section, select GridView display provider, if not already selected.
![]()
Return task items from a task list
- Click the Data Source tab.
- In the tree view, navigate to the site that contains the task list you wish to use and then select the task list.
![]()

Select Columns
In this section you will:
- Select the columns you wish to configure on the Display tab.
- Use filtering so the app part only displays non completed task items.
- Add a calculated column to display the number of days a person has to complete the task.
- Make the Task Name column a hyperlink to the *View item properties * (DispForm) page.
- Click the Columns tab.
- Click the check boxes to the left of the following columns:
- Task Name
- Assigned To
- Task Status
- Priority
- Due Date
- % Complete
To the right of the % Compete column, click the filtering icon
 , to display the Filtering configuration dialog.
Under Add new filter condition:
In the second list box, select <.
In the third list box, type 1.
, to display the Filtering configuration dialog.
Under Add new filter condition:
In the second list box, select <.
In the third list box, type 1.  Click Save to save your filtering configurations and close the Filtering Configuration dialog.
At the top of the Columns tab, click the Add new calculated column
 icon.
icon.The Add new calculated column dialog is displayed. In the Column name text box, type, No. of Days. From the Column type list, select String, if it is not already selected. From the Expression list, select Due Date [DateTime] and then click Insert field. Repeat the above step to add the Start Date [DateTime] column to the Expression text box. In the Expression text box, type the following expression:
Math.floor(Math.abs([DueDate]-[StartDate])/(24*60*60*1000))+1.
 Click Save to close the Calculated column dialog.
Your Columns tab should look similar to the following screenshot.

Format column data
This section describes the following configuration steps:
- Format the Due Date and % Complete columns.
- Group by Priority and sort order.
- Conditionally format High priority non completed tasks that should have been completed by today.
- Conditionally format tasks that are less than 50% complete.
- Display items in batches of up to 30 items.
- Enable create, read, update and delete (CRUD) functionality within the app part.
- Click the Display tab.
- In the Format list, for the following columns:
- Due Date, select Short date.
- % Complete, select Percent.
Click the Formatting
 icon for the Due Date column to display the Conditional formatting dialog.
Select Apply to entire row.
In the Foreground text box, type, FF0000.
Click the blue plus icon to add a condition.
icon for the Due Date column to display the Conditional formatting dialog.
Select Apply to entire row.
In the Foreground text box, type, FF0000.
Click the blue plus icon to add a condition.
- In the first box, select, Priority, select the operation =, and in the third box, select (1) High.
icon to add a second conditon.
- In the first box, select Due Date, select the operation <=, and select the Today check box.
icon to add a third condition.
- In the first box, select % Complete, select the operation <, and in the third box, type 1
icon to add a condition.
- In the first box, select % Complete, select the operation <, and in the third box, type 0.5.
 Click Save to close the dialog.
 In the Data connection section: In the Link item to column list, select Task Name. Select the three check boxes, Enable create, Enable edit and Enable delete.
 In the Grouping and sorting section:
Select the Show item count in groups check box.
Under Fields to sort by, drag and drop the columns so they are in the order, Priority, Due Date and % Complete.
In the Grouping and sorting section:
Select the Show item count in groups check box.
Under Fields to sort by, drag and drop the columns so they are in the order, Priority, Due Date and % Complete.  In the Page settings section, type 30 in the Records per page text box.
The Display tab should look similar to the following screenshot.

Click Save to close the Data Viewer App Configuration dialog. This completes the configuration of the Data Viewer App Part.
Feedback
Copyright © 2025 Lightning Tools
—
Powered by 
Post your comment on this topic.