
The Parcel Sketch shows the sketch of the house, the base area and total area of each section drawn.
The program automatically will resize the sketch to be as big as possible for the viewer.
What goes in the Parcel Sketch?
The Parcel Sketch is mainly for the house, porches and attached garage.
 Along with the house, can a user also add a yard/utility shed and a pole barn here?
YES—For those transitional properties, it’s fine to add 2-3 outbuildings here (Edit — Insert — Outbuilding).
Errors may occur IF user tries to add a few outbuildings in the Parcel Sketch and subsequent ones in the Site Plan.
In other words:
IF user adds one outbuilding in the parcel sketch, THEN add them all in the parcel sketch.
IF user adds one outbuilding in the site plan, THEN add them all in the site plan.
Also check out FAQ about improvements Required on Sketch.
To access the Parcel Sketch go to
Appraisal File — Residential File — Parcel Sketch Tab
To enter the parcel sketch
CLICK on the Sketch Button on the Tool Bar 
OR
CLICK on the Edit Sketch Button when in Edit mode

The Sketch module will then open.
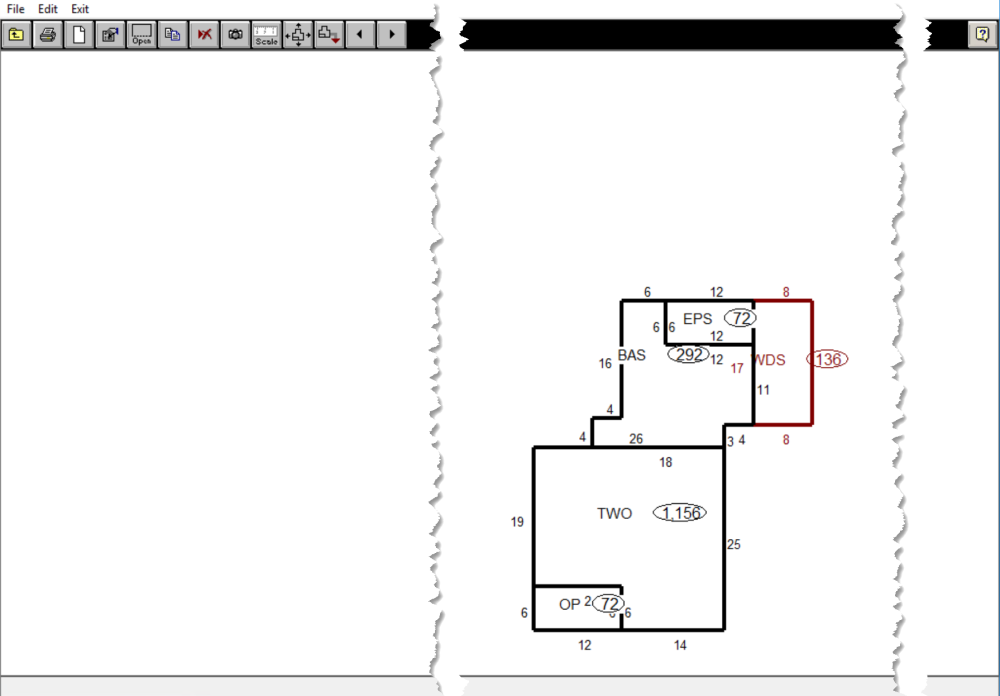
The selected section will appear in a different color then the rest of the sketch. Each label can be moved or hidden on each section of the sketch.
 -Exit the Sketch
![]() -Print the Sketch
-Print the Sketch
![]() – Create a New Section
– Create a New Section
When clicked, the Section Information box will appear.
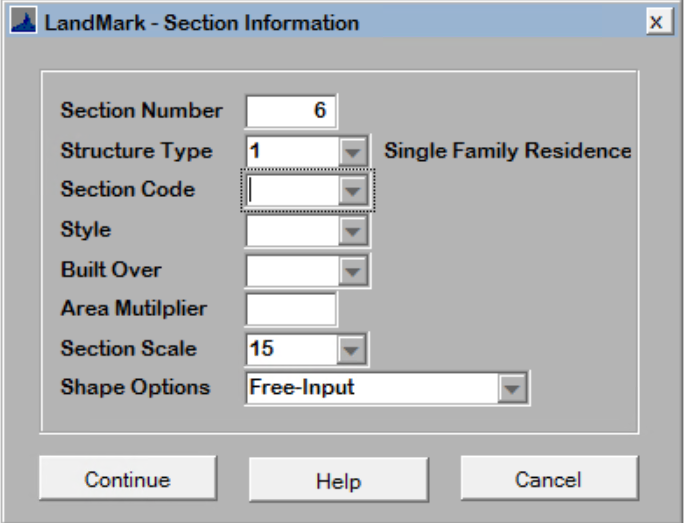
CLICK the drop-down menu for Structure Type and select the type of building.

CLICK the Section Code drop-down menu and select the type of structure being sketched.

CLICK the drop-down menu for Style. Each Section Code is linked to its own Style menu.

If the Section Code is Home, the Built Over drop-down menu will be available.

The Area Multiplier is based on the number of stories of the building.
For example, if the Home is a One Story, the Area Multiplier will be 1, but if the Home is a Two Story, the Area Multiplier will be 2.
The Section Scale is how big or small the zoom on that section will be. The higher the number, the smaller the scale of the section.
There are four Shape Options types:

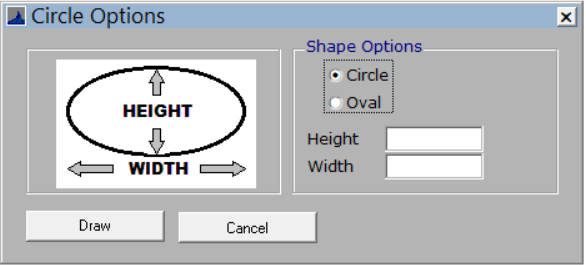
- Circle/Oval: When circle is selected, the Circle Options box will appear. Select if the shape is a circle or an oval and enter the height and width. Click on draw, then simply click where the drawing goes on the sketch.
- Flat-Area: The Flat-Area Shape option does not need to be drawn on the sketch. Simply enter the Total Section Area and click on the sketch where to place the label.

- Free-Input: Free-Input allows the user to draw whatever shape is needed to draw the structure.
- Rectangle: When rectangle is selected, only the height and width need to be drawn and the other two sides are automatically drawn to match.
![]() – Edit the selected section
– Edit the selected section
 – Open deleted the last line drawn on the selected section
 – Copy the selected section. To paste the copy, click on the sketch where the copied section goes.
![]() – Delete the selected section
– Delete the selected section
 – View the pictures attached to the parcel
 – Change the scale of the whole sketch, or just the selected section by checking the Rescale Current Section Only box. The higher the number, the smaller the sketch.
If Sketch Grid to the Nearest Foot box is checked in the County Information Table the sketch will round to the nearest foot.
 – Center the sketch
 – Move the currently selected section. Drag the section to the desired spot and right click to drop the section.
– Moves through and changes the selected section
Outbuildings that have their own quality and condition and need to show as a Site Improvement can be added by going to Edit, Insert, Outbuilding

Post your comment on this topic.