
Set up
Automatic accounting
With automatic accounting for drivers, you can assign a balance or allowance to each driver and make a charge for each job that is dispatched to them. This feature allows you to set your fare charge rate for each driver and track driver transactions to make driver payments simple and easy.
Enable the feature
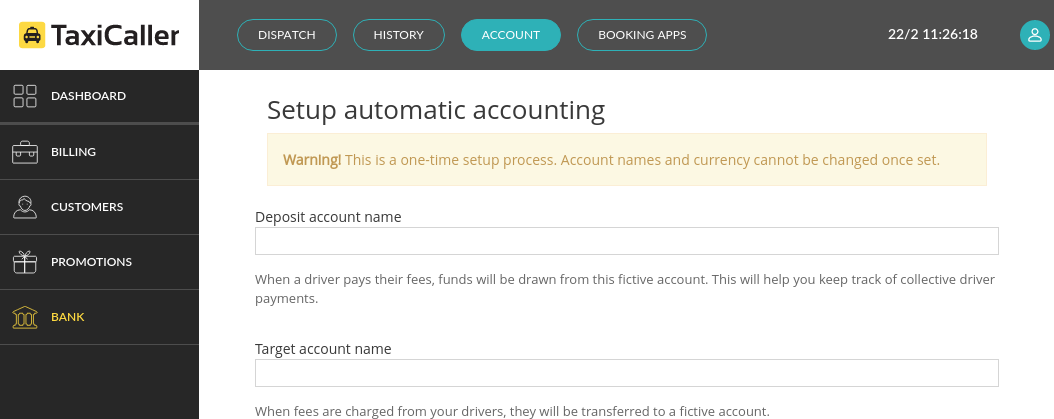
- In the Admin Panel, Go to Bank and Automatic Accounting
- Click on Edit and Check on Enabled

- Click on the green + sign to add a charge. You can add different charges corresponding to each job stage. The 5 different job stages available are: Accept, Start, Reject, Cancel and Deliver.
- Set either a Fixed fare that will apply to all drivers, or a Dynamic fare that can be different for each driver.
- Click on the Save button.
Set the fare charge rate for each driver
If you have chosen a Dynamic fare to charge on Deliver, you will need to configure the fare change rate for each driver.
To do this:
- Go to the Users section in the Admin Panel
- Select a driver and scroll down to the bottom of their profile until you find the Driver Options.
- In here you will be able to enter a Fare charge rate in percentage form.

Customer account
To activate automatic account for customer accounts you need to enable it under Customer accounts.
Start by filling out the fields in the new customer accounts.
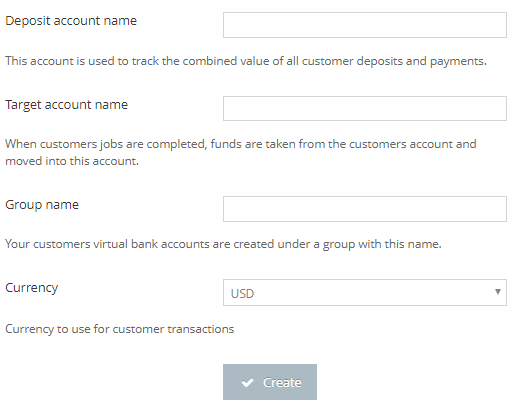
After filling out the customer account and creating it, you will be presented with the settings for how the customer account will be deducted for billed jobs and account jobs. It’s important that these settings are correct.

Top Menu
- Enabled = Turns on/off the accounting feature. (Check this box)
- Enforce Funds = Decides if an account must be in credit to be able to place a job. (Optional but recommended)
- Minimum funds = Sets the minimum funds than an account must have to be able to book a job (Optional)
- Source From = The deposit account (You named this in Step 1)
- Transfer To = The target account (You named this in Step 1)
Rule
Click the grey + sign to create a new rule.
- Charge on = “Generate Receipt” (This MUST be selected)
- Transfer to = Target account (You named this in Step 1)
- Description = (Optional)
- Charge type = “Dynamic Fare” (This must be set so the system matches the value of the fare)
- Min. Amount = The minimum amount a fare must be (Optional)
Enabling banking for customer account
You’ll need to enable the banking feature for each customer that will prepay for their jobs and ensure that the account is set up correctly.
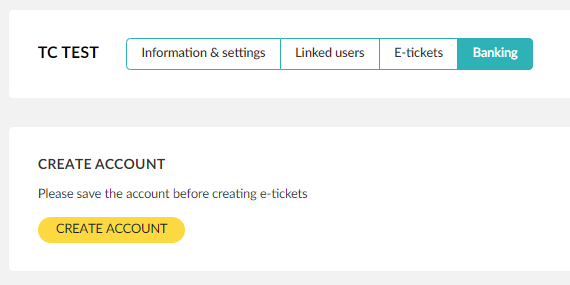
- Go to ADMIN > ACCOUNT > CUSTOMERS.
- Select the customer account you want to set up the banking feature for.
- Ensure that Payment Type = Billed.

Click the “Banking” tab and press “Create Account”.
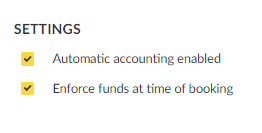
Once the account is created, enable “Automatic accounting” and “Enforce funds”.
Add funds to Customer Account
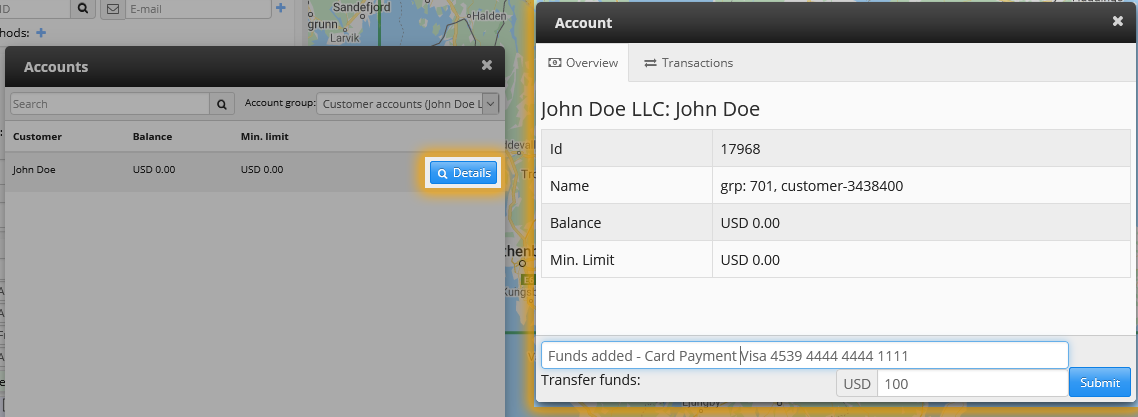
When the Automatic Account has been set up, it’s time to put funds into the customer account. The customer’s account is managed from the dispatch panel.
- On the dispatch panel, click the banking tab.
- If you use the driver bank feature too, make sure you select “customer accounts” in the “Account Group” drop down.

- Find the account which you created the banking account for and click “Details” to bring up the account overview.

- Here, you can add the funds which the customer has paid, along with a reference note or number in the “Message” field.
From the account overview page, you can also see the transaction history which shows all job charges and funds top ups.
Now, you should be ready to start making bookings on the account