
Advanced Auto Dispatch will let you set the rules of how the Dispatch Console will send the jobs to the drivers and how the jobs will show in the Driver App.

Require vehicles to accept an assigned job:
You can give the drivers an option to accept/decline jobs in the Driver App. Uncheck this option if you want to “hard-assign” a job (not give the driver an option to accept/decline).

Hold jobs for unreachable vehicles:
Holds a job offer for a vehicle that is temporarily unreachable (the system cannot establish a connection with the driver’s device).
For example, if the driver accepted a job and all of a sudden he/she losses connectivity, the Driver App will hold the job.
Don’t assign jobs to vehicles who cannot complete it before the shift ends:
For drivers that have set a shift ending time, make sure no jobs can be assigned that would fall beyond this time.
Reset rejects to look for vehicles that have previously declined or timed-out:
If you enable this option, when assigning a job the system will consider again vehicles that have previously declined or timed-out when auto-dispatching.
Automatically select a company based on pickup location if you have more than one company profile:
If this feature is enabled, when creating a job in the Dispatch Console it will automatically select a company based on pickup location.
For this setting to work, you have to have more than one company profile in your account.

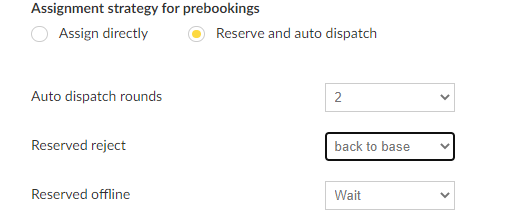
Assignment strategy for prebookings
Assign Directly
Used if you want a pre-booked job to be assigned to a vehicle immediately when the booking is created. This requires that a vehicle is selected, or “hard-assigned”, making it the owner of the job. Select a vehicle from the drop-down list or drag and drop the job onto the desired vehicle in dispatch. If a pre-booked job is not hard-assigned to a vehicle, it will be assigned at T-time.
Assign Directly does not apply to passenger app bookings, as passengers cannot hard-assign jobs. Unless a dispatcher manually hard-assigns an app pre-booking, these jobs are always assigned at T-time.
Reserve and auto dispatch
The job is reserved for the vehicle selected but will run through the default auto dispatch settings if the vehicle doesn’t accept it in time (see further below for additional settings on this)
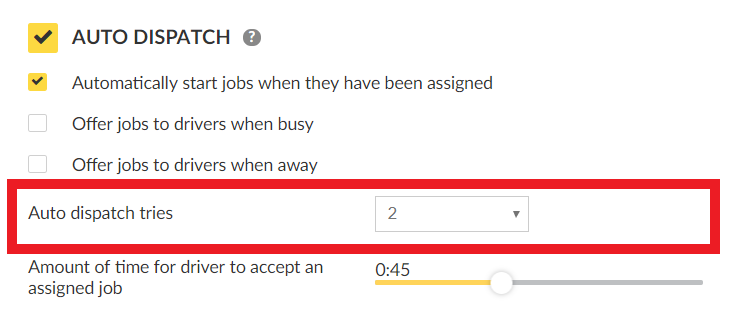
Auto dispatch rounds:
This determines how many times the same job can be offered to the same vehicle. You will have to use this setting in conjunction with Reset rejects to look for vehicles that have previously declined or timed-out so that vehicles that have declined or timed out can be considered for the next round. Think of the auto dispatch rounds as a multiplier for the auto dispatch tries, 2 tries and 2 rounds = 4 total auto dispatch tries, but each vehicle can only receive one try per round.
Reserved reject
Warning! This option only works when “Reserve and auto dispatch” is enabled.
This setting allows you to determine how the system should behave when the vehicle assigned to a pre-booking rejects the job or doesn’t accept the job in time. There are 2 options:
Default
The system will treat this reject as any other reject and this job will go through the additional auto dispatch rounds/tries (whichever settings you have configured)
Back to base
The system will assign this vehicle to “No one” which gives it a red banner in the Unassigned tab forcing manual re-assignment.
Reserved offline
This setting, contrary to Reserved reject, allows you to specify how the system should behave when the vehicle assigned to the pre-booking is offline when it’s time to pick up the passenger. There’s 3 options:
Default
The system will treat this reject as any other reject and this job will go through the additional auto dispatch rounds/tries (whichever settings you have configured)
Wait
This means the job will remain unassigned indefinitely until the assigned vehicle logs on. Keep in mind that a job can easily get stuck with this setting if the designated driver is unavailable.
The system will assign this vehicle to “No one” which plays a warning sound and tags the job with a red banner in the Unassigned tab, forcing manual re-assignment from a dispatcher.
Back to base
The system will assign this vehicle to “No one” which gives it a red banner in the Unassigned tab forcing manual re-assignment if the vehicle is offline
Broadcast:
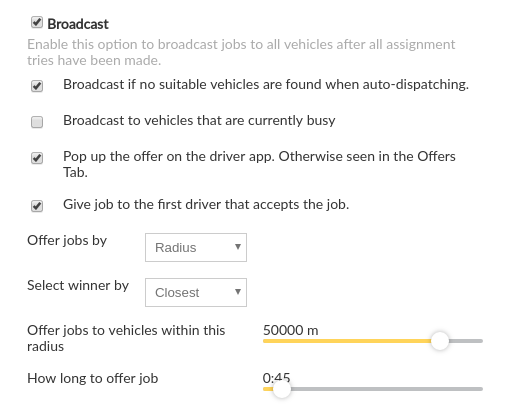
If all Auto dispatch tries have been made, a job can be broadcasted to all available vehicles. Enable this option to being able to offer the jobs to all vehicles after all assignment tries have been made without any driver accepting the job. If this option is enabled the job will be offered to the Drivers so they can Bid on the Job.
Broadcast if no suitable vehicles are found when auto-dispatching:
If no suitable vehicles are found when auto-dispatching, the job will go straight to broadcast if this option is selected.
For example, if someone is trying to book a job with a particular type of car and there is none connected then the job will be broadcasted.
Broadcast to vehicles that are currently busy:
The system can also offer broadcast jobs to vehicles that are currently set to Busy or are in the middle of a job.
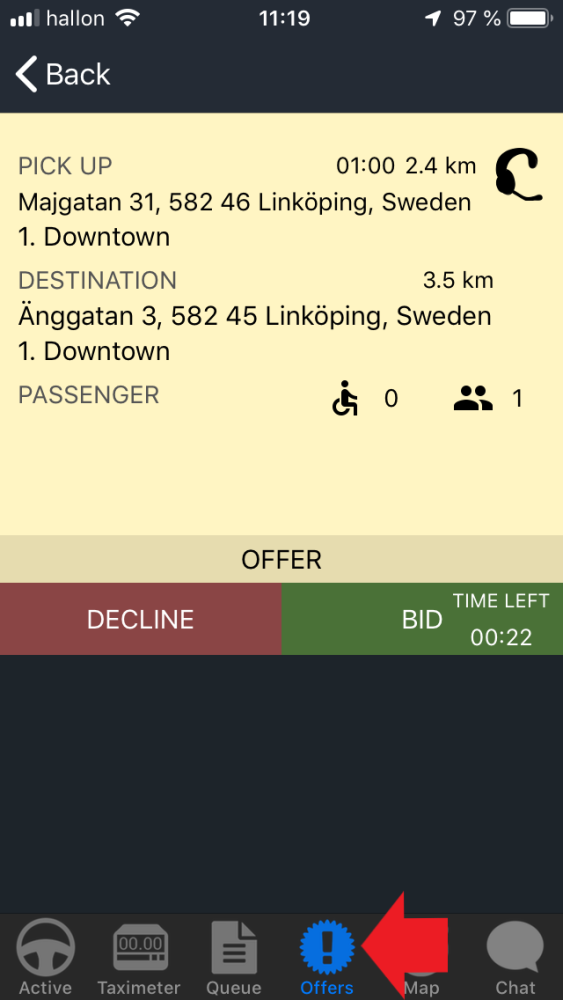
Pop up the offer on the driver app. Otherwise seen in the Offers Tab:
If this is selected, the broadcast offer will pop up on the Driver App. Otherwise, the bids can be seen in the Offers Tab in the Driver App.
Give a job to the first driver that accepts the job:
It’s a way to “fast select”; the first driver that accepts the job will get the job with no regard to other broadcast settings.
Offer jobs by:
This is another strategy you can use to enable how to Broadcast a job.
Choose whether broadcasted jobs should be offered by radius, zone or zone chain.
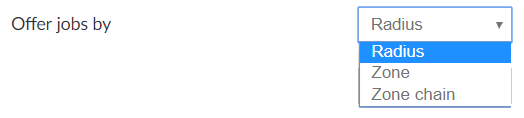
By Radius means that the job will be only offered to drivers that are located within a certain radius from the pick-up position of the job.
Zone, will only offer jobs based on the assignment zones that you have set.
Zone Chain, will broadcast within the same zone order you have set in Settings>Zones>Advanced.

Select winner by:
This option determines who wins the broadcast bid. It can be set to either the closest car or the first in the zone queue.

Offer jobs to vehicles within this radius:
If you select Offer jobs by Radius, with this setting you will be able to choose the radius from the pick-up location of the job where you would like to broadcast the job, excluding those that are too far away.

How long to offer job:
A driver would need to accept a bid within this time window.

Priority
If you use priorities in the Dispatch Console, this section will come in handy.

For example, if you have 2 jobs in the same area (within a certain radius), and one has a higher priority than the other, the job with the highest priority will effectively block the other jobs in the designed area, until it’s assigned. The system will then go through the jobs at priority level where 1 is lowest and 5 is highest.
The following settings will allow you to give preferences to jobs marked with higher priority levels. You can use this for example if you have a VIP customer or if you have a long-route job that you would like to prioritize.

Block radius:
Select the area size that will be blocked by a job with higher priority.
Block jobs by:
Instead of radius, you can use zones or zone chains to block other jobs with lower priority levels.
Block same priority level jobs and prioritize the job that’s been created first:
Will also block jobs with the same priority level, the job that’s been created first or ASAP jobs will take precedence.