
The ConveyLinx Auto-Configuration Procedure routine will detect which photo-sensors are connected in order to configure a given ConveyLinx-ERSC Module as a 1 or 2 zone controller. The physical order of module connections; from upstream to downstream, dictate the MDR direction and product flow logic.
Before You Begin
- All sensors should be clear. Auto-Configuration assumes takes for granted that the state of each sensor is the “zone empty” state so that the module can auto-learn the block/clear states for both retro-reflective and diffuse type sensors
- Make sure you have no more than 221 *ConveyLinx-ERSC Module*s connected. Auto-Configuration will not configure past 221 *ConveyLinx-ERSC Module*s in one network
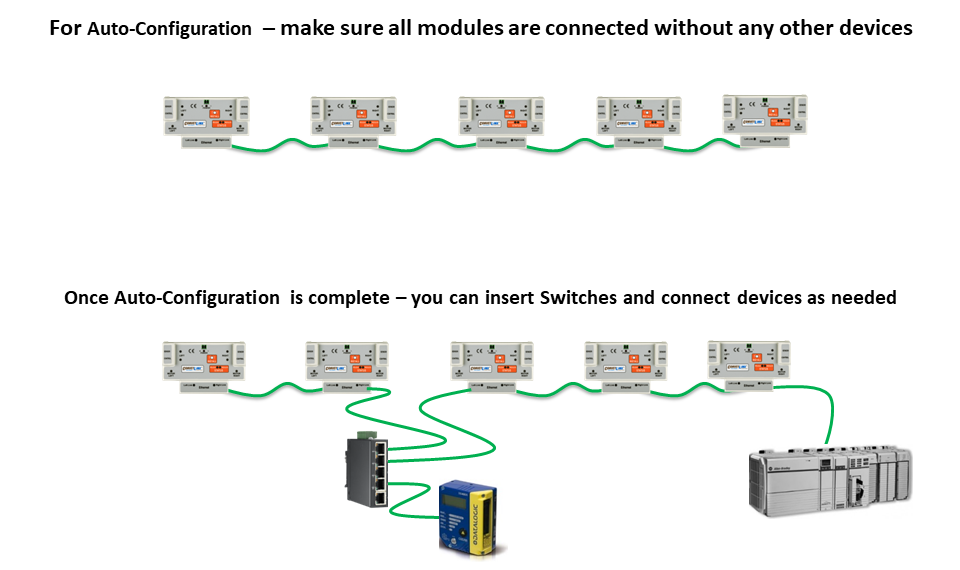
- Make sure that there are no other Ethernet devices or switches connected in your string of *ConveyLinx-ERSC Module*s. After Auto-Configuration is complete and successful, you can interrupt the Ethernet string with other devices and/or switches as needed.
The direction of flow of the conveyor dictates where to begin the Auto-Configuration Procedure. The ConveyLinx-ERSC Module located at the most upstream or in-feed end of the conveyor is the module where the procedure must be initiated.. Because of its physical location on the conveyor path and physical location in the Ethernet connection chain; the most upstream ConveyLinx-ERSC Module will automatically connect to all downstream *ConveyLinx-ERSC Module*s and set their I.P. address for communication. Then the routine automatically sets the direction of flow.
Auto-Configuration Procedure
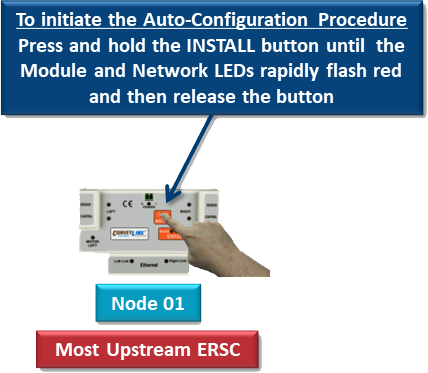
- Press and hold INSTALL button on the most upstream/in-feed end ConveyLinx-ERSC Module and keep it held for 5 seconds
- After 5 seconds the Module Status LED will flash RED
- Once Module Status LED begins flashing RED, the INSTALL button must be released within 2 seconds. If held for longer than 2 seconds; the procedure is cancelled
- Once the INSTALL button has been released within the 2 second time window, the ConveyLinx-ERSC Module will be initiated as most upstream module and the Auto-Configuration Procedure routine will begin.
- Observe that all of the LED’s (with the exception of the Left Link and Right Link LEDs) will flash on and off RED on all the *ConveyLinx-ERSC Module*s in the network string