The Discover Permission results can be customized, using either the commands in the Display Options group on the Commands Ribbon tab, or using the Filter icon to the right of the column headings.
Display Options
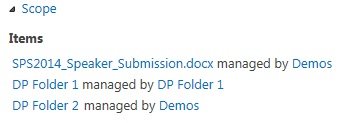
- View Scope. Select this command if you wish to display the SharePoint objects selected, for example, when you have selected multiple folders and / or items and then clicked the Discover Permissions in the Item Permissions group on the DeliverPoint Ribbon tab, the Scope section would display all the folders / items you selected. The managed by SharePoint object refers to the object from which the selected object is receiving its permission configuration from. For example, in the following diagram, the docx file is inheriting it’s permissions from the Demos site as is the folder DP Folder 2. This indicates that permission inheritance has not been broken from the default settings; whereas the permission inheritance for the folder DP Folder 1 is itself which indicates permission inheritance was broken at this folder level. By default, the Scope section is not displayed.
- Show Administrators. Use to include or exclude site collection administrators in the results ONLY if you are a site collection administrator. This option is grayed out if you are not site collection administrators. The Show Administrators command is a toggle switch. By default, the Show Administrators command has a blue background which is used to show that users who are members of the Site Collection Administrators group are displayed in the results. When the Show Administrators command is not selected, that is, it has a white background, the Site Collection Administrators group will not be displayed in the Permissioned Via column.
- Nested Groups. Use to include or exclude users who have been given permission directly through nested Active Directory (AD) groups. For example, when Brett is a member of the g_Sales AD group, which is nested inside the g_Employees AD group, and the g_Employees AD group is mapped to the Edit permission level on a SharePoint object, such as, a site, then when the Nested Groups command is selected, that is, when it has a blue background, then Brett is displayed in the results. By default users who gain access to a SharePoint object because they are in a nested AD group are displayed in the results.
- Direct Groups. Use to include or exclude users who have been given permission directly using Active Directory (AD) groups. For example, when Brett is a member of the g_Sales AD group, and the g_Sales AD group is mapped to the Edit permission level on a SharePoint object, such as, a site, then when the Direct Groups command is selected, that is, when it has a blue background, then Brett is displayed in the results. Users who only gain access through nested AD groups on a SharePoint object will not be displayed when the Direct Groups command is selected. By default, users who gain access to a SharePoint object because they are included in an AD group that is mapped directly to a permission level on a SharePoint object are displayed in the results.
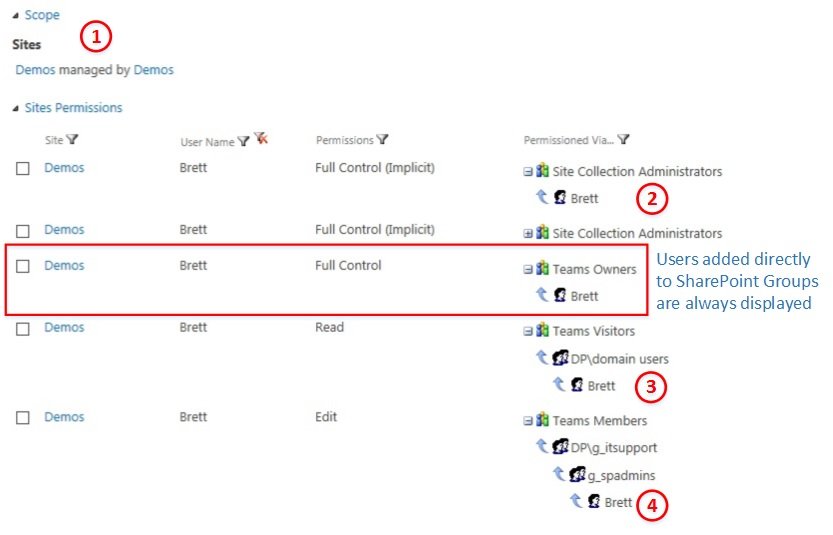
The labels in the following diagram shows the affect of selecting the commands in the Display Options group on the Commands Ribbon tab.

- The Scope section is displayed when the View Scope command is selected.
- Users in the Site Collection Administrators group are displayed when the Show Administrators command is selected.
- Users in Active Directory groups are displayed when the Direct Groups command is selected.
- Users in Nested Active Directory groups are displayed when the Nested Groups command is selected.
Column Heading Filtering
Use the Filter icon displayed to the right of each column heading to filter the Discover Permissions results by Site, User Name, Permissions or Permissions Via. When a filter is configured for a column heading then the Remove Filter icon
is displayed to the right of the Filter icon
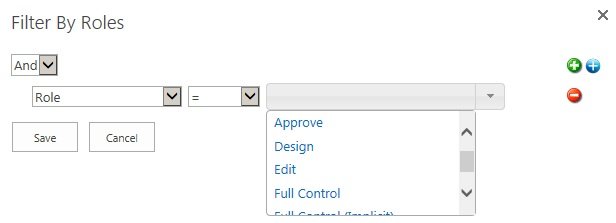
When you click the Filter icon a dialog box opens that allows you to configure one or more filter criteria. By default the Filter By dialog contains three drop down lists for you to configure one filter criteria, to add another criteria, select either And / Or and then click the green plus icon
:
- Click And to create a filter where the data must match the criteria in all filter criteria.
- Click Or to create a filter where the data must match the criteria in only one filter criteria.
Each criteria can be removed from the filter by clicking the remove filter icon 
Once the filter is configured click Save. To edit an existing filter, click the Filter icon again.
Each filter criteria consists of three input boxes:
- Specify the format of the value in the column you wish to use, for example.
- When you click the Filter icon
to the right of Site / List / Item column heading, the Filter By Site, Filter By List or Filter By Item dialog box opens, which allows you to filter the Discover Permissions results using either the Site Title or Site Url / List Title or List Url / Item TItle or Item Url.
- When you click the Filter icon
to the right of User Name, the Filter by User dialog allows you to specify the filter criteria using the Display Name, Email or Name.
- When you click the Filter icon
to the right of Permissions, the Filter by Permission Levels dialog allows you to filter using permission levels, whether they are the out-of-the-box permission levels or custom permission levels.
- When you click the Filter icon
to the right of Permissions Via, the Filter by Permission Via dialog allows you to filter by user, Active Directory group or SharePoint Group using the Display Name, Email or Name fields.
Click the Operation box, and then select the operator that you want. The operations available are: =, Like or Not Like
Click the Value box, and then select or type the criteria that you want, for example, when you select the Permissions column heading filter, the values listed in the Value box, will be the permissions levels displayed in the results page. When you select the Permissions Via column heading filter, the values lists in the Value box, are the users, Active Directory groups and SharePoint groups that are displayed on the results page.

You can also type a value into the Value box, for example, you can create a filter criteria to display all users whose name contains “an”.


Post your comment on this topic.