Alerts are notifications of permission changes that you receive as e-mail messages. You can create, review, modify and delete alerts.
Create an alert
To configure (enable) Alert Me, complete the following steps:
- Click Settings
and then click DeliverPoint to display the DeliverPoint dashboard, ensure the Farm Centric view is selected.
- In the tree view, select the check box to the left of the relevant SharePoint object you wish to track. If you select more than one SharePoint object then an alert is created for each SharePoint object selected.
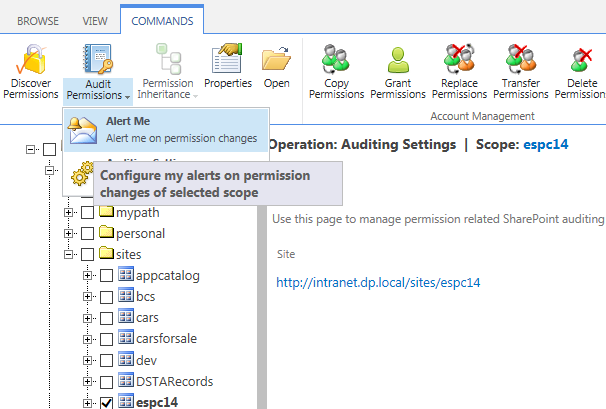
- On the Commands Ribbon tab, click the Audit Permissions split button down arrow and then click Alert Me.
The Operation: Alerts Management page is displayed in the results pane of the DeliverPoint dashboard. Existing Alerts are listed on this page, which you can modify or delete.
- Click New Alert.
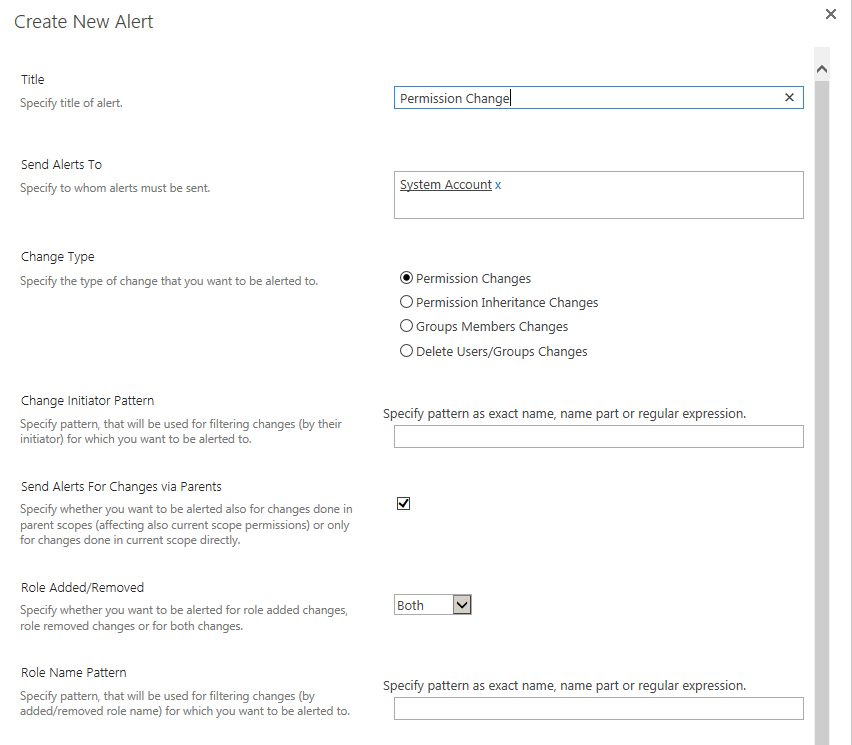
The Create New Alert dialog is displayed.
- Complete information in the following sections and then click Create at the bottom of the dialog. You may need to scroll down to see all the sections.
- Title. Type a title for the alert. This is used as the email subject.
- Sent Alerts To. Type the user names or email addresses of people you to be notified of permission changes. By default, the person who is creating the alert is automatically added to this text box.
- Change Type. Select the type of permission change you wish to track:
- Permission Changes. Track permission changes are made to users, Active Directory security groups or SharePoint Groups on the select SharePoint scope, that is, send an email message when users, Active Directory security groups or SharePoint Groups are assigned to different permission levels.
- Permission Inheritance Changes. Track when permission inheritance is broken or restored on the selected SharePoint scope.
- Groups Members Changes. Track permission changes to SharePoint groups.
- Delete Users/Groups Changes. Track when users or Active Directory security groups are deleted from a site collection.
- Permission Changes. Track permission changes are made to users, Active Directory security groups or SharePoint Groups on the select SharePoint scope, that is, send an email message when users, Active Directory security groups or SharePoint Groups are assigned to different permission levels.
- Change Initiator Pattern. Use this box to track permission changes by the person who makes the change. In the text box, use one of the following formats to identify the initiator’s login name. You can not use their email address or display name.
- Type the exact value of the initiator’s login name, for example, dp\penny, where dp is the domain name, and penny is the userid.
- Use the wildcard characters (% or *) to identify one or more login names, where the wild card character represents one or more character in the login name, for example:
- dp\p*, or dp\p% to find any login name beginning with p.
- dp\*ny or dp\%nny to identify any login name ending in ny.
- dp\*nn* or dp\%nn% to identify any login name that contains the characters nn in the middle of the login name.
- dp\p*, or dp\p% to find any login name beginning with p.
- Use regular expression, in the form, R[RegEx], where RegEx is the regular expression.
- Type the exact value of the initiator’s login name, for example, dp\penny, where dp is the domain name, and penny is the userid.
- Send Alerts For Changes via Parent. This option is only valid for the first two change types, that is, Permission Changes and Permission Inheritance Changes, and is not meaningful, for alert scopes at site collection, managed path, web application or farm. When the check box is deselected, then alerts will be sent when break or restore permission level changes occur on the selected SharePoint scope. When the check box is selected, then alerts are sent when a change occurs to a SharePoint object in the parent inheritance chain.
- Permission Level Assigned/Removed. Select whether to track when permission levels are Assigned or Deleted or Both (default).
- Permission Level Name Pattern. You can limit the notifications received by including only changes for one or more permission levels. In the text box, type:
- The exact name of a permission level, such as, Edit or Full Control.
- Use the wildcard characters (% or *) to identify one or more permission levels.
- Use or use a regular expression to identify more than one permission level, such as, R[Edit|Contribute].
When the text box is empty, permission changes that involve all permission levels are included in the notifications.
- The exact name of a permission level, such as, Edit or Full Control.
- Member Type. Track permission changes occur when they affect:
- User s and Active Directory security groups.
- SharePoint Groups.
- Both (default).
- User s and Active Directory security groups.
- Member Name Pattern. You can limit the notification by filtering the permission changes to one or more users or Active Directory security groups or SharePoint groups. In the text box, type:
- The exact name of a user or security group or SharePoint Group.
- Use the wildcard characters (% or *) to identify one or more users / security groups or SharePoint groups.
- Use regular expressions to identify more than one user and / or security groups and / or SharePoint groups, in the format R[RegEx].
- The exact name of a user or security group or SharePoint Group.
- When To Send. Select how frequently you want to receive notifications:
- Send notification immediately.
- Send a daily summary.
- Send a weekly summary. You can choose when to send the weekly notification, by default it is set to Sunday at 12 a.m.
- Send notification immediately.
- Change Initiator Pattern. Use this box to track permission changes by the person who makes the change. In the text box, use one of the following formats to identify the initiator’s login name. You can not use their email address or display name.
- At the bottom of the dialog click Create.
The Operation: Alerts Management page is display in the results pane of the DeliverPoint dashboard, summarizing the alert(s) you have created.
Modifying alerts
To modify an alert, complete the following steps:
- Click Settings
and then click DeliverPoint to display the DeliverPoint dashboard, ensure the Farm Centric view is selected.
- In the tree view, select the checkbox to the left of the SharePoint object where the alert was created. If you select more than one SharePoint object then alerts for all those objects are displayed. If you are unsure where alerts have been created, click Server Farm, a Web Application, managed path or site collection.
- On the Commands Ribbon tab, click the Audit Permissions split button down arrow and then click Alert Me.
The Operation: Alerts Management page is displayed in the results pane of the DeliverPoint dashboard. Existing Alerts for the SharePoint objects selected are listed on this page.
- If you have selected the Server Farm, Web Application, Managed Path or Site Collection to see Alerts created for sites within these scopes, select the Include Child Scopes checkbox.
- Use the filter
icon to the right of the column heading to display the Filter By Creation/Modification Date dialog, which you can use to set criteria so only a subset of alerts are displayed.
- To modify an alert, click the Edit
icon to the left of the alert to display the Edit Alert dialog.
Reviewing alerts
To review alerts, complete the following steps:
- Click Settings
and then click DeliverPoint to display the DeliverPoint dashboard, ensure the Farm Centric view is selected.
- In the tree view, select the checkbox to the left of the SharePoint object where the alert was created. If you select more than one SharePoint object then alerts for all those objects are displayed. If you are unsure where alerts have been created, click Server Farm, a Web Application, managed path or site collection.
- On the Commands Ribbon tab, click the Audit Permissions split button down arrow and then click Alert Me.
The Operation: Alerts Management page is displayed in the results pane of the DeliverPoint dashboard. Existing Alerts for the SharePoint objects selected are listed on this page.
- If you have selected the Server Farm, Web Application, Managed Path or site collection_ to see Alerts created for sites within these scopes, select the Include Child Scopes checkbox.
- Use the filter
icon to the right of the column heading to display the Filter By Creation/Modified Date to display a subset of alerts.
- To review the details of an alert, click the Edit
icon to the left of the alert to display the Edit Alert dialog.
Delete an alert
To delete an alert, complete the following steps:
- Click Settings
and then click DeliverPoint to display the DeliverPoint dashboard, ensure the Farm Centric view is selected.
- In the tree view, select the check box to the left of the relevant SharePoint object where the alert was created. If you are unsure where alerts have been created, click Server Farm, a Web Application, managed path or site collection.
- On the Commands Ribbon tab, click the Audit Permissions split button down arrow and then click Alert Me.
The Operation: Alerts Management page is displayed in the results pane of the DeliverPoint dashboard. Existing Alerts for the SharePoint objects selected are listed on this page.
- If you have selected the Server Farm, Web Application, Managed Path or site collection_ to see alerts created for sites within these scopes, select the Include Child Scopes check box.
- To the left of the alert, click the delete
icon to delete the alert.


 and then click DeliverPoint to display the


Post your comment on this topic.