
Environment Attributes are customizable attributes that users can apply to specific environments within your organization. This feature allows for greater flexibility, ensuring that User Defined Attributes (UDAs) are tailored to each environment.
In addition to managing attributes for individual environments, you can also add system-wide attributes that apply to all environments, ensuring consistency across your organization. For more information on system attributes, click here.
In this topic, we’ll delve into how to create, search, edit, and delete environment attributes.
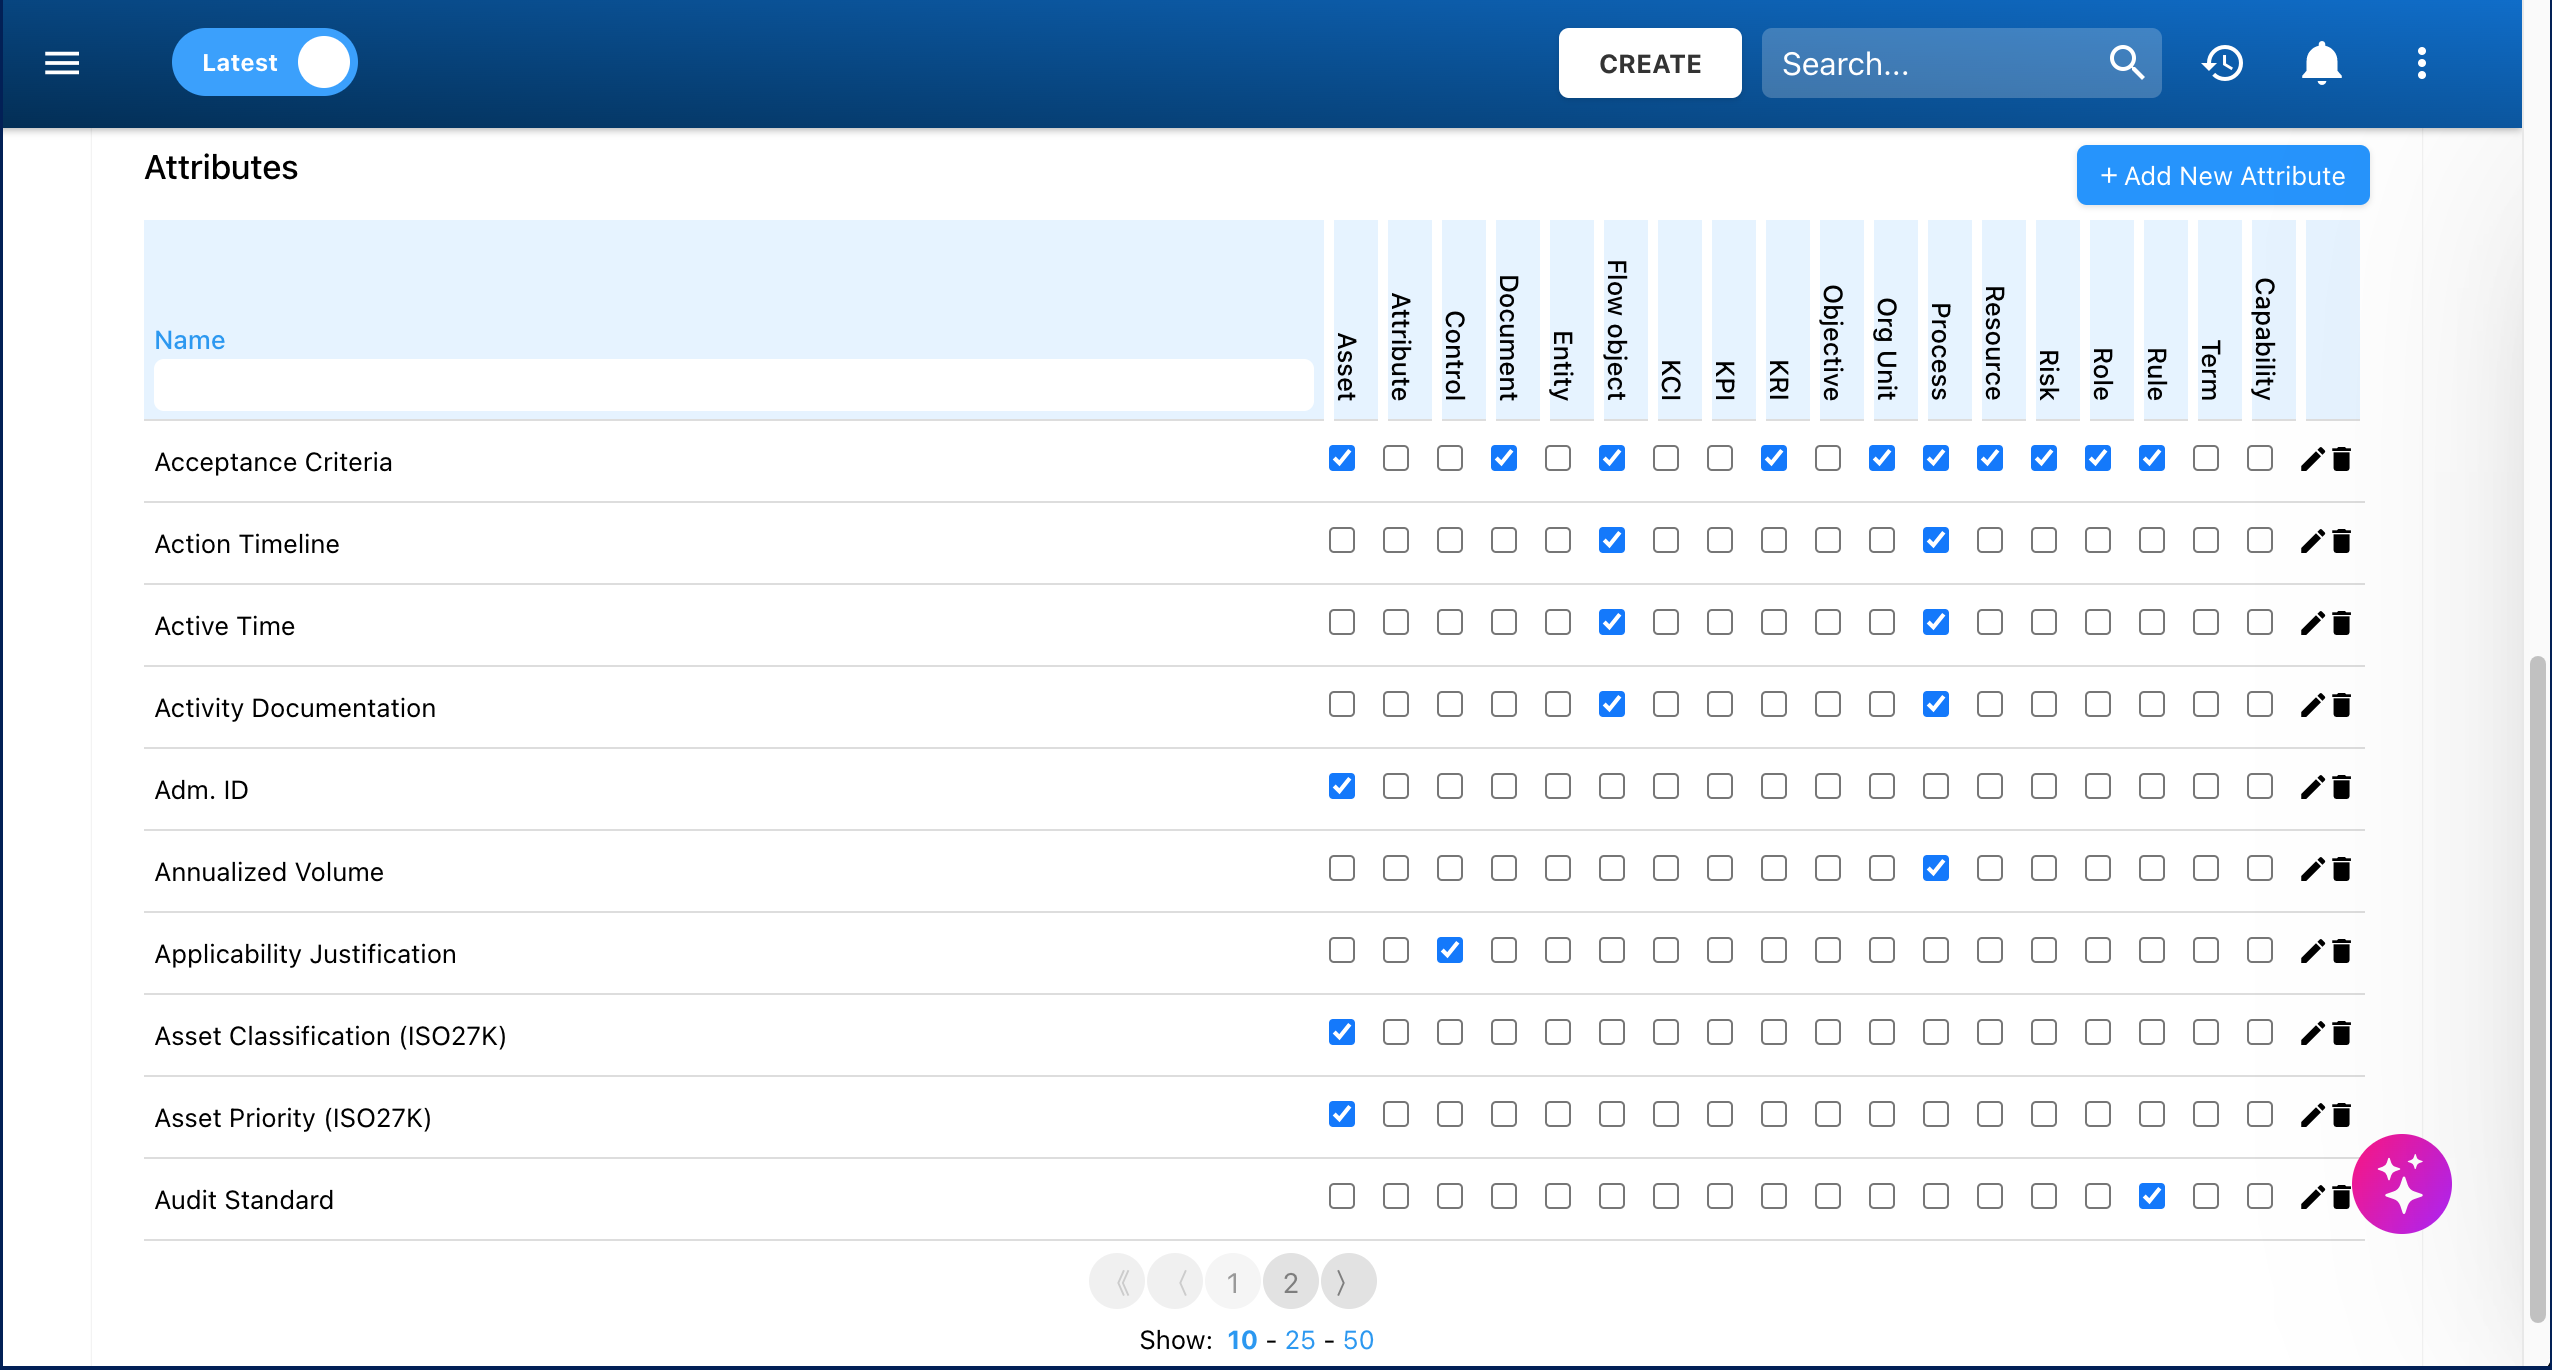
Navigating to Environment Attributes
- Navigate to the Environment Admin Section.
- Select the Attributes tab.

- Scroll down to the Attributes table.
- Existing System and Environment Attributes will be displayed in the table.
Creating Environment Attributes
- Select the + Add New Attribute button.
- A window will appear. Fill in the information:
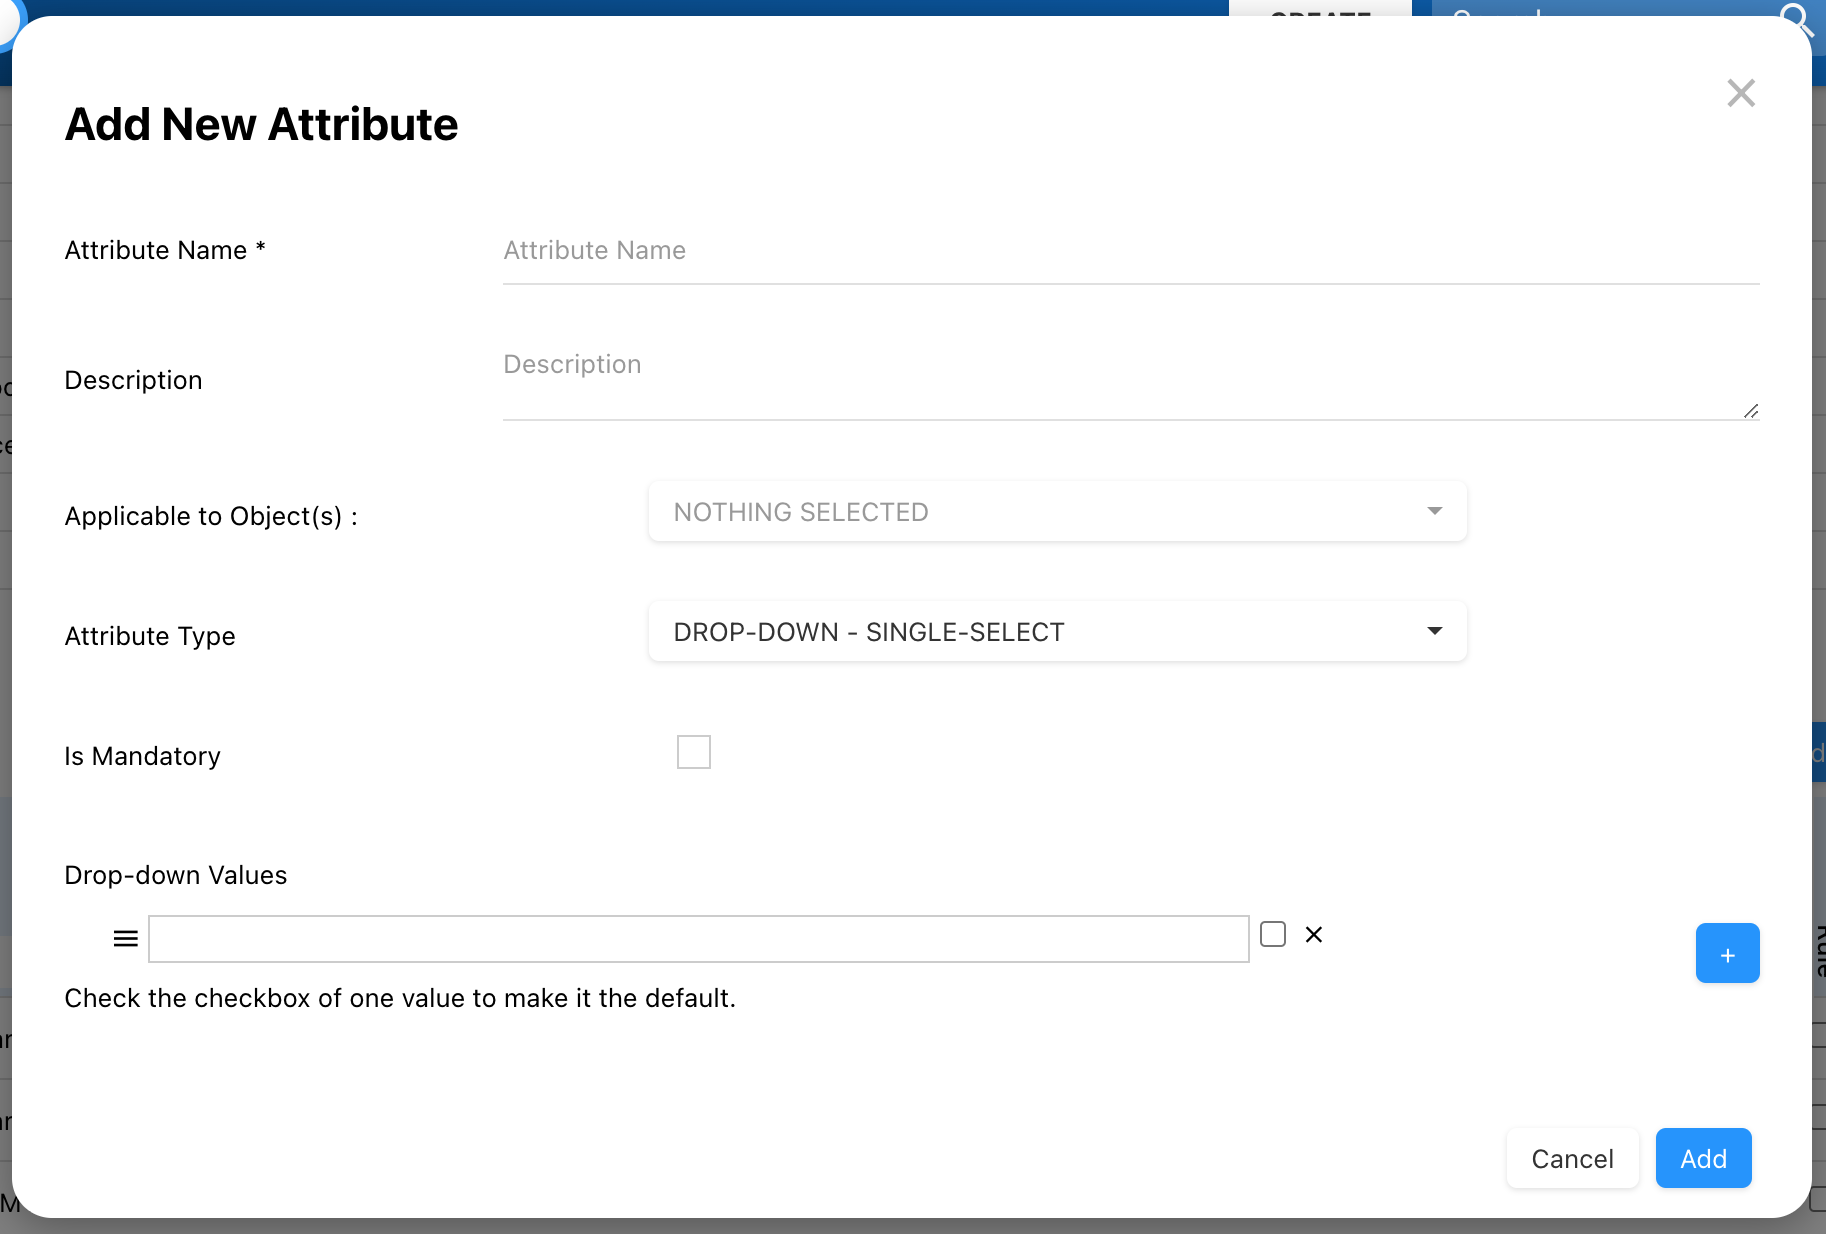
- Name
- Description
- Applicable to Object(s): Select the objects to which the attribute will be applicable to. You can select one or multiple.
- Attribute Type: Choose the attribute’s type depending on the purpose of it. Here are the choices:
- Currency
- Date Type
- Duration
- Drop-down – Multi Select
- Drop-down – Single Select
- Number
- Rich Text
- Simple Text
- Is Mandatory Checkbox: Select this checkbox to make the attribute mandatory, requiring users to fill it out before saving their changes.
- Select the Add button.
- The attribute will be added to this environment only.
Attribute Information for Each Attribute Type
Each attribute type requires specific information when being created. Below is a breakdown of what needs to be filled out for each type, along with the purpose and examples:
Currency
- Purpose: To record monetary values tied to specific objects with a defined currency.
- Information to Add:
- Default Value: The pre-filled monetary amount that users will see.
- Default Currency: Select the currency type (e.g., USD, EUR).
- Examples of Currency Attributes:
- “Salary”: Use this to store an employee’s salary in a specified currency (e.g., USD, EUR).
- “Budget Allocation”: Track the budget assigned to a specific project or department (e.g., $50,000).
Date Type
- Purpose: To select a specific date, typically for deadlines, milestones, or events.
- Information to Add: None; this attribute is simply a date picker.
- Examples of Date Type Attributes:
- “Due Date”: Use this to track the deadline for completing a task or project.
- “Contract Start Date”: Record the date when a contract begins.
Duration
- Purpose: To track a specific time span or duration.
- Information to Add:
- Default Value: The pre-filled value that appears when users first interact with the attribute.
- Examples of Duration Attributes:
- “Project Duration”: This could be used to capture how long a project is expected to last (e.g., 60 days).
- “Warranty Period”: Track the length of a warranty for a product (e.g., 24 months).
Drop-Down – Multi Select
- Purpose: To allow users to select multiple options from a predefined list, providing flexibility when multiple categories or factors apply.
- How to build the Drop-down Values:
- Enter the value in the text field.
- Click on the + button to add more values.
- Reorder the values by clicking the burger button (
![]() ), dragging, and dropping.
), dragging, and dropping. - Click on the checkboxes next to the fields to select a default value (single select) or multiple default values (multi-select).
- Click on the x button to remove a value.
- Examples of Drop-Down Multi Select Attribute:
- “Skills Required”: Use this to list multiple skills needed for a project (e.g., Java, Python, SQL).
- “Product Features”: Allow users to select multiple features that a product offers (e.g., Bluetooth, Waterproof, 4K Display).
Drop-Down – Single Select
- Purpose: To allow users to select one predefined option from a list, ensuring that only one category or status is assigned.
- How to build the Drop-down Values:
- Enter the value in the text field.
- Click on the + button to add more values.
- Reorder the values by clicking the burger button (
![]() ), dragging, and dropping.
), dragging, and dropping. - Click on the checkboxes next to the fields to select a default value (single select) or multiple default values (multi-select).
- Click on the x button to remove a value.
- Examples of Drop-Down Single Select Attribute:
- “Project Status”: Choose one option to indicate the current state of the project (e.g., Not Started, In Progress, Completed).
- “Priority Level”: Set the urgency of a task or issue (e.g., High, Medium, Low).
Number
- Purpose: To store numerical data relevant to an object.
- Information to Add:
- Default Value: The pre-filled value that appears when users first interact with the attribute.
- Examples of Number Attribute:
- “Number of Team Members”: Capture the total number of people assigned to a project or task.
- “Available Stock”: Track the quantity of available products in inventory.
Rich Text
- Purpose: To capture more detailed information that may require text formatting (e.g., bold, italics, lists).
- Information to Add:
- Default Value: The pre-filled value that appears when users first interact with the attribute.
- Examples of Rich Text Attribute:
- “Project Description”: Provide a detailed summary of the project, with formatting options for bullet points, headings, or emphasis.
- “Meeting Notes”: Use this to record formatted notes from team meetings, including important discussions or decisions.
Simple Text
- Purpose: To store short, unformatted text information.
- Information to Add:
- Default Value: The pre-filled value that appears when users first interact with the attribute.
- Examples of Simple Text Attribute:
- “Job Title”: Use this to input the name of the role or position for an employee (e.g., Software Engineer).
- “Department Name”: Track the department responsible for a particular task or project (e.g., Marketing).
Searching and Sorting Environment Attributes
Users can search for specific attributes by using the search bar located in the header of the Name column.
Additionally, this column can be sorted for easier navigation by clicking on the header:
- 1 click will sort in ascending order, reflected by
![]()
- 2 clicks will sort in descending order, reflected by
![]()
- 3 clicks will remove the sorting action.


For more details, please refer to this topic.
Edit Environment Attributes
Environment Admins can make in-line edits directly in the table or navigate to the edit section for more advanced editing options.
The process for editing Environment Attributes is the same as for System Attributes. For more details, click here to learn how to edit attributes.
Delete Environment Attributes
Simply click the trash can icon ( ![]() ) next to the attribute you want to delete.
) next to the attribute you want to delete.
Haben Sie noch weitere Fragen?
Visit the Support Portal