
EPC’s rich text editor features a diverse range of versatile formatting options and tools.
This topic will comprehensively explore the components of the rich text editor:

Toolbar
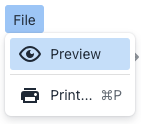
File
This menu allows you to preview and print the currently written text.
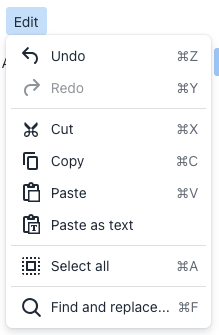
Edit
This menu allows you to do some basic editing actions, namely undo, redo, copy, paste, cut, select all, and find and replace.
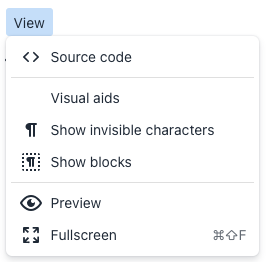
View
This menu enables you to view or edit the text’s code, show visual aids, preview, and edit in fullscreen mode.
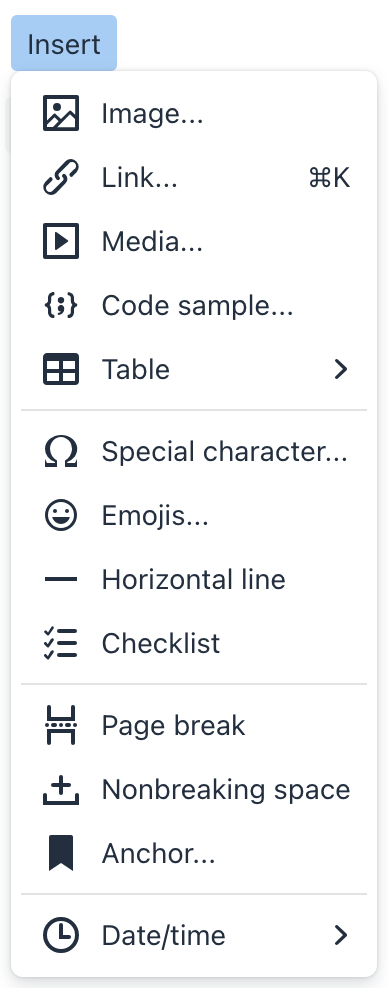
Insert
This menu offers a versatile range of options for inserting different elements, including media (images, links, videos), code samples, tables, special characters (currency, symbols, arrows, etc.), emojis, horizontal lines for text division, checklists, page breaks, nonbreaking spaces, anchor links, and even the current date and time.
Inserting Tables
- To insert a table, simply hover over the desired number of columns and rows and click to add it.
- The table will be inserted automatically.
- Once the table is added, you’ll notice a menu below it, enabling you to easily make modifications to the table.
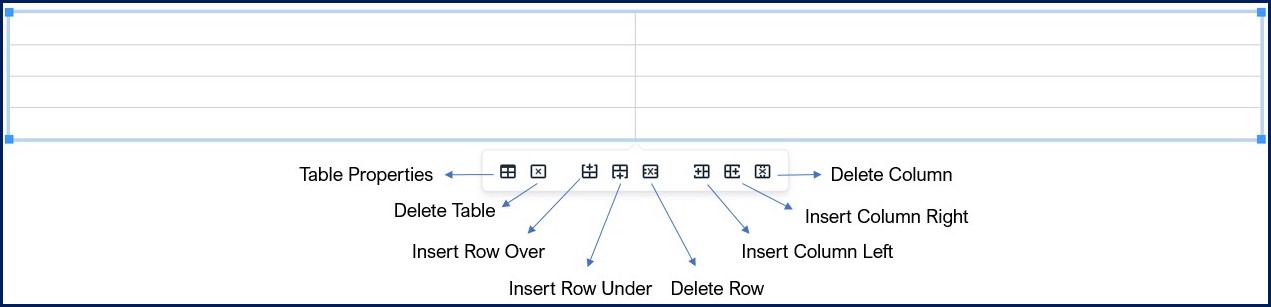
- To adjust the table’s size, click and drag any corner to your preferred dimensions.
- For resizing a column or row, click and drag any cell’s edge to your desired size.
- To access custom cell and row properties, please refer to the ‘Table’ menu. More detailed information can be found in a later section below.
Format
This menu presents text formatting options.
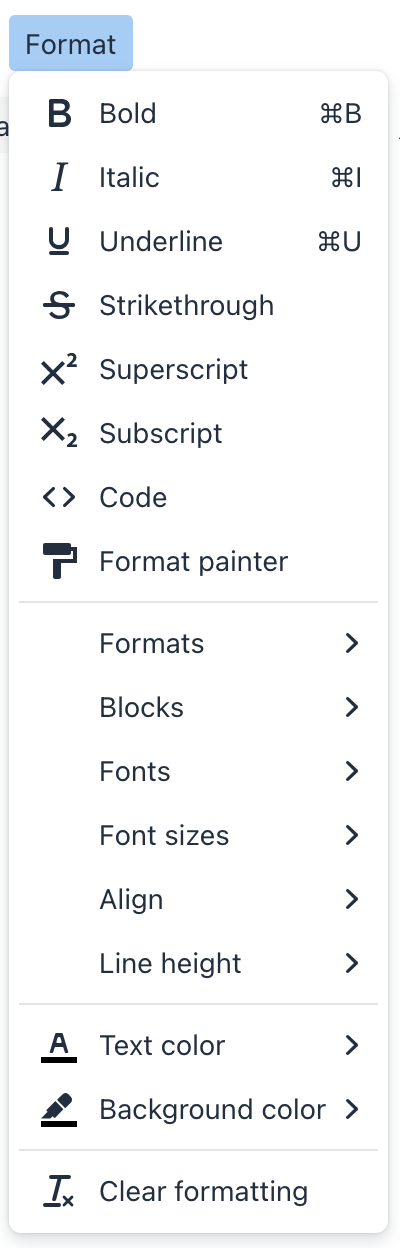
To apply text formatting, either click on the desired format before typing or highlight the text you want to format after typing, and then choose the format.
To create bullet or numbered lists, either type them manually (e.g., 1. for numbered lists or * for bullets) with your text, and press Enter on your keyboard, or select the option from the ellipsis menu.
Tools
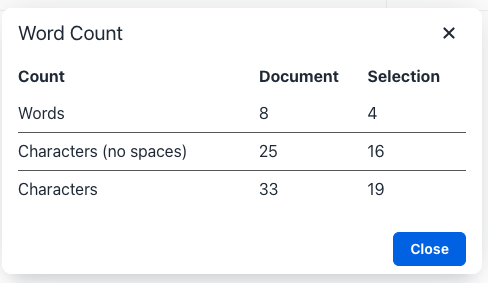
This menu allows you to access the text’s code and utilize a word counter tool.
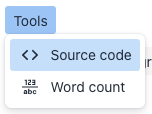
To determine the word and character count of a specific portion of the text, simply highlight the desired text and then select the word counter tool.
Table
This menu facilitates table insertion and deletion, as well as granting access to advanced cell, row, column, and table properties. It’s important to note that the advanced properties become accessible after you’ve added a table.
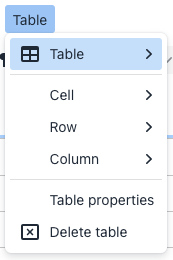
Within the cell, row, and table properties pop-up window, you can customize various aspects, such as size, alignment, type, colour, borders, and more. For visual reference, an image of one of the pop-up windows is included below:

Help
This menu offers users access to helpful resources, including convenient shortcuts, keyboard navigation instructions, and advanced documentation covering various tools within the rich text editor.
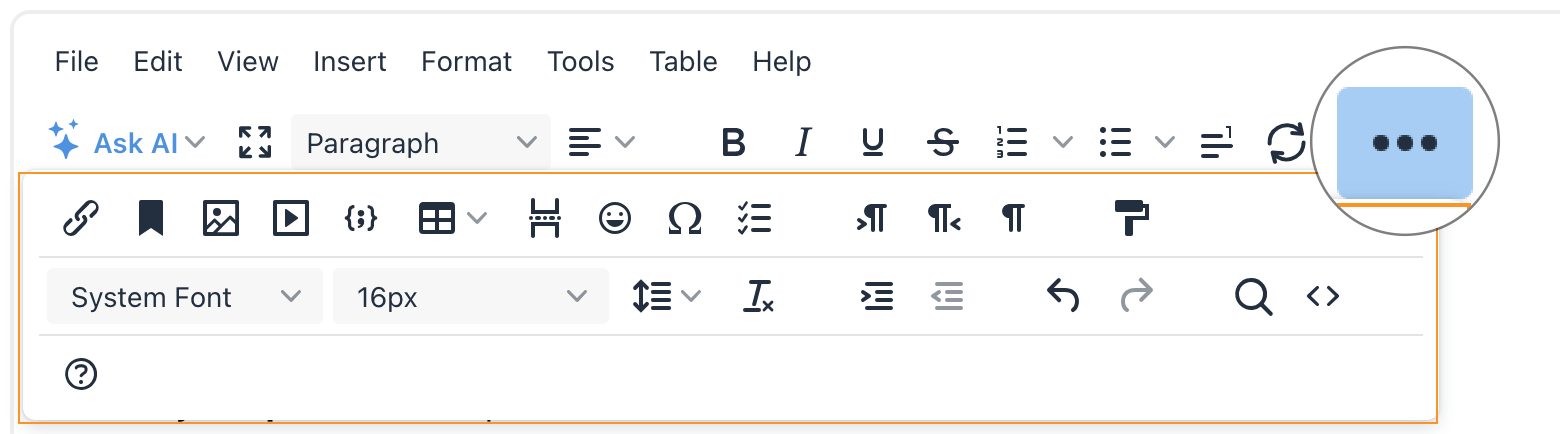
Buttons
Ask AI
This feature employs advanced AI to assist you in generating content within rich text fields. Whether you’re writing documents, reports, or procedures, the AI can help you with suggestions and even create content according to your needs.

For more information on how to use the AI Rich Text Generator, please click here.
To learn how to set up the AI in your EPC system, please click here.
![]() – Fullscreen
– Fullscreen
The Fullscreen button enables you to edit and view text in fullscreen mode, providing a distraction-free writing environment.
![]() – Block Formats
– Block Formats
 – Block Formats
This feature allows you to select various block formats, such as paragraphs, headings, and preformatted text.
![]() – Text Alignment
– Text Alignment
Adjust the alignment of your text to left, center, right, or justified.
![]() – Bold, Italic, Underline & Strikethrough
– Bold, Italic, Underline & Strikethrough
 – Bold, Italic, Underline & Strikethrough
Use these formatting options to emphasize text with bold, italic, underline, or strikethrough styles.
![]() – Lists
– Lists
 – Lists
Create numbered or bulleted lists. Click the buttons for default list styles, or use the dropdown arrow to select the desired list format.
![]() – Insert & Update Footnotes
– Insert & Update Footnotes
 – Insert & Update Footnotes
The Insert footnote button allows to create footnotes within your text. When a footnote is inserted, a superscript number appears at the end of the selected text. The tool automatically creates a new line in the footnotes section at the bottom of the rich text editor and positions the cursor there, enabling users to immediately enter the content for the new footnote.
Footnotes usually update automatically when added, removed, or edited, but in cases where changes (like removing an image caption or table row) don’t reflect, orphaned footnotes may remain. To resolve this, click the Update Footnotes button in the toolbar to refresh and remove any outdated footnotes.
![]() – Insert/Edit Link
– Insert/Edit Link
Add or modify links within your text with this button.
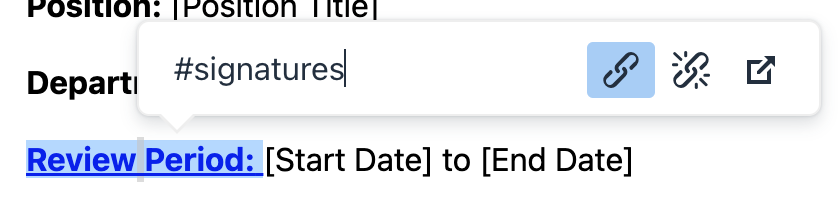
![]() – Anchor
– Anchor
Anchor links direct users to specific sections within the document. To insert an anchor, select the desired location, click the Anchor button, and enter the Anchor ID.
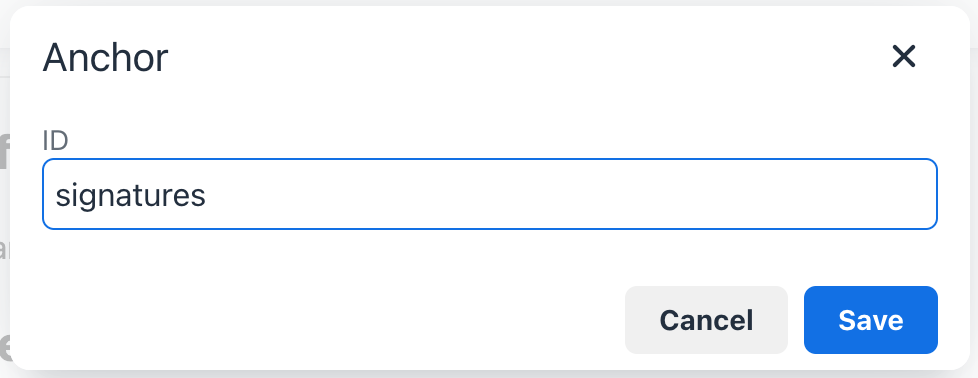
To link text to this anchor, create a link using #[AnchorID]. For example, if your Anchor ID is signatures, the link should be #signatures.
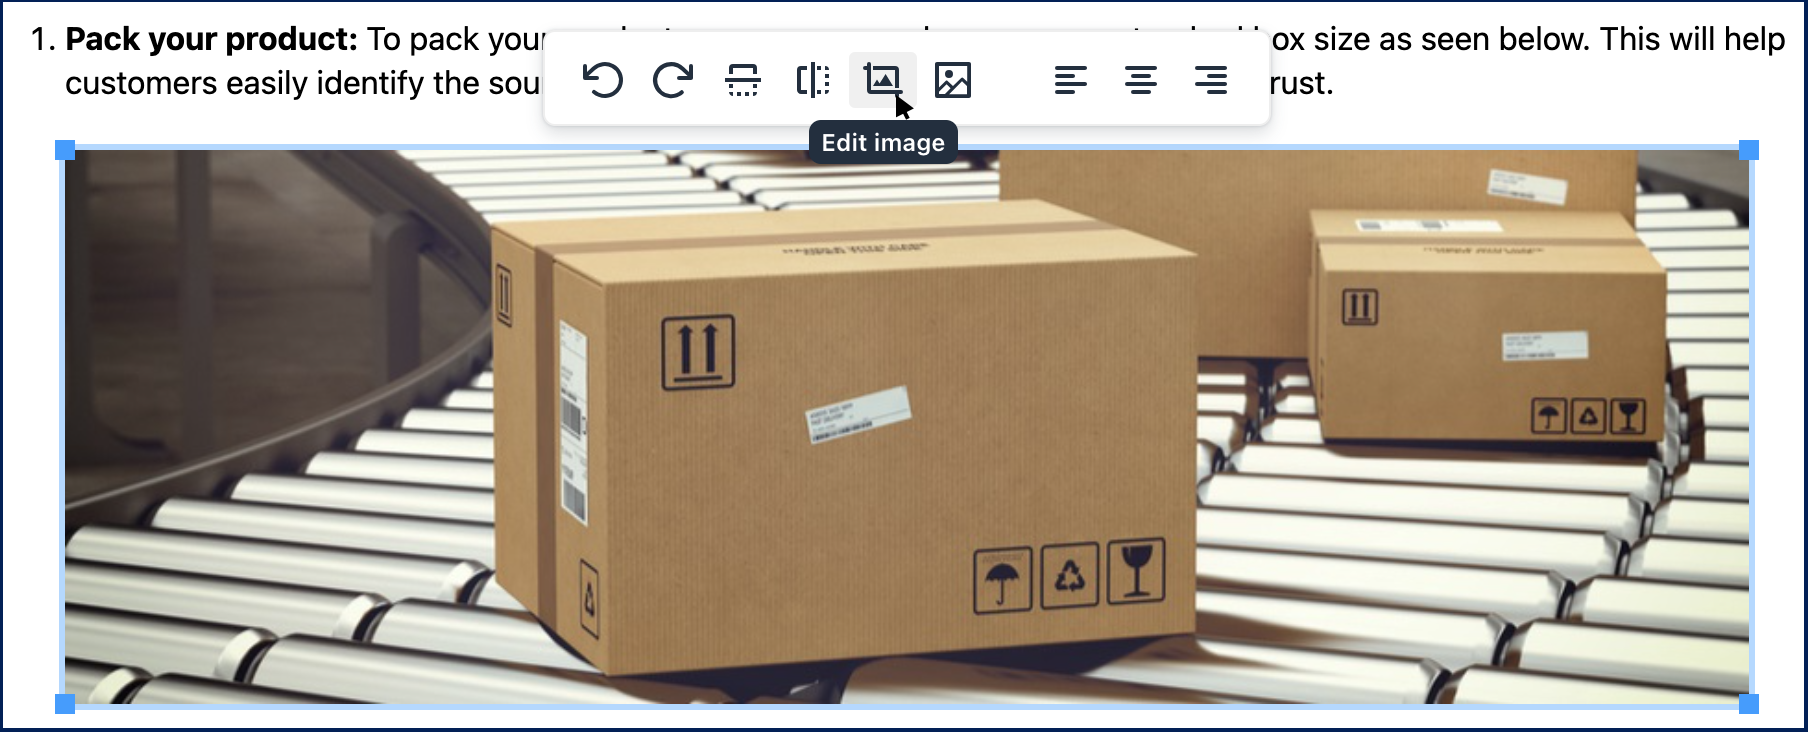
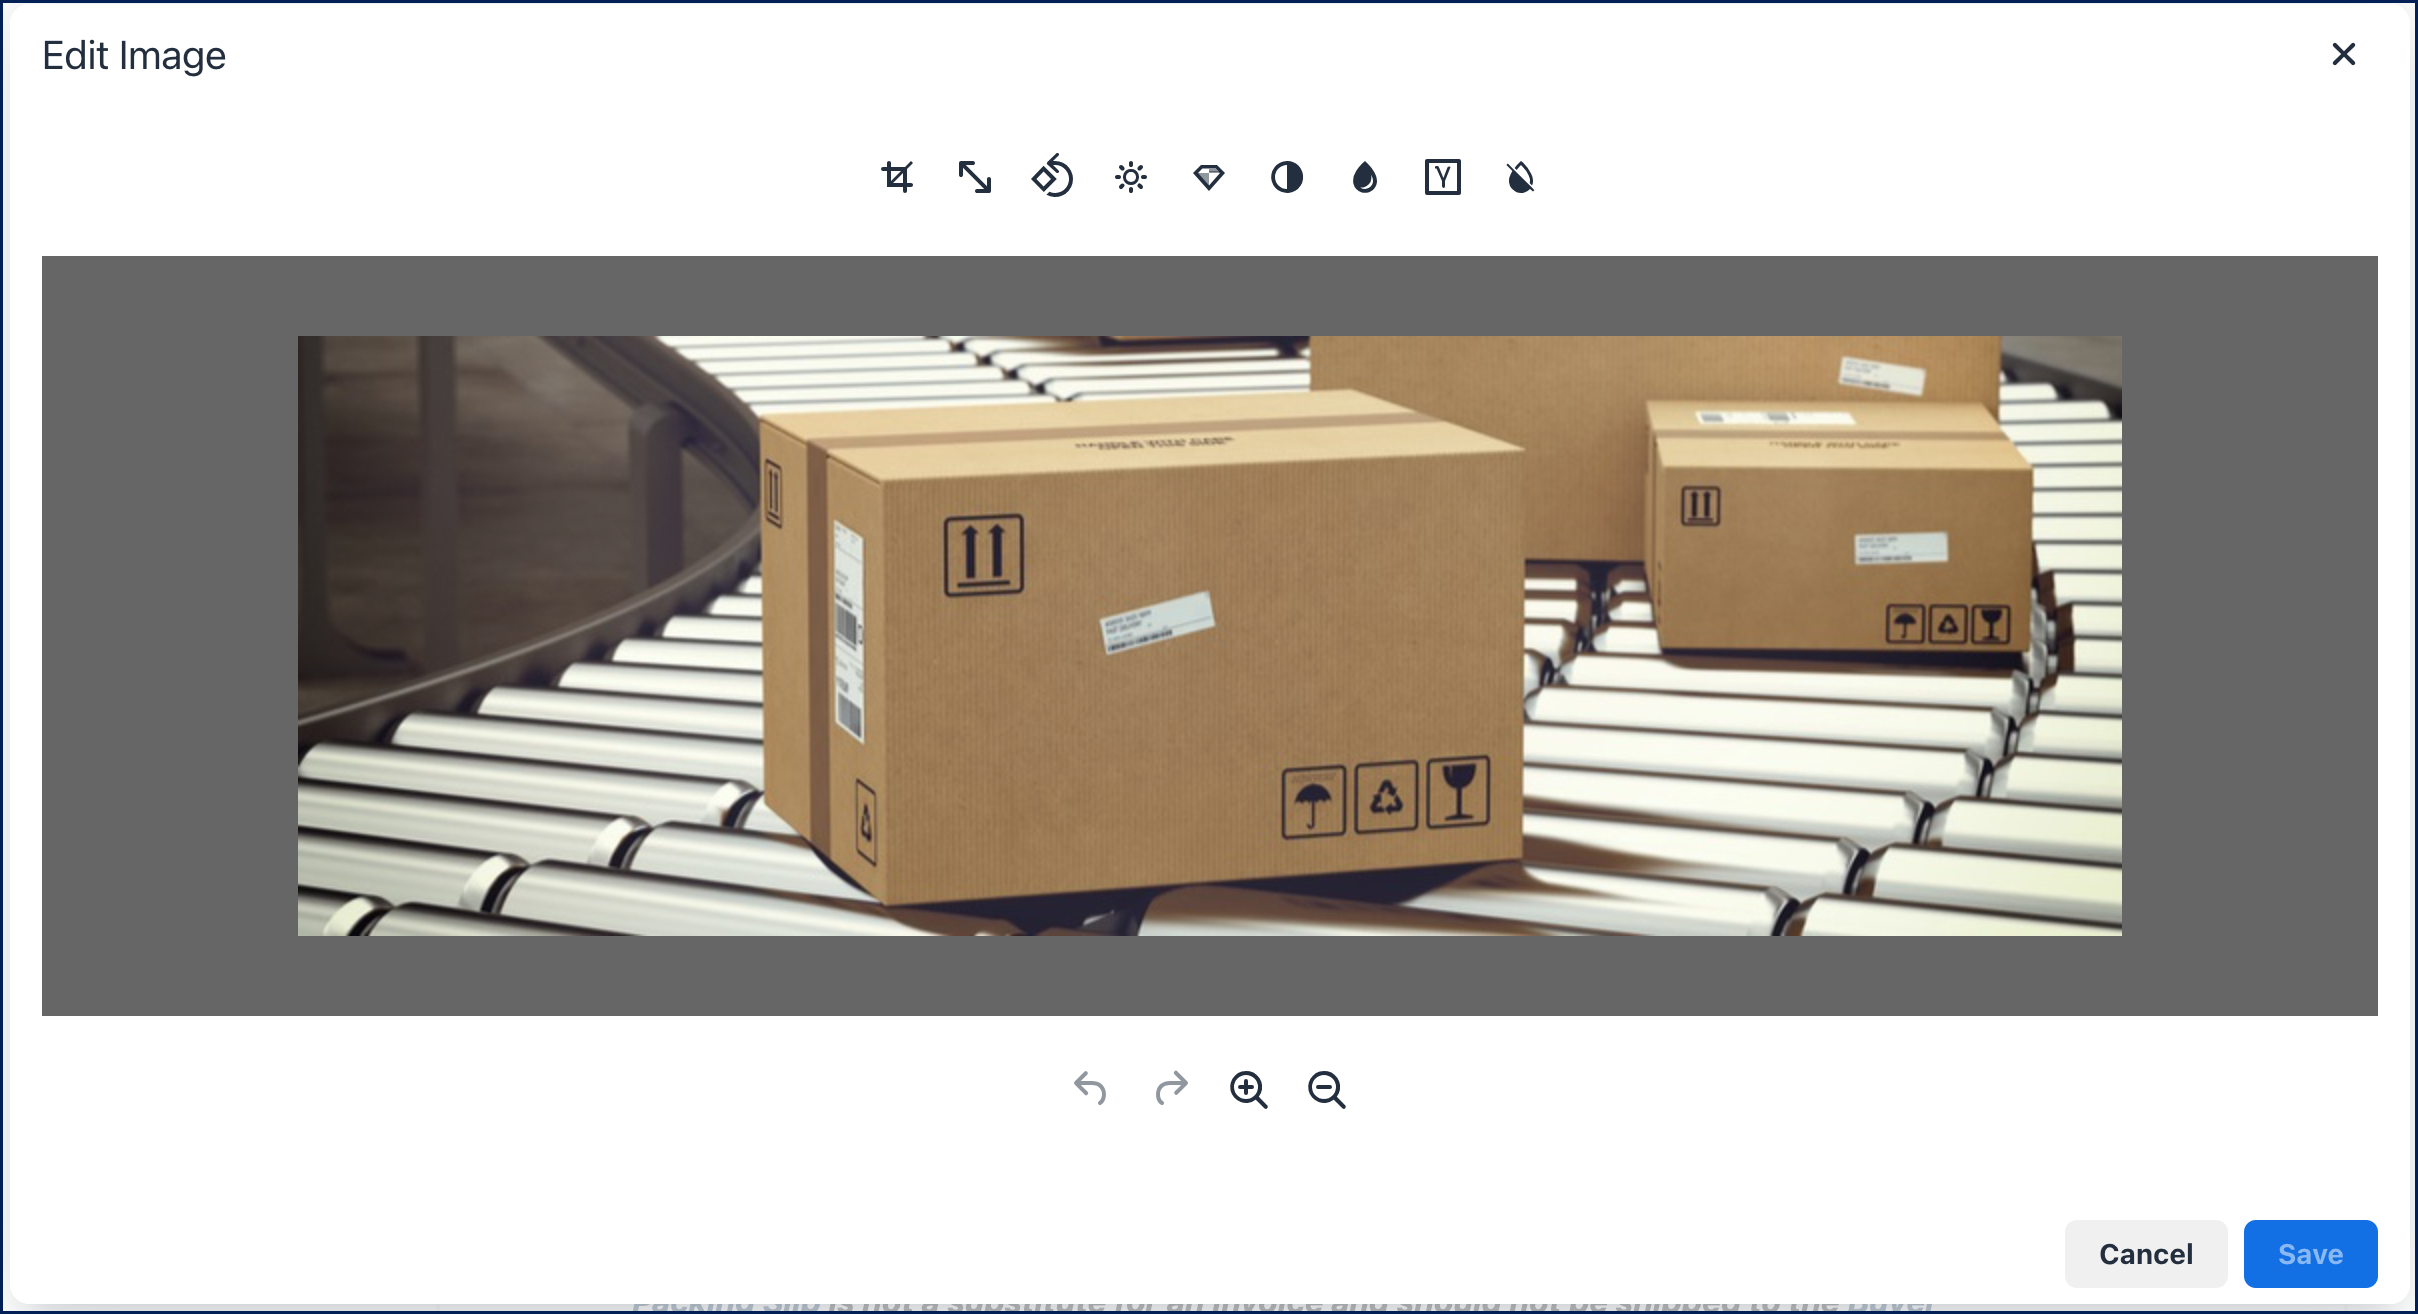
![]() – Insert Image & Image Editor
– Insert Image & Image Editor
The Insert Image button lets you add images to your text.
When selecting an image within the text, the Image Editor appears, offering various tools for editing and enhancing images:
- Image Adjustments (brightness, contrast, sharpen, etc.)
- Cropping and Resizing
- Alignment and Positioning
![]() – Insert Media
– Insert Media
Add HTML5 video and audio elements to your content with this feature.
![]() – Insert Code Sample
– Insert Code Sample
Use this tool to embed code snippets within your text.
![]() – Insert Table
– Insert Table
Insert tables into your text. For detailed instructions, please click here.
![]() – Page Break
– Page Break
Insert a page break to divide content into separate sections.
![]() – Emojis & Special Characters
– Emojis & Special Characters
 – Emojis & Special Characters
Add emojis and special characters such as currency symbols, arrows, and more to your text.
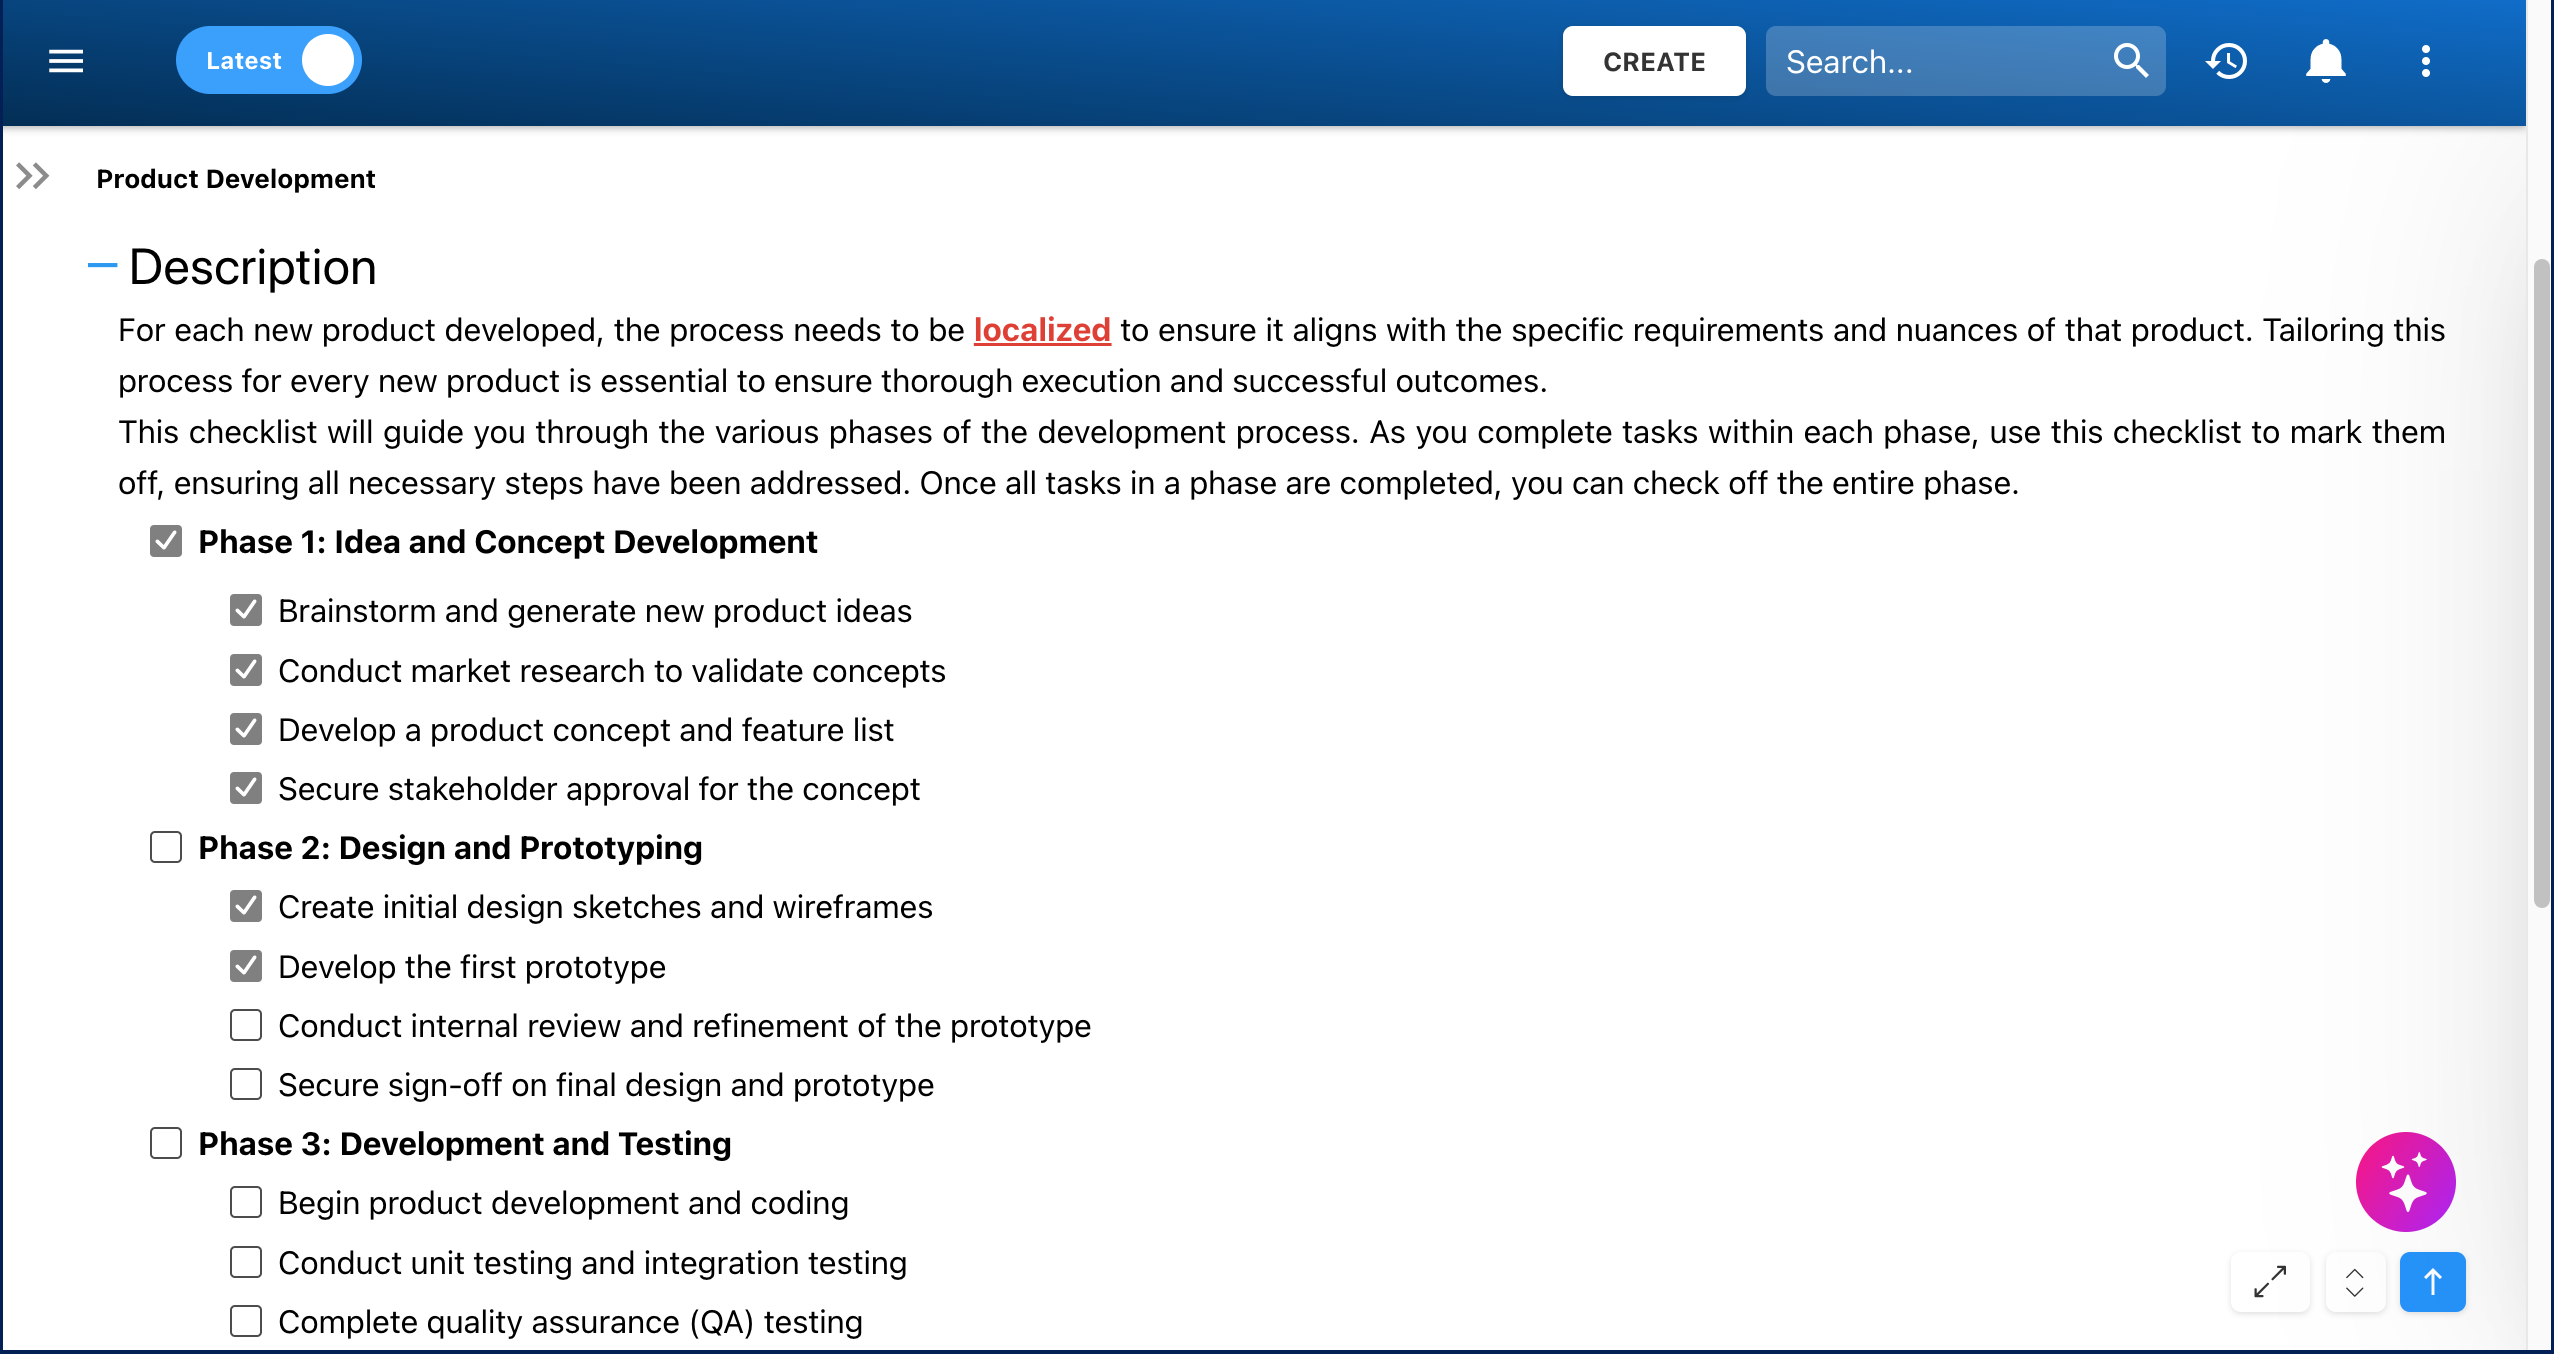
![]() – Insert Checklist
– Insert Checklist
This allows for the easy creation of to-do lists, checklists, and other items where checking off options is needed. The feature supports interactive checkboxes that can be checked or unchecked only while in edit mode, making it simple to manage and track items directly within the text.
![]() – Left to Right, Right to Left & Show Invisible Characters
– Left to Right, Right to Left & Show Invisible Characters
 – Left to Right, Right to Left & Show Invisible Characters
This feature lets you switch the text direction between left-to-right and right-to-left, particularly useful for languages that are written from right to left. The Show Invisible Characters option displays non-printable formatting characters like spaces and paragraph breaks.
![]() – Format Painter
– Format Painter
The Format Painter allows you to copy and apply formatting from one section of text to another, including font styles, sizes, and table formats. You can use it in two ways:
Toolbar Method:
- Place your cursor on the formatted text.
- Click the Format Painter button.
- Highlight the text you want to format.
Keyboard Shortcut:
- Place the cursor on the formatted text.
- Press
Ctrl+Alt+Cto copy the formatting. - Highlight the target text.
- Press
Ctrl+Alt+Vto apply the formatting.
![]() – Font & Font Size
– Font & Font Size
 – Font & Font Size
Select the font type and size for your text using the respective dropdowns.
![]() – Line Height
– Line Height
Adjust the line spacing between text with the Line Height option.
![]() – Clear Formatting
– Clear Formatting
Remove formatting by highlighting the text and clicking the Clear Formatting button.
![]() – Increase & Decrease Indent
– Increase & Decrease Indent
 – Increase & Decrease Indent
Change the indentation level of your text, especially useful for creating sub-lists within lists.
![]() – Undo & Redo
– Undo & Redo
 – Undo & Redo
Undo or redo recent actions using these buttons.
![]() – Find and Replace
– Find and Replace
Find specific words in your text and replace them either individually or all at once. To access Find and Replace, you can also your the Ctrl + F keyboard shortcut.
![]() – Source Code
– Source Code
The Source Code editor provides advanced HTML editing features, ideal for users who prefer working directly with code. Key features include:
- Syntax highlighting
- Automatic element matching and closing
- Code folding
- Multiple selections and carets
- Search and replace (
Ctrl + F) - Enhanced user experience: dark mode, font size options, full screen mode, and more.
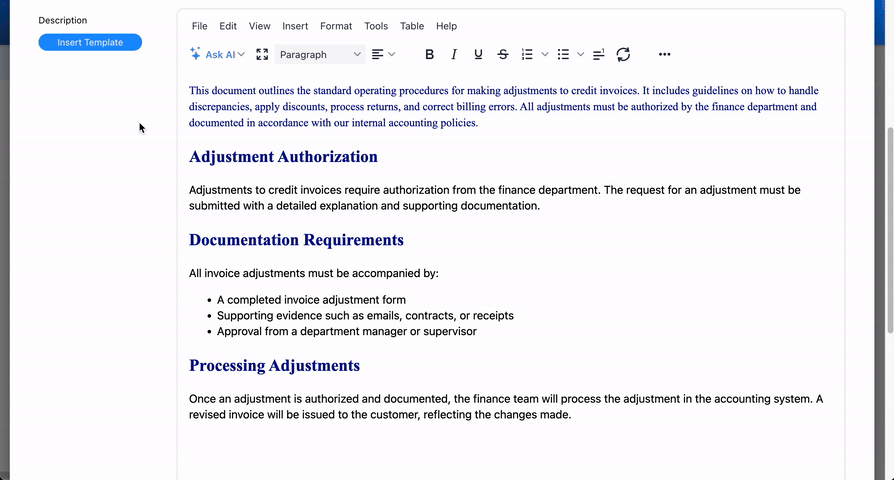
Insert Templates
Users can seamlessly incorporate predefined rich text templates into description fields, promoting alignment with their organization’s preferred standards and enhancing the convenience of using wiki templates.
- Click on the “Insert Template” button next to the description field to trigger a pop-up window, providing the options to preview and select from the range of predefined templates.
- Upon selecting a document, its description content will seamlessly populate the rich text field currently being worked on.

Haben Sie noch weitere Fragen?
Visit the Support Portal