As a best practice, familiarize yourself with the infotypes used in this procedure.
Procedure
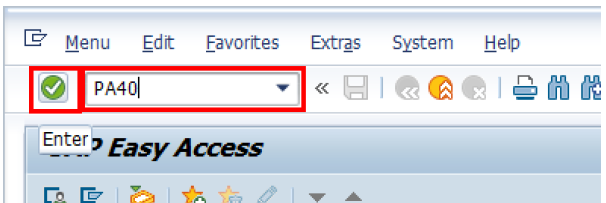
- Start the transaction using the menu path or transaction code, e.g.PA40.
- Click
button
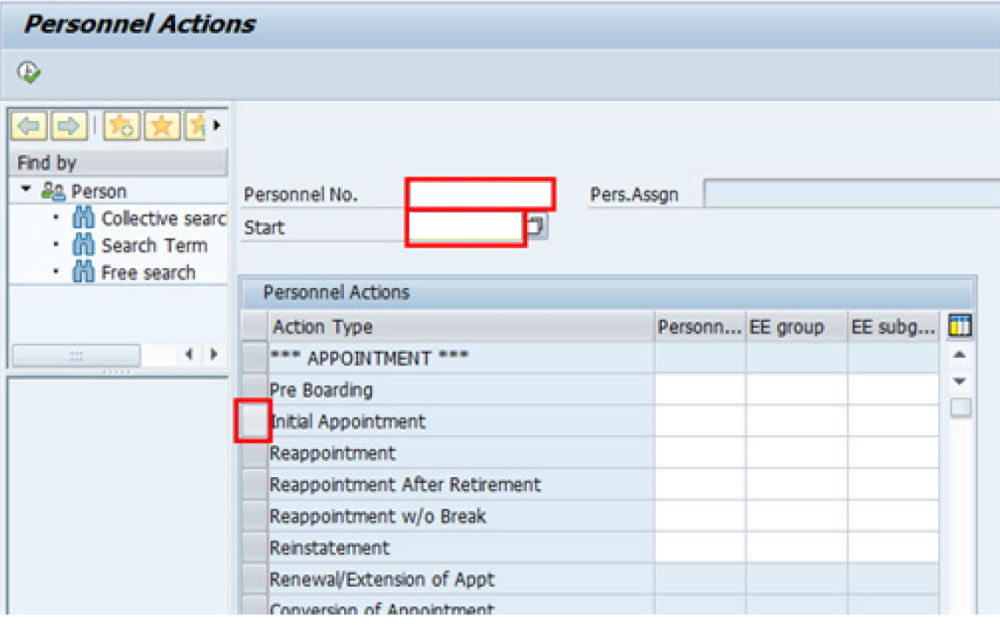
- Enter the staff member’s Index Number in the Personnel No. text box.
- Enter the effective date [ddmmyyyy] of the appointment in the Start text box. This date must be the actual reporting date.
- Click
to display the list of options for the Reason for Action.
- Click
to validate entries.
- Click
to execute the action.
- Click
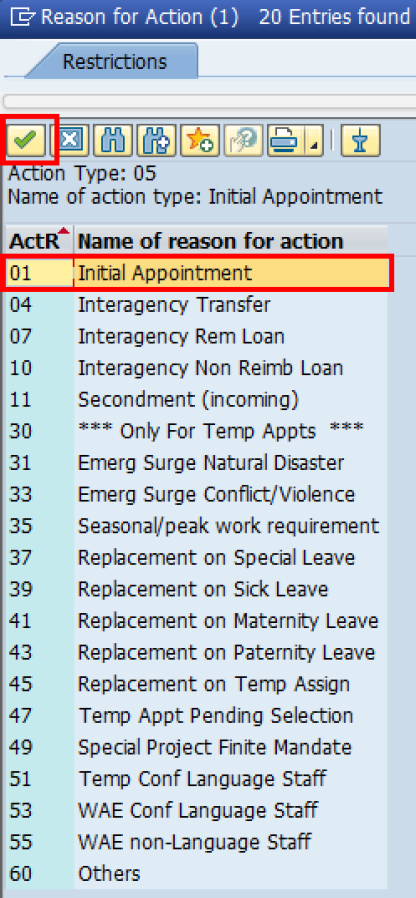
to display the list of options for Reason for Action.
- Click Initial Appointment to select.
- Click
to confirm selection.
- Enter the id number for the position the Staff Member will occupy in the Position text box.
a. Click to validate entry.
- Once the position number has been entered and validated, the position title is displayed and the Organizational assignment area. The Employee group and Employee subgroup fields are automatically populated based on the Organizational Management information for the position.
- If any of these values are incorrect make sure you have entered the correct Position number, and correct if necessary.
- If the Position number is correct, but the title is incorrect, contact your OM Administrator to resolve.
- If the Employee group and/or subgroup are incorrect, enter the correct values.

If the position remains 9999999, or does not have funding, the Staff Member will not be paid.
a. Click to validate entry.
- Click
to save the record
- Note the header information has been dynamically updated after saving infotype 0000 (Actions) and that the Staff Member’s Employee Status has changed to Active.
- Infotype 0002 (Personal Data) is populated with the information from the current Personal Data record. Review this information. It should match the information from the legal document(s) (passport, birth certificate, etc) submitted. In the event that any changes are required, you can only make the changes if the Staff Member provides new legal documentation supporting the change (new passport, marriage certificate, etc). Follow the procedures for entering information as documented in the GID Job Aid.
- Update any missing fields, as applicable, based on the Staff Member’s original verified documentation.
- For example, if the Staff Member is married and related but does not provide the marriage certificate until they come on board, you would update the Since field here.

Special Note Regarding Staff Members Subject to Taxation on their UN Emoluments: It is critically important to accurately capture the UN Nationality for all Staff Members, but especially for Staff Members whose country taxes UN income, e.g. USA. Make sure the UN National field is set to the Staff Member’s official UN country of nationality. For those Staff Members who have dual citizenship in a country which taxes UN income, make sure the Othr/Birth field is set to that country, e.g. a British Staff Member with dual citizenship in the US must have Othr/Birth set to of the USA.
a. Click to validate entry
- Click
to save the record.
- The values reflected in infotype 0001 (Organizational Assignment) for Enterprise Structure and Personnel Structure are derived from the position number information established in infotype 0000.
- Enterprise Structure
Verify the Subarea (Duty Station) in the Enterprise Structure section.
If incorrect, enter, or select the correct option from the text box dropdown. The Subarea field is required for this infotype.
- Personnel Structure
Verify the Payroll area (Payr.area). If the Payr.area is
* 99, enter the correct Payr.area. 99 may appear during reappointments of separated Staff Members if their Payr.area was set to 99 (Not Payroll Relevant) as part of the separation process. This must be corrected or the Staff Member will not be paid.
Any inaccuracies related to position must be corrected since entitlements may be impacted. (i.e. if personnel area/sub area are wrong, the post adjustment, if applicable, would pick up the wrong value. If payr.area is not corrected from 99, the Staff Member will not be paid.)
If the information is correct proceed with validation and saving.
a. Clickto validate values. You may have to click
multiple times to acknowledge messages displayed at the bottom of the screen.
- Click
to save the record.
- Seniority in Grade is the length of time the Staff Member has been at the same grade level. For initial appointments, this matches the EOD date.
- You will need to manually calculate the retirement date [ddmmyyyy] for the Staff Member as per the current rules in force. (the date Staff Member will turn 65 if appointed after 01.01.2014]
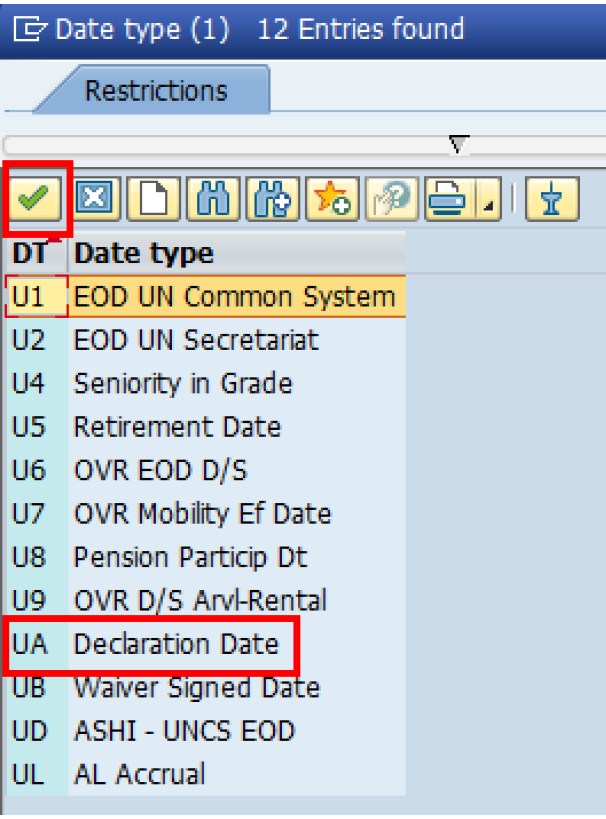
- You must also enter a Declaration Date. Click to display the list of options and locate the Declaration Date value.
- Click UA Declaration Date to select.
- Click
to confirm the selection.
- Enter the Declaration date in the Date text box.
- Click
to confirm the selection.
- Click
- Click
to save the record.
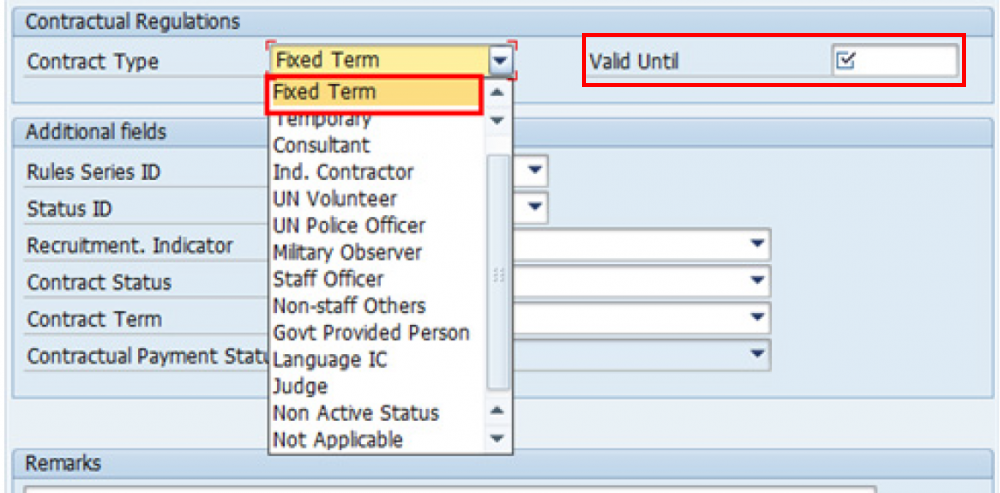
- Select the appropriate option from the dropdown list for Contract Type. Click Fixed Term.
- Enter the expiration date [ddmmyyyy] of the appointment in the Valid Until text box.
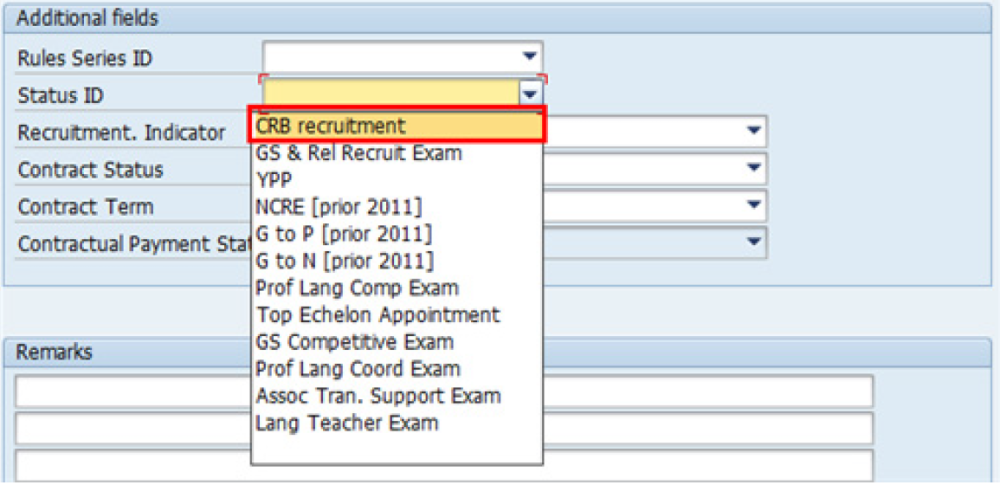
- Select the appropriate option as the method of recruitment from the Status ID dropdown menu.

If the Staff Member has been provisionally appointed pending the completion of reference checks this option should be left blank.
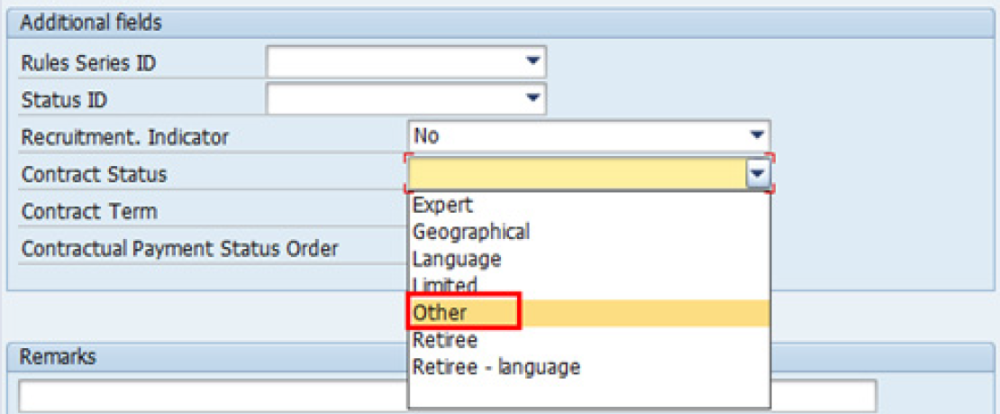
- The Recruitment Indicator is used to record if the Staff Member is entitled to being travelled by the Organization (for those recruited outside the commuting distance to the duty station). This field is for record purposes only. Click Yes.
- Select the appropriate option for Contract Status from the dropdown menu. Click Other.
- The comments entered in the remarks field of infotype 0016 (Contract Elements) will appear in the Special Conditions section of the LOA. Use only if you need to add remarks to the LOA.
- Click
to validate entries.
- Click
- Click
to acknowledge the message
- Click
to validate values.
- Click
to save the record.
- Click
to select the NPO Assignment Type All initial appointments are permanent movements.
- Click
to confirm selection.
- If the Staff Member is entitled to travel upon initial appointment, select Yes and record the appropriate shipment options selected by the Staff Member. This information is for record purposes only. No payments are processed through this infotype. You must process the Off-Cycle payments through the Off-cycle form in the Portal or the shipment through Travel. See the Movement Related Entitlements job aid for details.
a. Click to validate selection.
- Click
to acknowledge the message
- Click
to validate values.
- Click
to save the record.
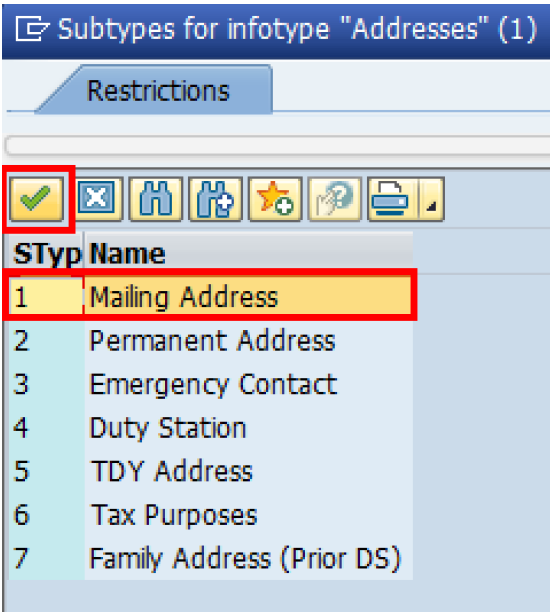
- The HR Partner should minimally enter the addresses for Mailing Address and Permanent Address, and the Emergency Contact information.
a. Click to confirm selection,
- Enter the details of the Staff Member’s mailing address.
- Click
to validate selections,
- Click
- Click
to save the record.
- Follow the steps above to enter all the available addresses. When done click
to proceed to next infotype,
- Select the work schedule for this particular Staff Member. Most Staff Members will have a normal work schedule for the duty stations but there are exceptions. Be sure to pick the right one for your case.

Please be sure to select a valid work schedule and verfity that the Time Mgmt status is always 9-Time evaluation of planned times. If the option shown is 0 – no time evaluation time evaluation will NOT run for this Staff Member. Once these two options are correctly set and validated, you MUST save the record. Do not skip this infotype as time evaluation will not run properly.
a. Click to validate selections. You may have to click
more than once to acknowledge messages at the bottom of the screen.
- Click
to save the record.
- You MUST enter the Pay scale Group and Level information for this infotype then validate and save or Payroll will NOT run for this Staff Member.
Once you have validated the information, the Wage types and amounts should populate. Review to ensure the information reflects the correct emoluments for the Staff Member.
Notice the Next Increase (new Within Grade Increment) is not accurately reflected. Once the infotype has been saved the correct date will automatically populate in this field. DO NOT enter the date in the field provided as this field is used for override purposes only. Review infotype 0008 (Basic Pay) using PA20 after you approve this PA, to confirm the correct date has been populated.
a. Click to validate entries. You may have to click
more than once to acknowledge messages at the bottom of the screen.
- Click
to save the record.
- In this infotype you indicate if the Staff Member is entitled to Pension participation.
The following menu options are available for the
|_. Fund Details Status |_. Schema |
| Contributing: If the Staff Member has an initial appointment of more than 6 months.|*Standard Schema*: This indicates the Staff Member is part of standard Pension Participation.|
| Non-Contributing: If the Staff Member has an initial appointment of less than 6 months.
Validating: Should not be used for Initial Appointment or Reappointment. | SLWOP Schema: This indicates that the Staff Member who is on Special Leave without Pay is making full contributions (to cover both the Staff Member’s and the organization’s contributions) to the Pension Fund. This should NEVER be selected for an Initial Appointment or Reappointment.|
The system automatically set the Staff Member’s status to Contributing because of their Fixed-Term appointment. Also, note that the Participation date is automatically generated by the system and cannot be changed.
a. Click to validate the values.
- Click
to save the record.
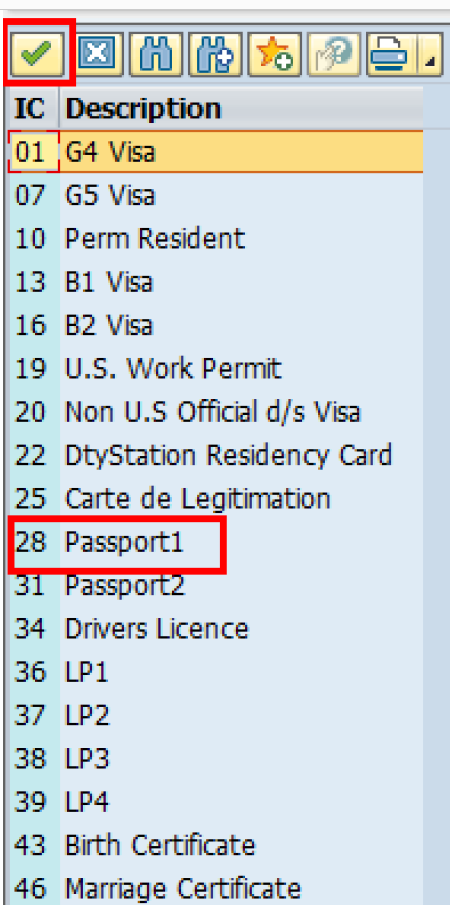
- You should record all passports and visas held by the Staff Member. Click Passport.
- Click
to confirm selection,
- Complete the field for Passport1
- ID number [xxxxxxxx]
- Date of issue [ddmmyyyy]
- Valid to [ddmmyyyy]
- Place of issue [xxxxxx]
- Country of issue [xxxxxx]
a. Click to confirm entries.
- Click
to save the record.
- Follow the steps above to enter all available Personal IDs. At a minimum, enter all passports and visas presented by the Staff Member.
Also enter the following, as applicable.
- G4 visa
- Non U.S. Official d/s Visa
- Drivers License
- Birth Certificate
- Marriage Certificate
- Tax Identification Number
- Special Note Regarding Staff Members with bank accounts in Argentina, Brazil, Venezuela, Colombia, or Chile:
For Staff Members who have bank accounts in one or more of these countries, TAX Identification Number is a requirement.
- Special Note Regarding Staff Members Subject to Taxation of UN Emoluments:
For Staff Members who are required to pay tax on UN income, the following MUST be recorded:
It is critically important to accurately capture the UN Nationality for all Staff Members, but especially for Staff Members whose country taxes UN income, e.g. USA. Make sure the UN National field is set to the Staff Member’s official UN country of nationality. For those Staff Members who have dual citizenship in a country which taxes UN income, make sure the Othr/Birth field is set to that country, e.g. a British Staff Member with dual citizenship in the US must have Othr/Birth set to of the USA.
- For Staff Members who are nationals of a country that requires taxation of UN emoluments, e.g. USA
Tax Identification Number record, e.g., USA format xxx-xx-xxxx, with To date, and Valid To date = 31.12.9999
- For Staff Members who are Permanent Residents of a country that requires taxation of UN emoluments, e.g. USA
Tax Identification Number record, e.g., USA format xxx-xx-xxxx, with To date, and Valid To date = 31.12.9999 Permanent Resident record, with Country of issue = country that requires taxation of UN emoluments, e.g., USA, and with To date, and Valid To date = 31.12.9999
a. When completed, click 
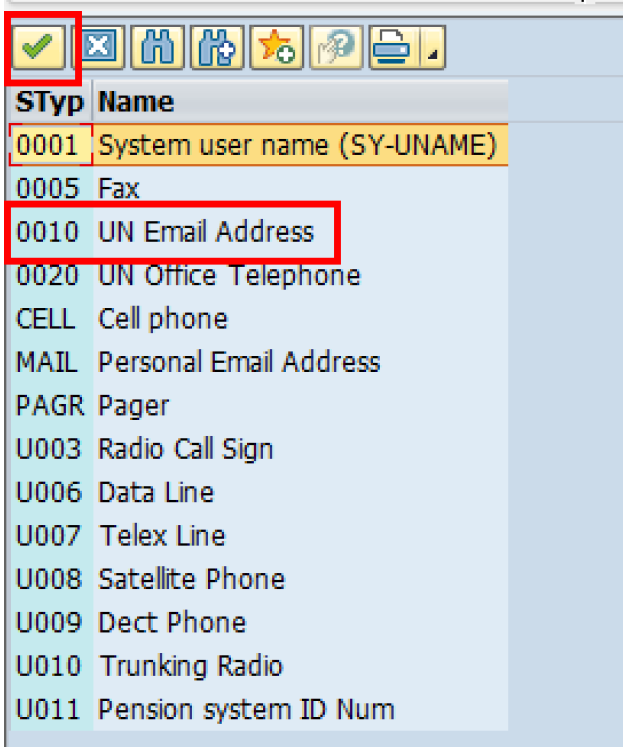
- Minimally, you should record an email address for the Staff Member. Use the Staff Member’s personal email address, if their UN Email address is not yet available. Click UN Email Address.
If available, enter also:
- UN Office Telephone
- Cell Phone
- Click
to confirm selection.
- Enter the Staff Member’s UN email address in the ID/number text box.
- Click
to validate entry,
- Click
- Click
to save the record.
- Follow the steps above to enter all available forms of Communication. When complete, click
to proceed to the next infotype.
- If you need to record a Medical or Security Clearance because the Clearance Type, Clearance Category, Application Status or Reference Number fields are blank, refer to the procedures in the Offer Management Procedures chapter of this manual and remember to save this record.
If these fields are populated then a clearance record exists, and should be the record you verified prior to executing this PA. In this case, you must skip this record as saving this record during the execution of the PA will create a new, duplicate record in infotype 0487 (Security/Medical Clearance) with a new effective date, the same as the effective date of this PA you are executing.
a. Click 
- For fixed-term appointments, you should minimally record the Staff Member’s Place of Recruitment:
Used to record the place from which the Organization recruited and travelled the Staff Member upon initial appointment or reappointment.
a. Click to validate entry,
- Click
to save the record.
- Click
to proceed to the next infotype.
- The infotype 9003 (Entitlement Monitoring), in this PA records completion of the action. Click Yes to select the Action Completed Flag documenting that the action has been completed. When you choose Yes, the Action Completed On field will automatically populate the date when you complete the action as indicated in the screen below.
- Click
to validate entry,
- Click
to save the record. An email notification will be sent to the Staff Member and the PA will appear in ESS.
- Click
to return to the SAP Easy Access screen,

You should execute a T-code PA20 to review the PA and infotypes to which you made changes in this transaction, Each personnel action completed should be documented by adding a note (T-code PA30) to the record saved on the infotype 0000.
)footnote1





 to save the record



 to confirm selection.



 to return to the
